Payroll Management Module
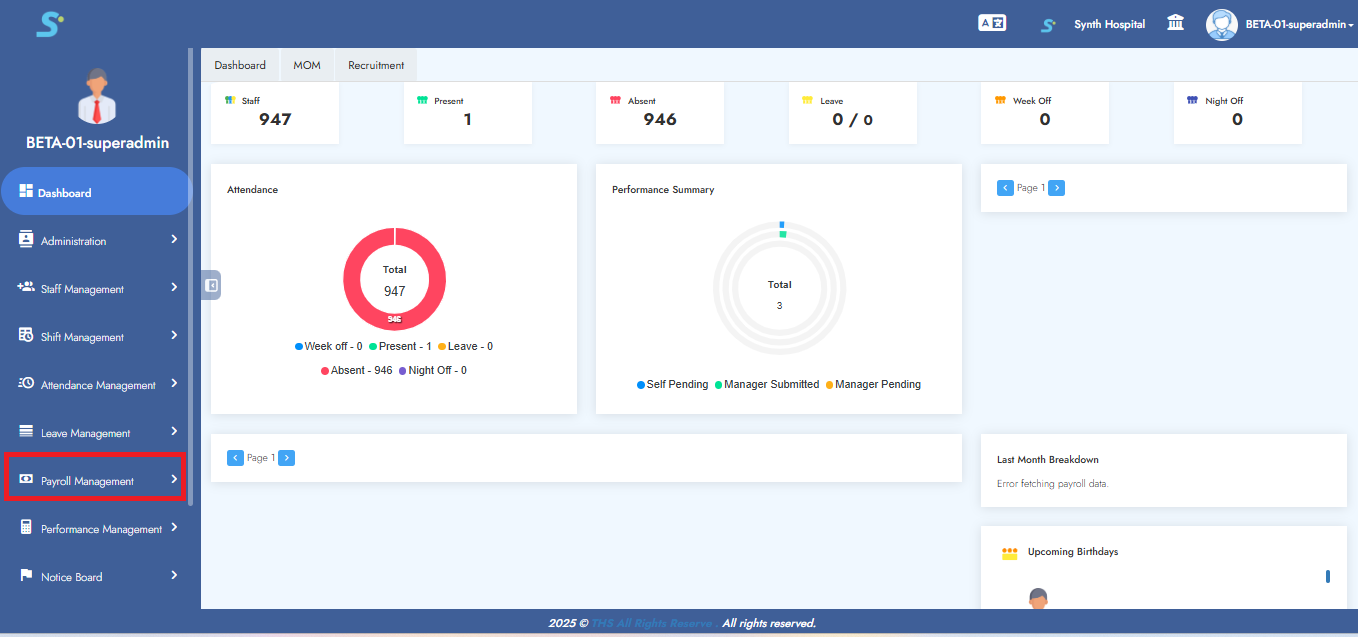
Step 1: Payroll Management – Getting Started
First, go to the Payroll Management module as shown in the image.
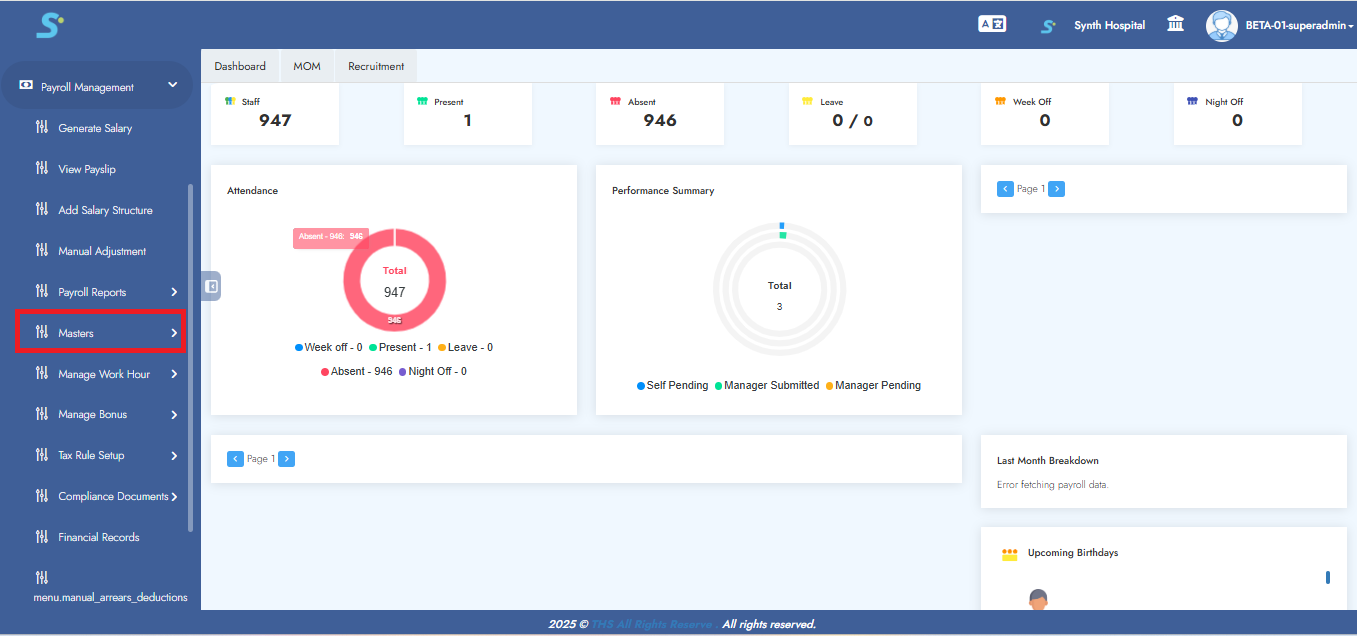
Step 2: Accessing Masters Section
Click on the Masters sub-module as shown in the image.
Step 3: Accessing Add Salary Head
Click on the Add Salary Head sub-module of Masters as shown in the image.
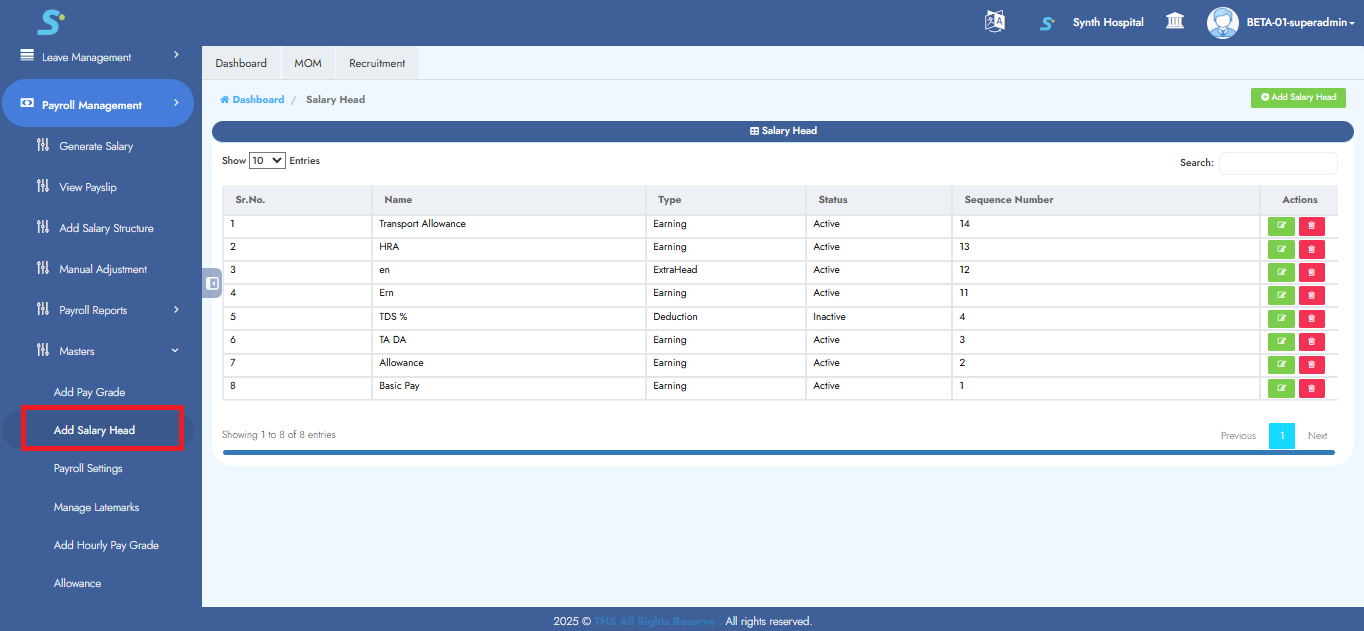
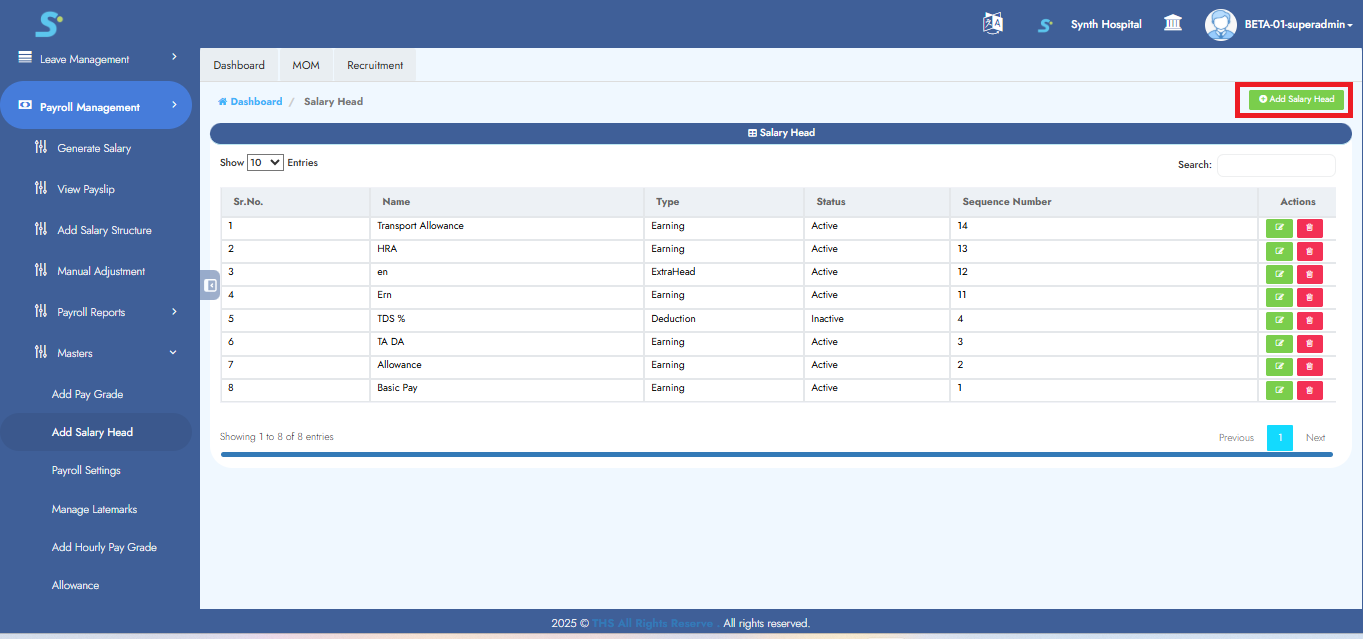
Step 4: Adding a New Salary Head
Click on the Add Salary Head button as shown in the image.
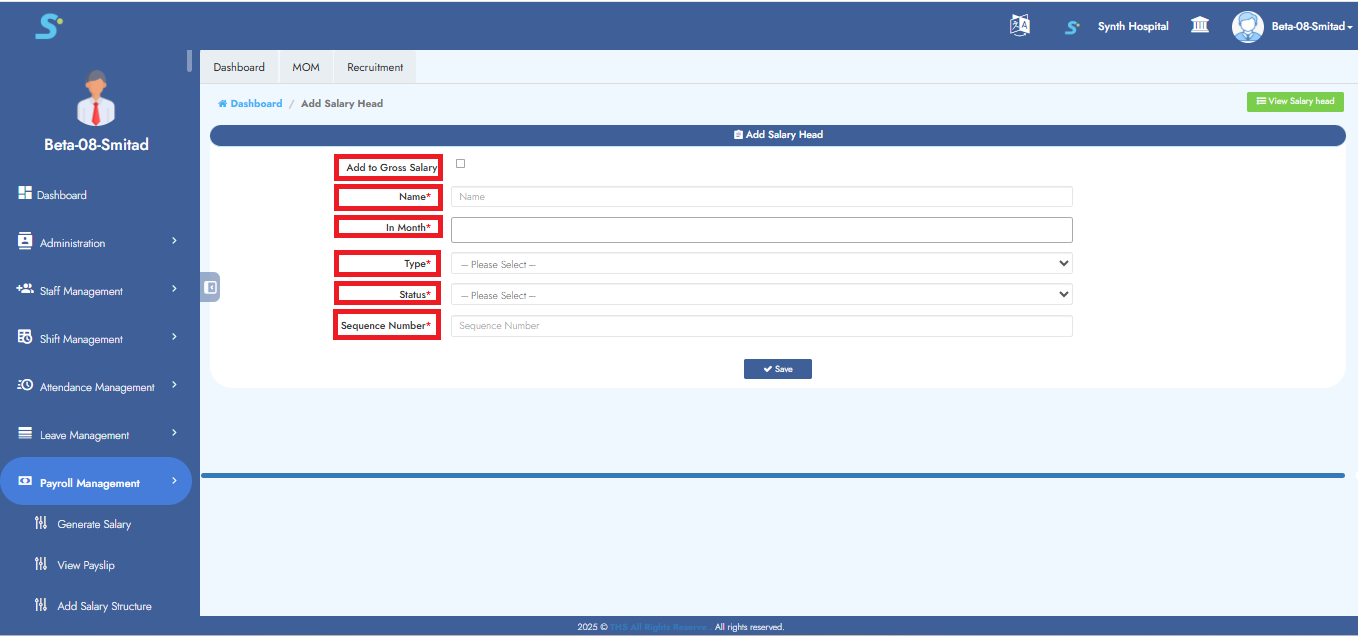
Step 5: Salary Head Creation
Enter the following details in the Add Salary Structure form:
1. Add to Gross Salary (optional)
2. Name of the salary head
3. In month
4. Type
5. Status
6. Sequence Number
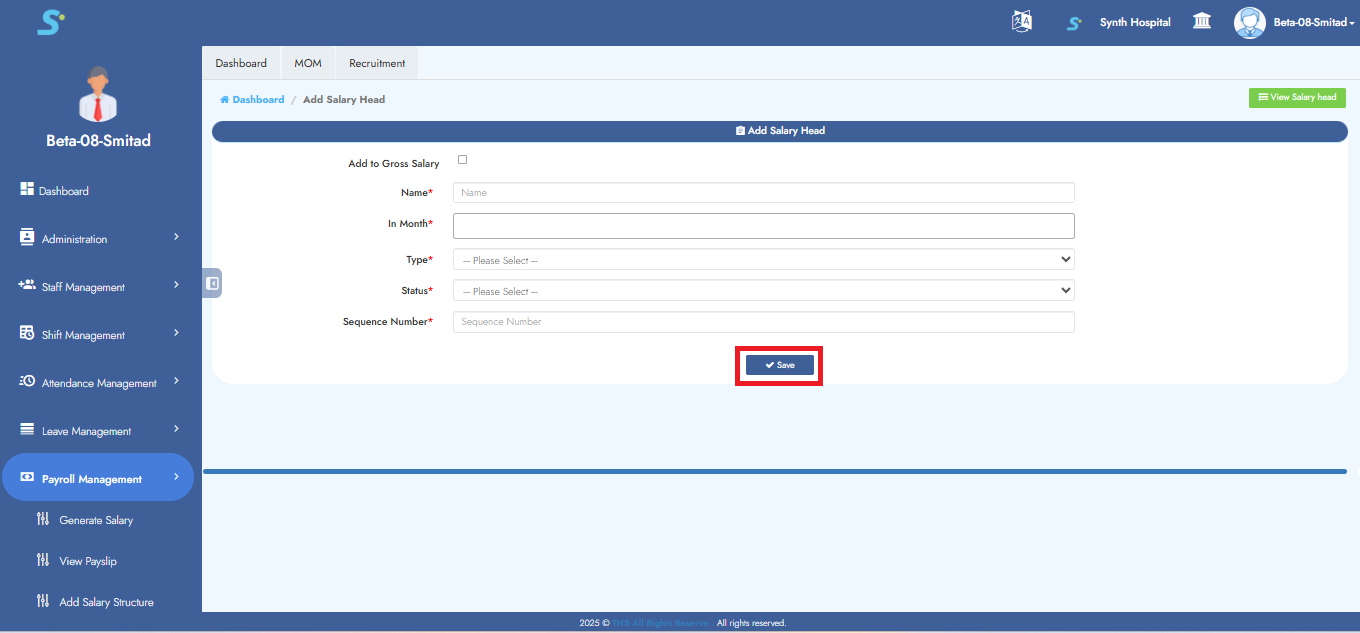
Step 6: Saving Salary Head
Once all details are filled in the Salary Head form, click on the Save button to save the entry.
A success message will confirm that the record has been saved.
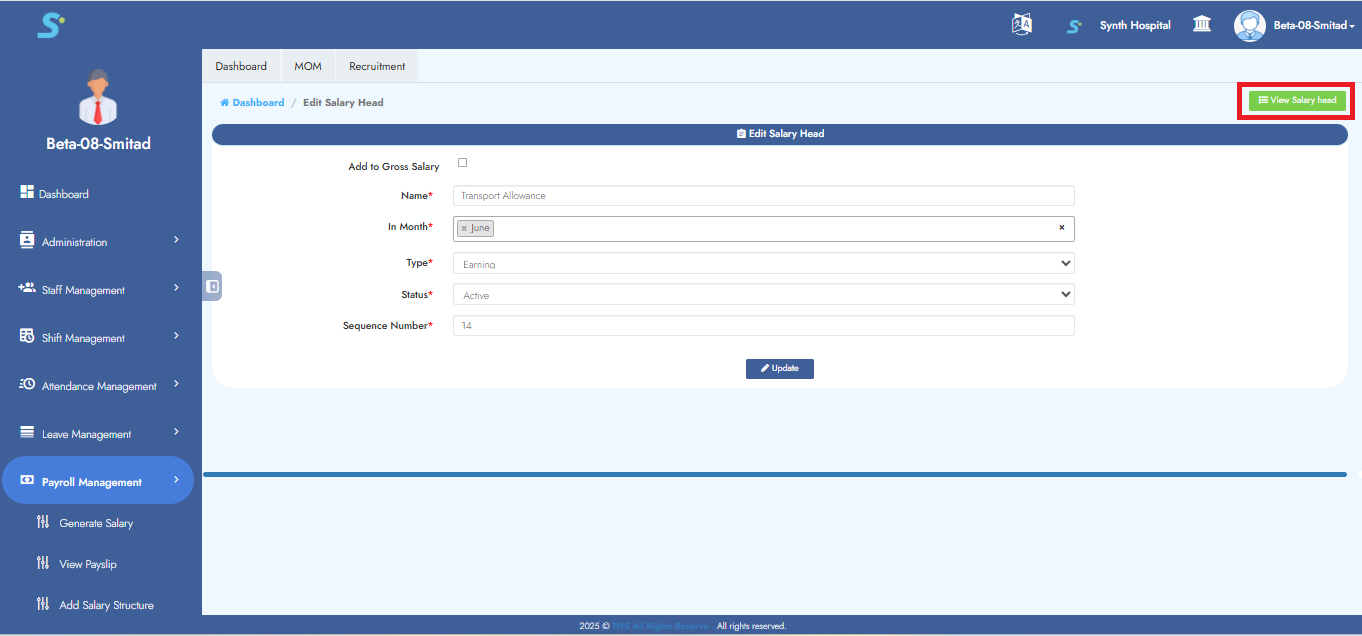
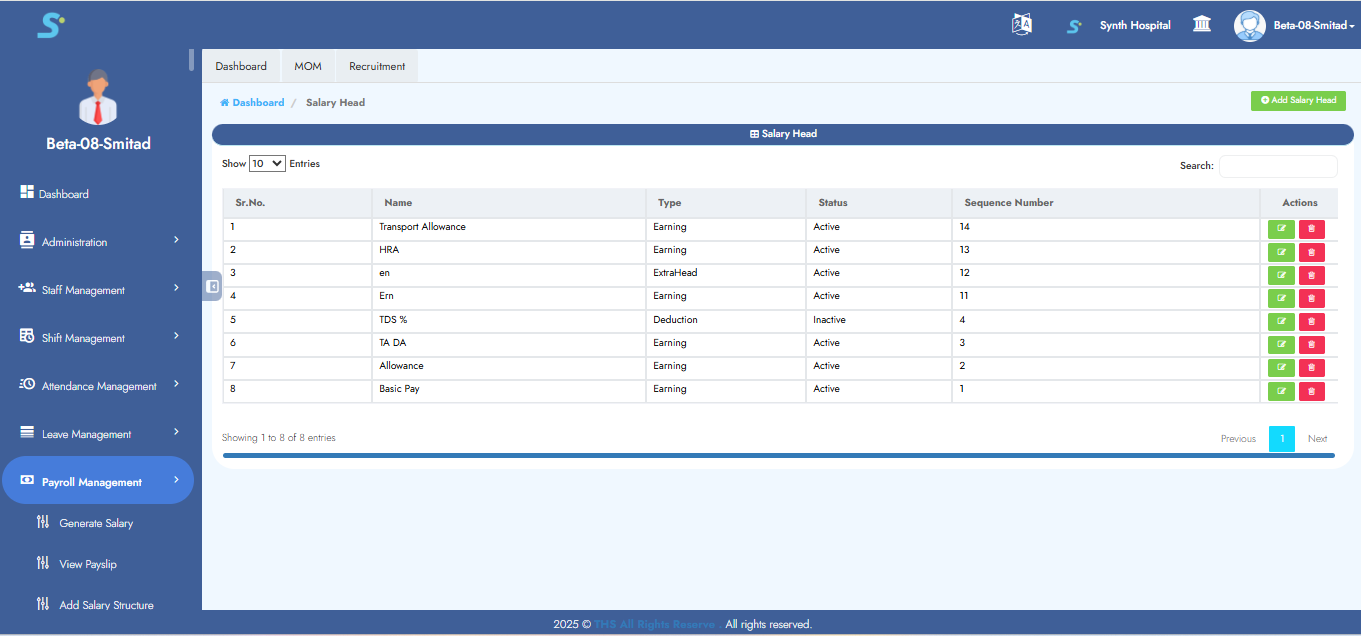
Step 7: View Salary Head
To view the list of existing salary heads, click on the View Salary Head option.
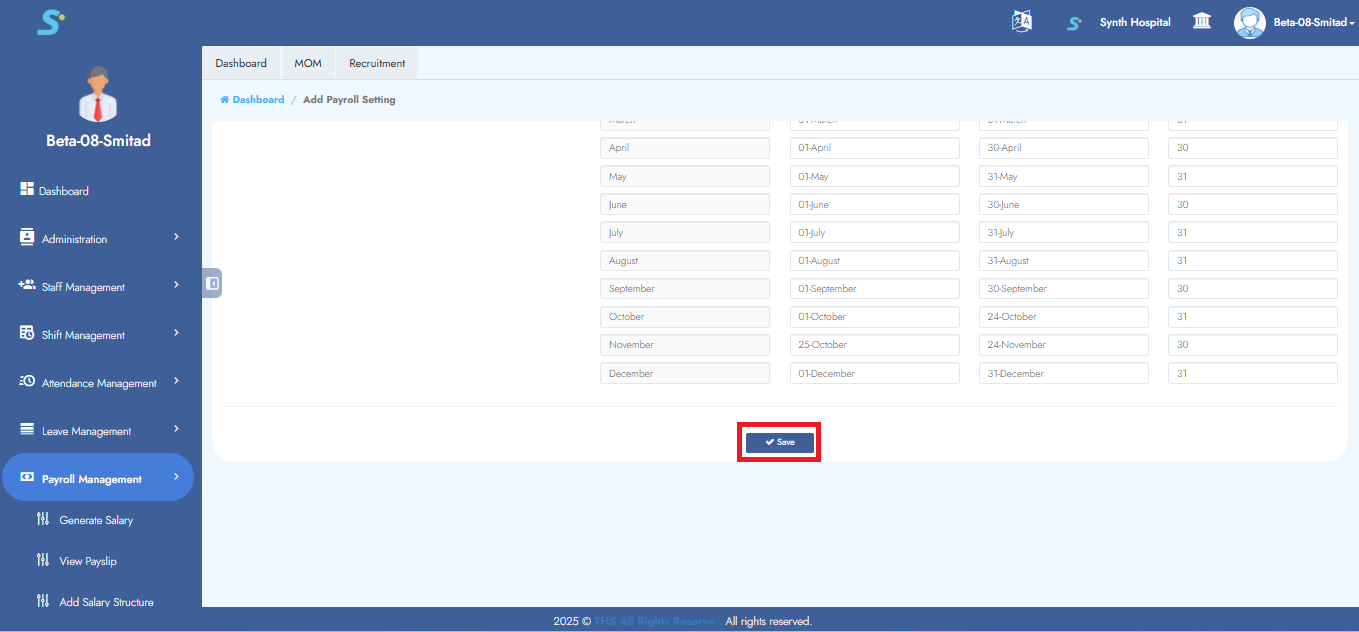
Step 8: Go to Payroll Settings
Navigate to the Payroll Settings sub-module under Masters.
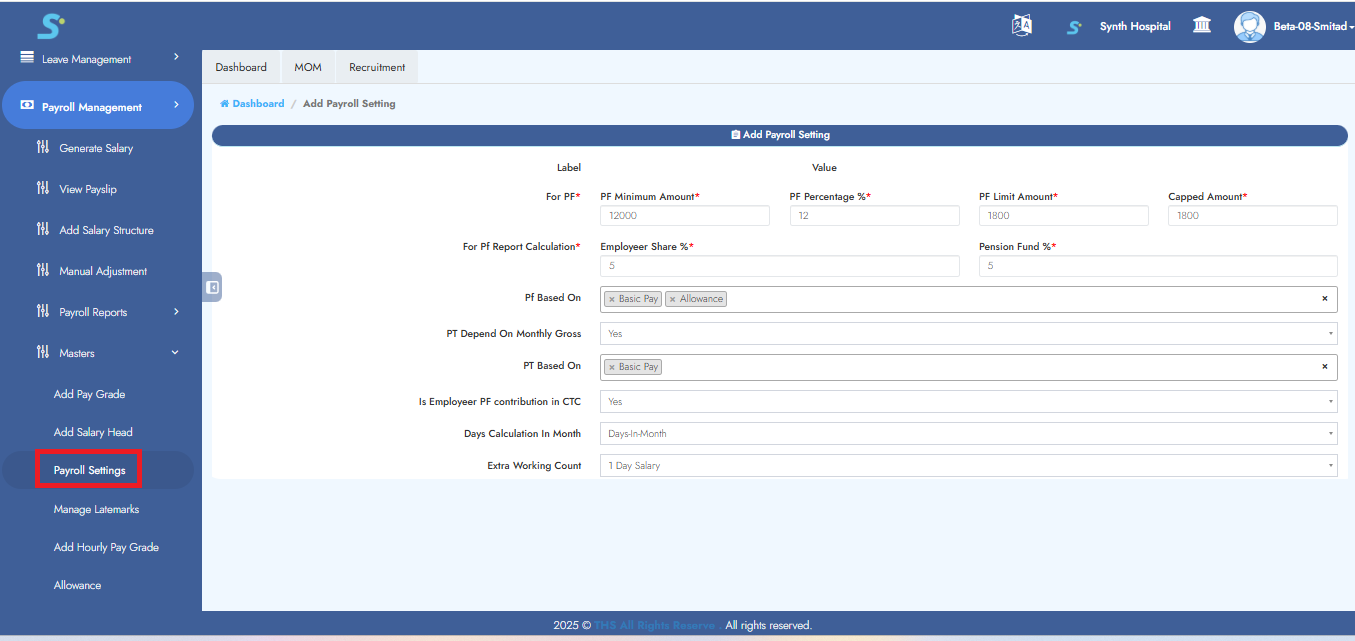
Step 9: Configure Payroll Settings
Enter the following details in the form:
For PF:
- PF Minimum Amount*
- PF Percentage %*
- PF Limit Amount*
- Capped Amount*
For PF Report Calculation:
- Employer Share %*
- Pension Fund %*
- PF Based On (Dropdown)
- PT Depend On Monthly Gross (Yes/No)
- PT Based On (Dropdown)
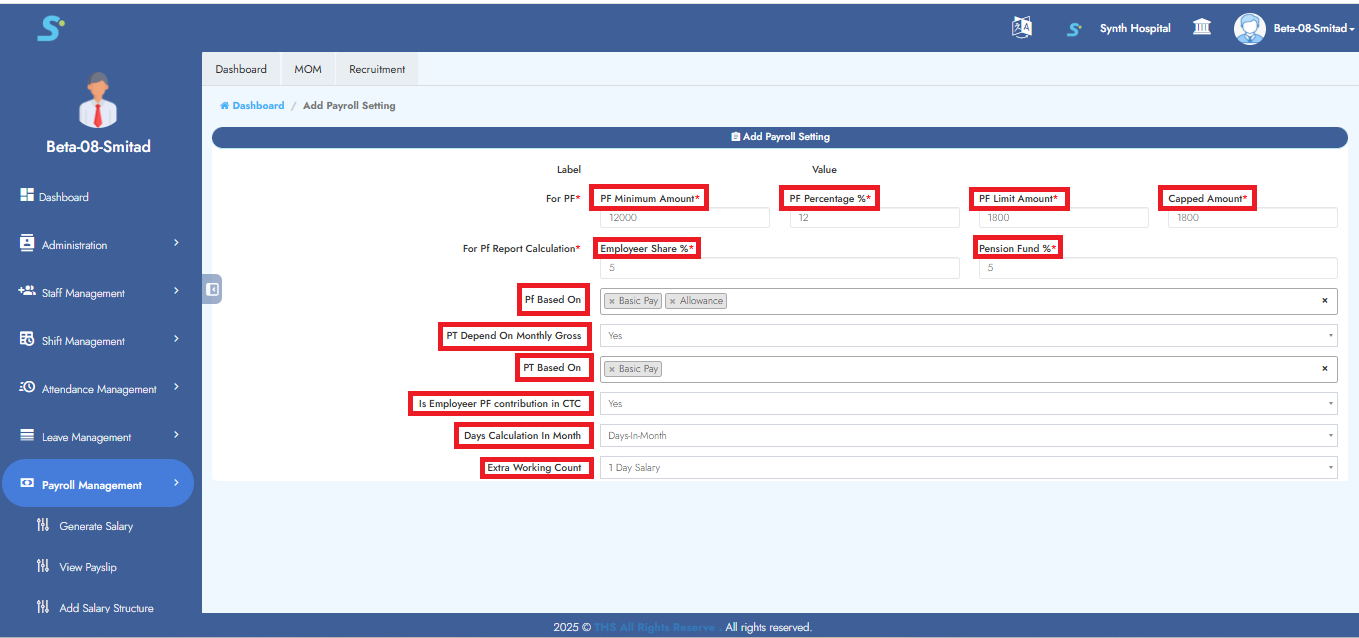
- Is Employer PF contribution in CTC (Yes/No)
- Days Calculation In Month (Dropdown)
- Extra Working Count (Dropdown)
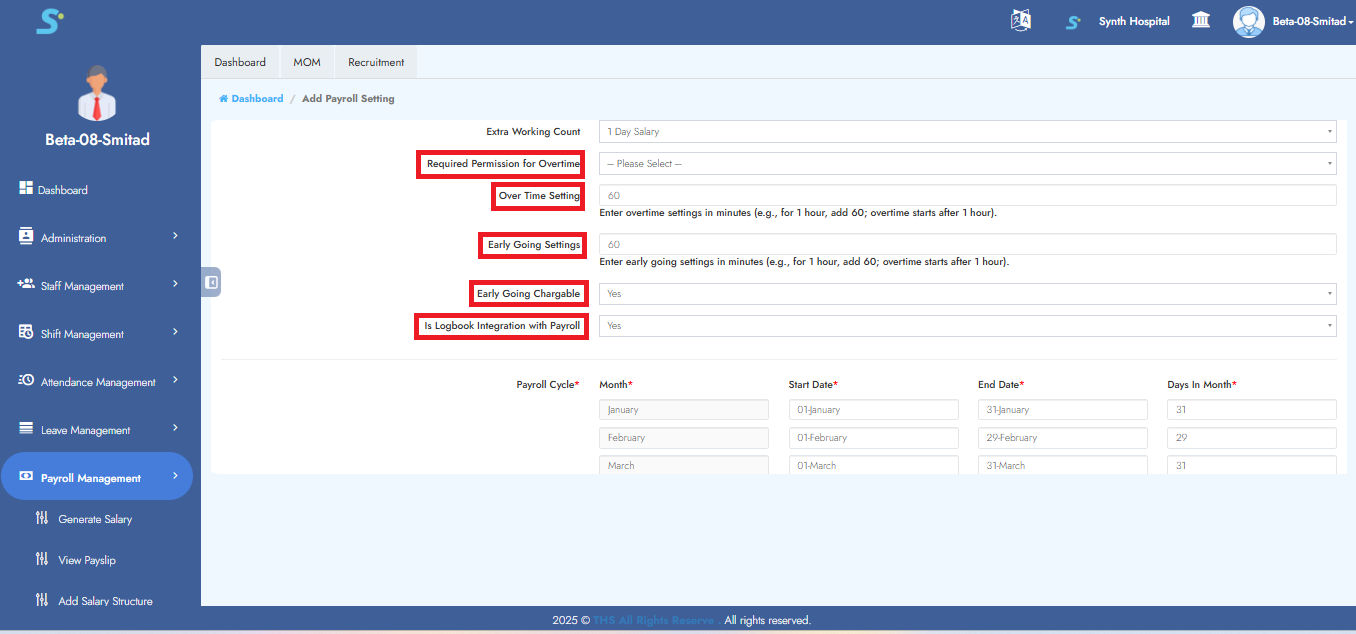
- Required Permission for Overtime (Dropdown)
- Over Time Setting (in minutes)
- Early Going Settings (in minutes)
- Early Going Chargeable (Yes/No)
- Is Logbook Integration with Payroll (Yes/No)
Step 10: Save Payroll Settings
Click the Save button to submit the details.
A confirmation message saying "Record saved successfully" will appear.
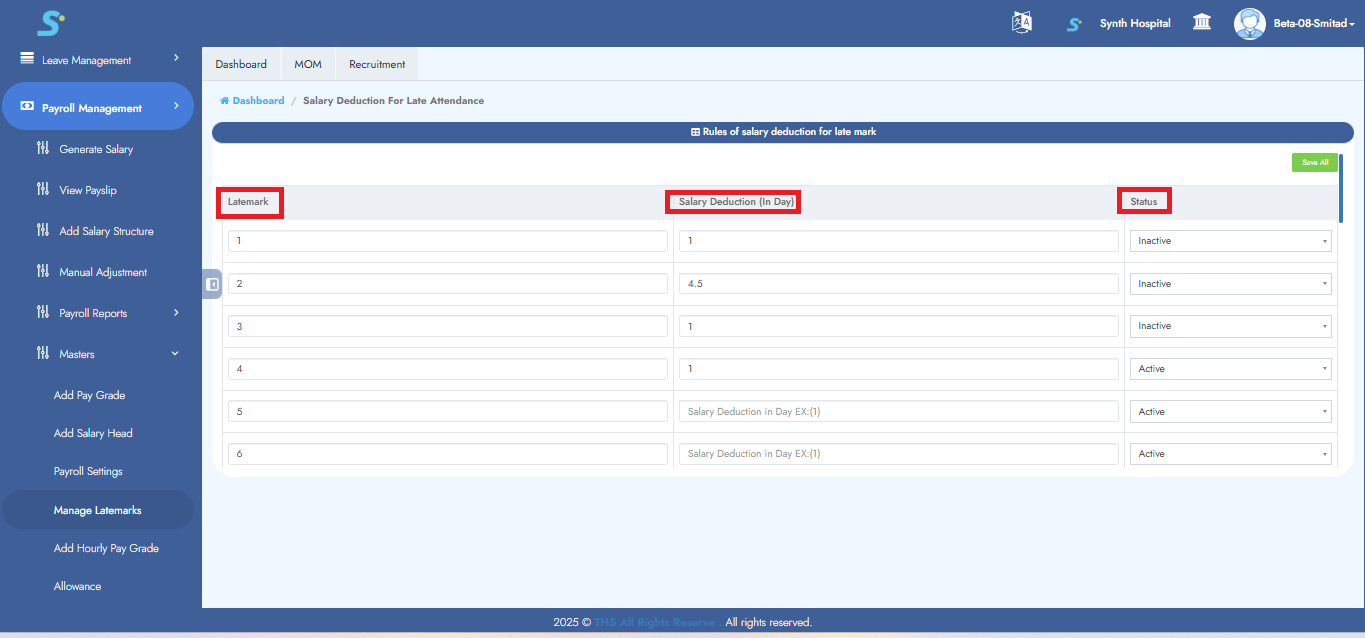
Step 11: Salary Deduction for Late Attendance
Set deduction values (in days) and status.
Example:
- After 3rd late mark → 0.5, Status: Active
- After 4th late mark → 0.5, Status: Active
Step 12: Salary Deduction for Early Going
Click on Manage Early Going from the Payroll Management > Masters section in the side menu.
This page is used to configure salary deduction rules when an employee leaves early from work multiple times.
On this screen, configure the following details:
-
Deduct Leave Balance For Latemark
Select Yes or No based on whether the leave balance should be deducted along with salary deduction. -
Early Going
Enter the early-going count or occurrence number. -
Salary Deduction (In Day)
Enter the salary deduction value in days.
For example, enter0.5to deduct half day salary. -
Status
Select the rule status: - Active: The rule will be applied.
- Inactive: The rule will not be applied.
After entering or updating the deduction rules, click the Save All button to save the configuration.
Example
In the shown screen:
- For 2 early goings, salary deduction is set as 0.5 day, but status is Inactive, so this rule will not be applied.
- For 3 early goings, the rule is set as Active, so this rule will be applied based on the configured deduction.
- Additional rules can be configured for 4, 5, 6, and more early-going counts.
This setup helps apply salary deduction rules automatically and systematically for repeated early-going records.

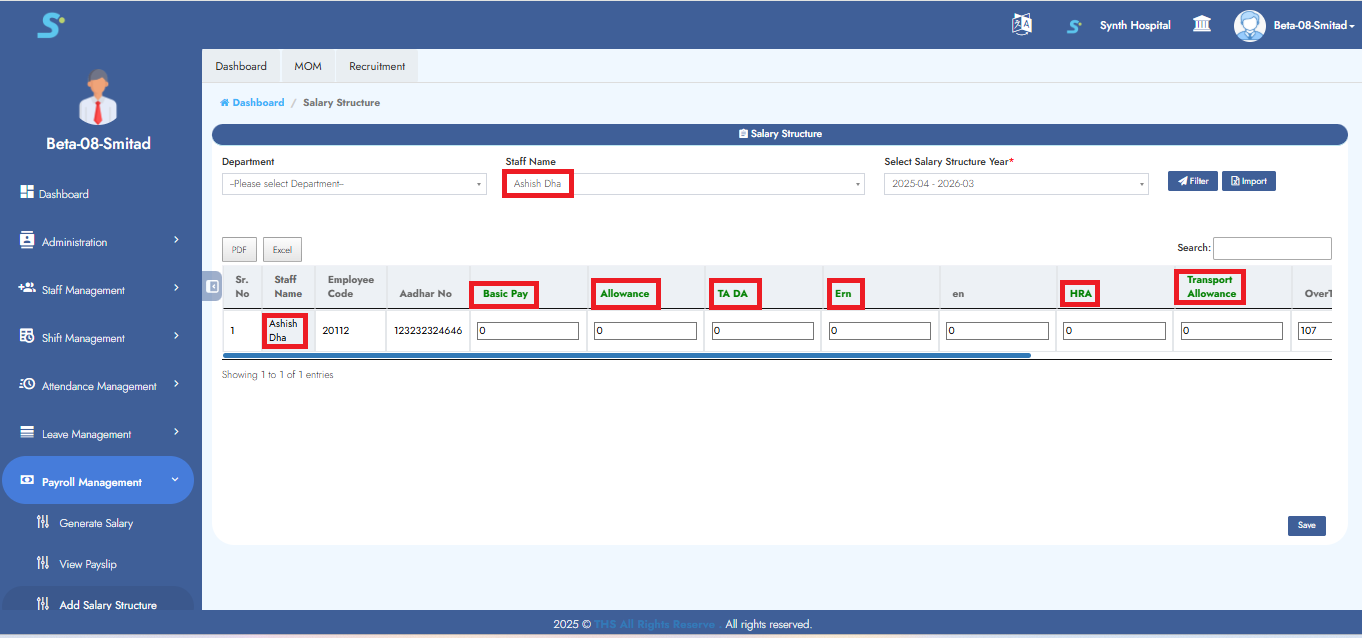
Step 13: Configure Salary Structure with Salary Heads
Click on the Add Salary Structure sub-module.
Select:
- Department (Dropdown)
- Staff Name (Dropdown)
- Salary Structure Year (Dropdown)
Click Filter.

Step 14: Enter Salary Head Details
The salary heads you created will appear in green.
Enter appropriate values for each head as shown in the image.
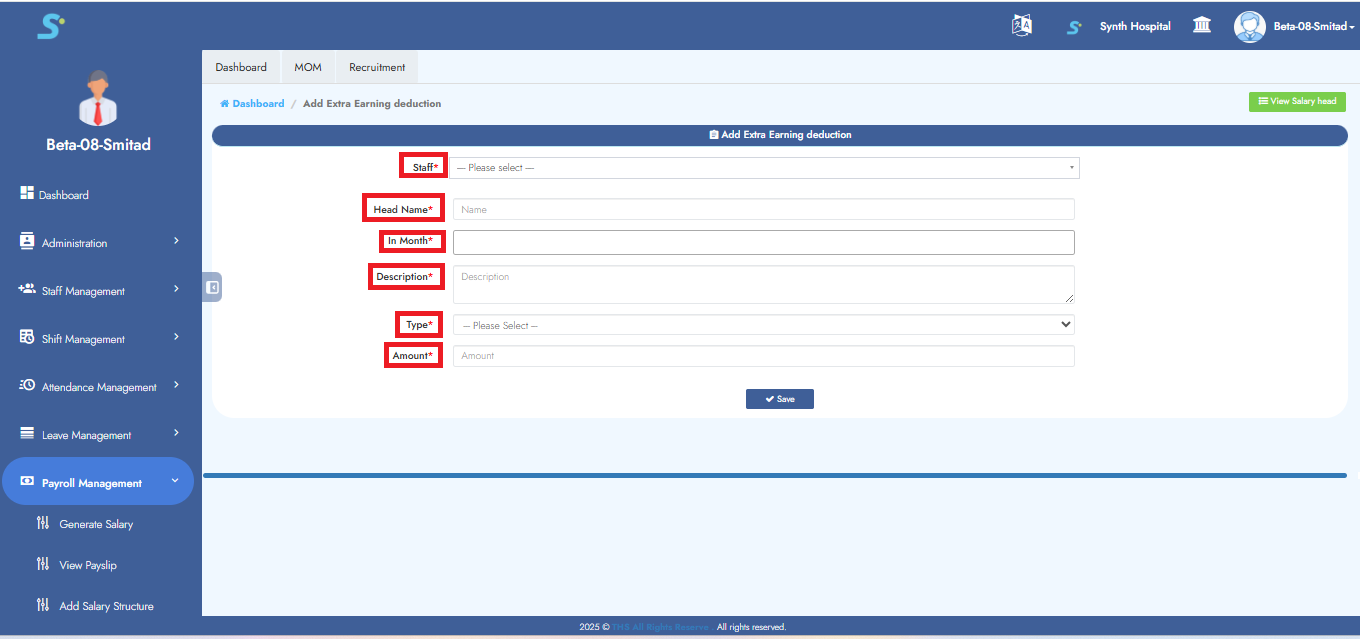
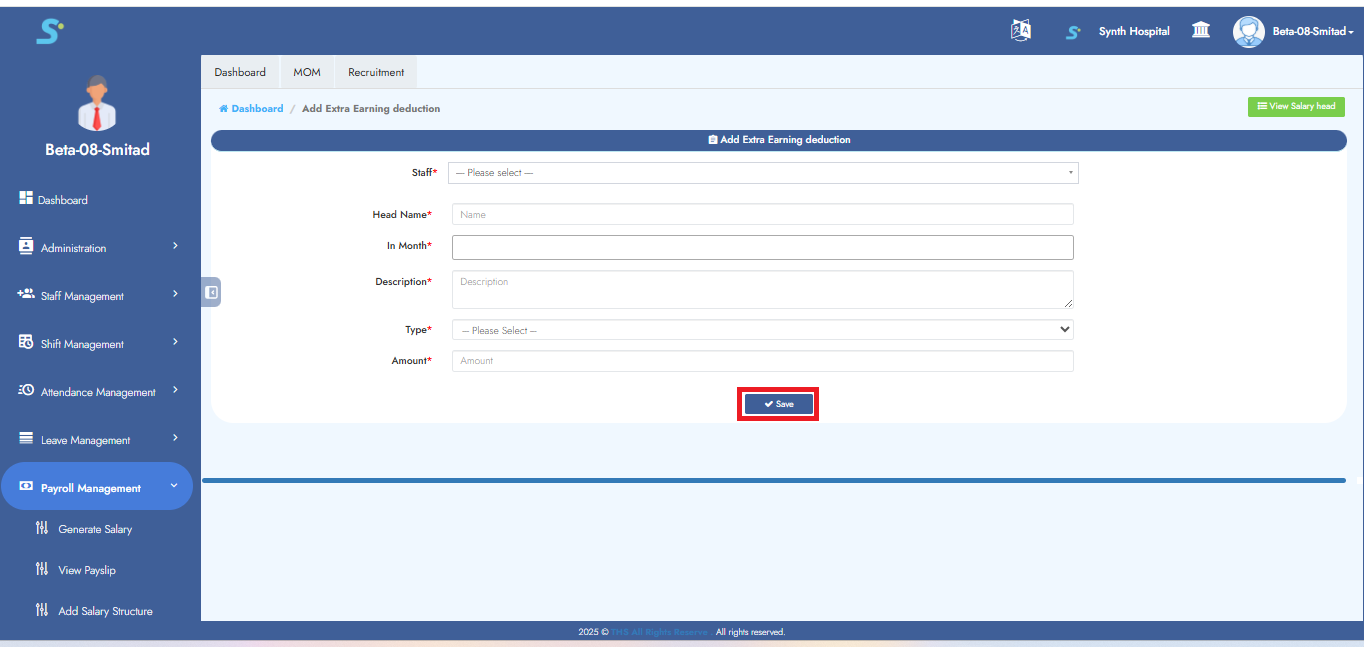
Step 15: Add Earnings or Deductions
To adjust salary:
- Select Staff Name
- Choose Salary Head
- Select Month
- Specify Type (Earning/Deduction)
- Enter Amount
Example: For EMI/Loan deduction, use this method for recurring amounts.
Step 16: Save Salary Structure Record
Click the Save button.
A message will confirm: "Record saved successfully."
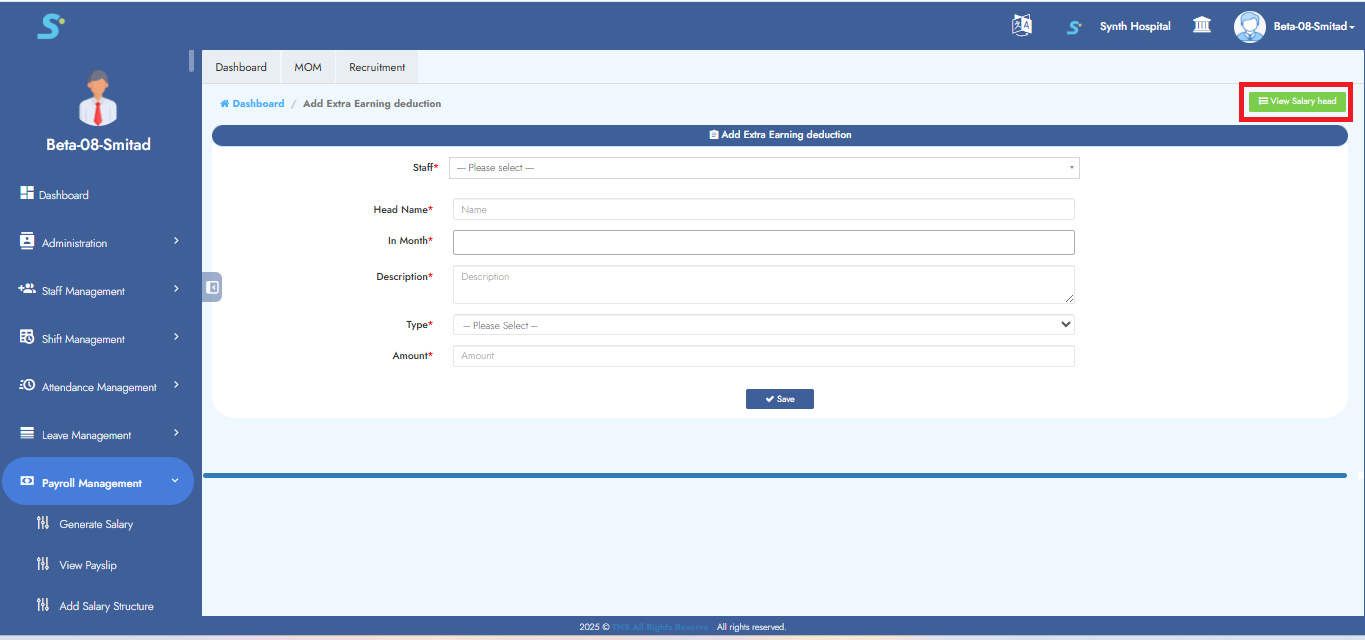
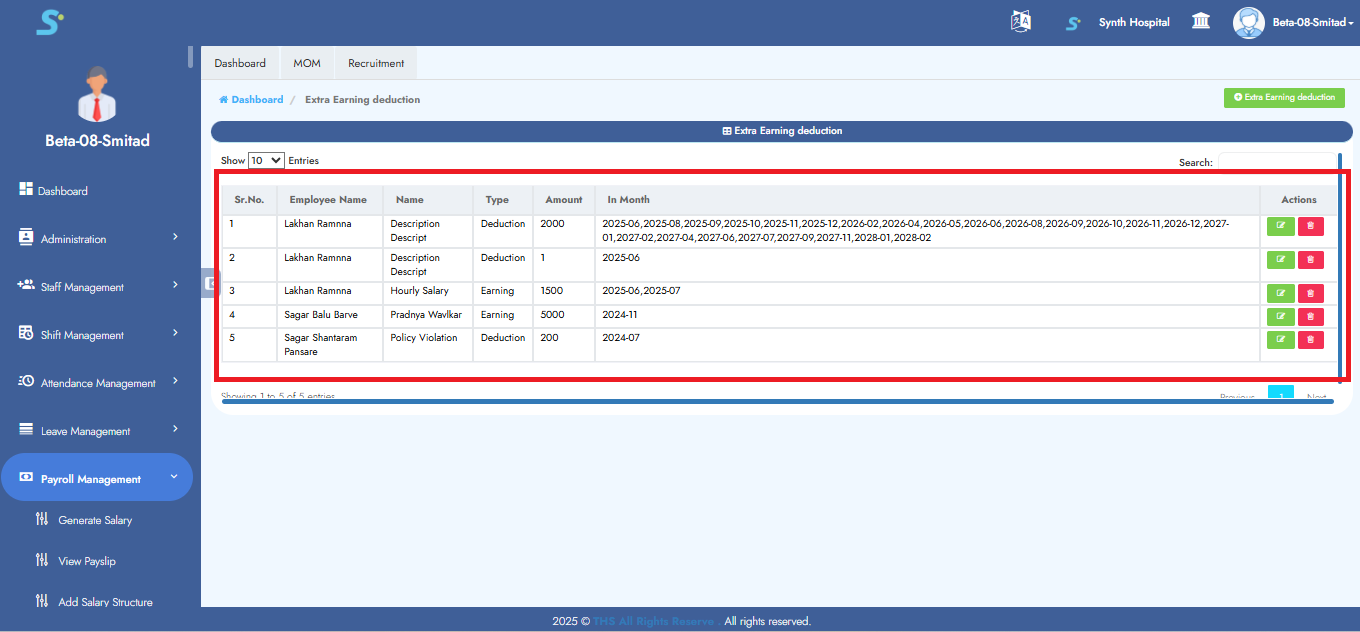
Step 17: View Manual Adjustments
To view saved earnings/deductions, click on View Salary Head.
Step 18: Edit Manual Adjustments
To edit any manual record, use the edit option shown in the image.
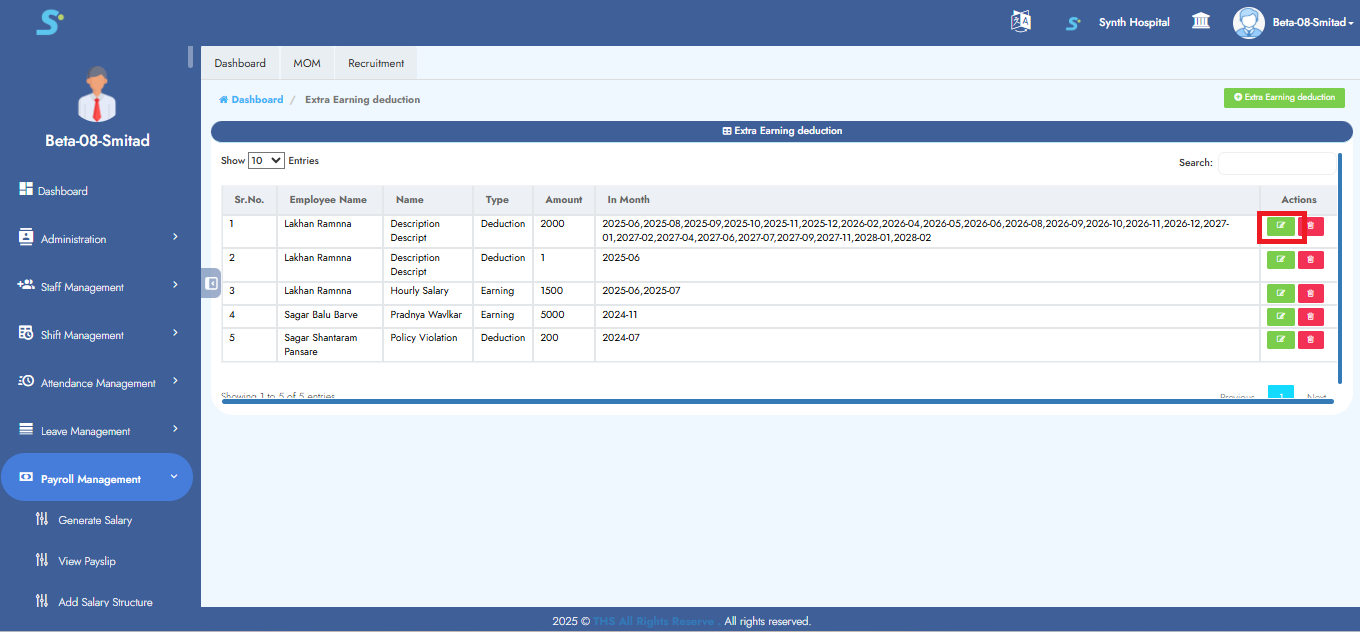
Step 19: Delete Manual Adjustments
To delete any manual record, use the delete option as shown in the image.

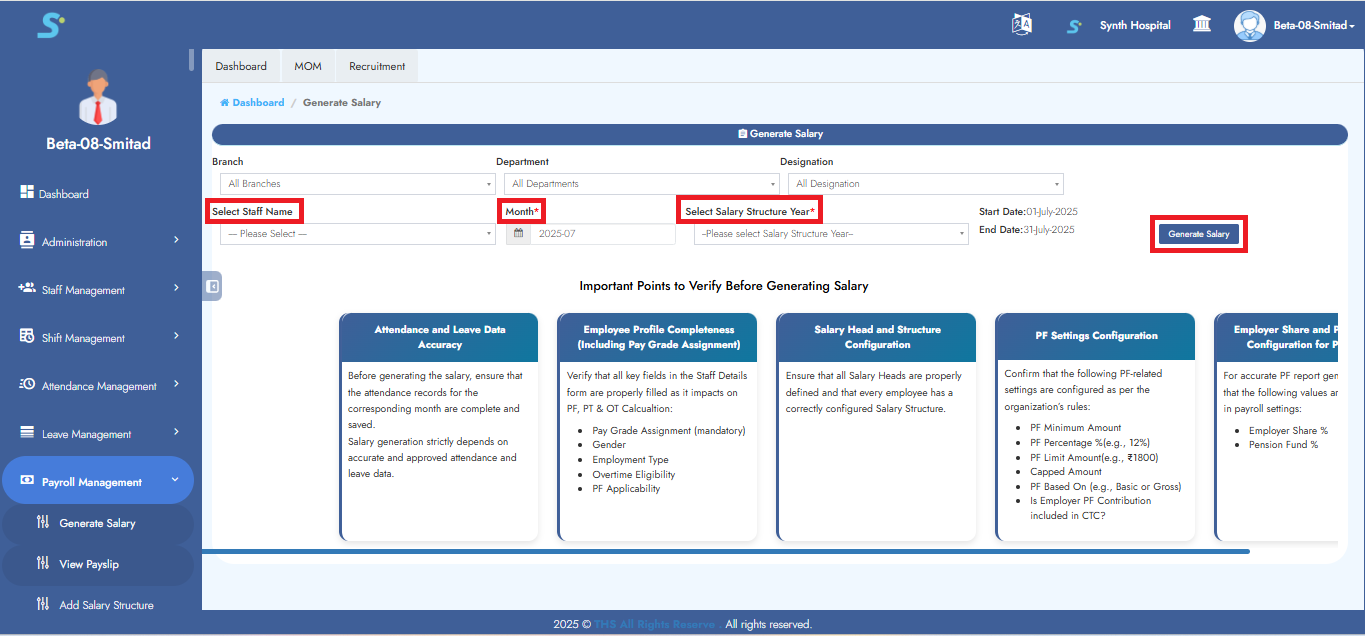
Step 20: Generate Salary
Note: Ensure the attendance report (from Timing Summary) is saved before this step.
Go to the Generate Salary sub-module.
Select:
- Staff Name
- Month
- Salary Structure Year
Click Filter to generate salary.
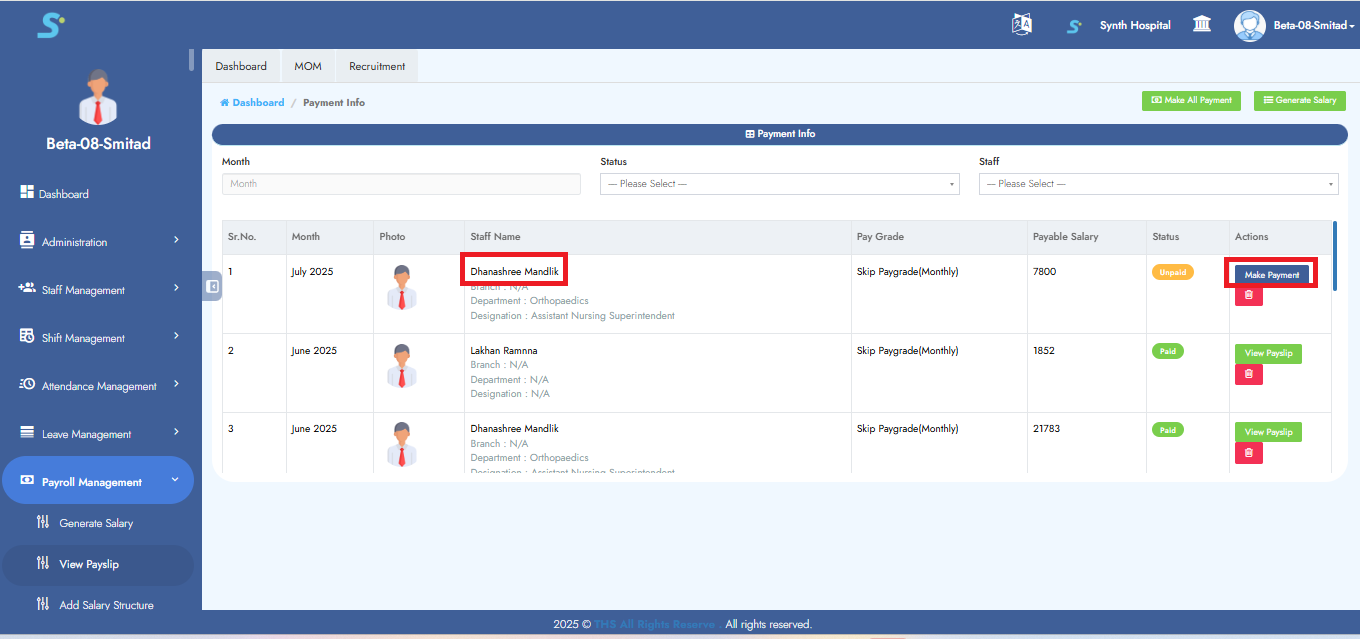
Step 21: Processing Salary Payment
Once the salary is successfully generated and the confirmation message appears, proceed by clicking the Make Payment button.
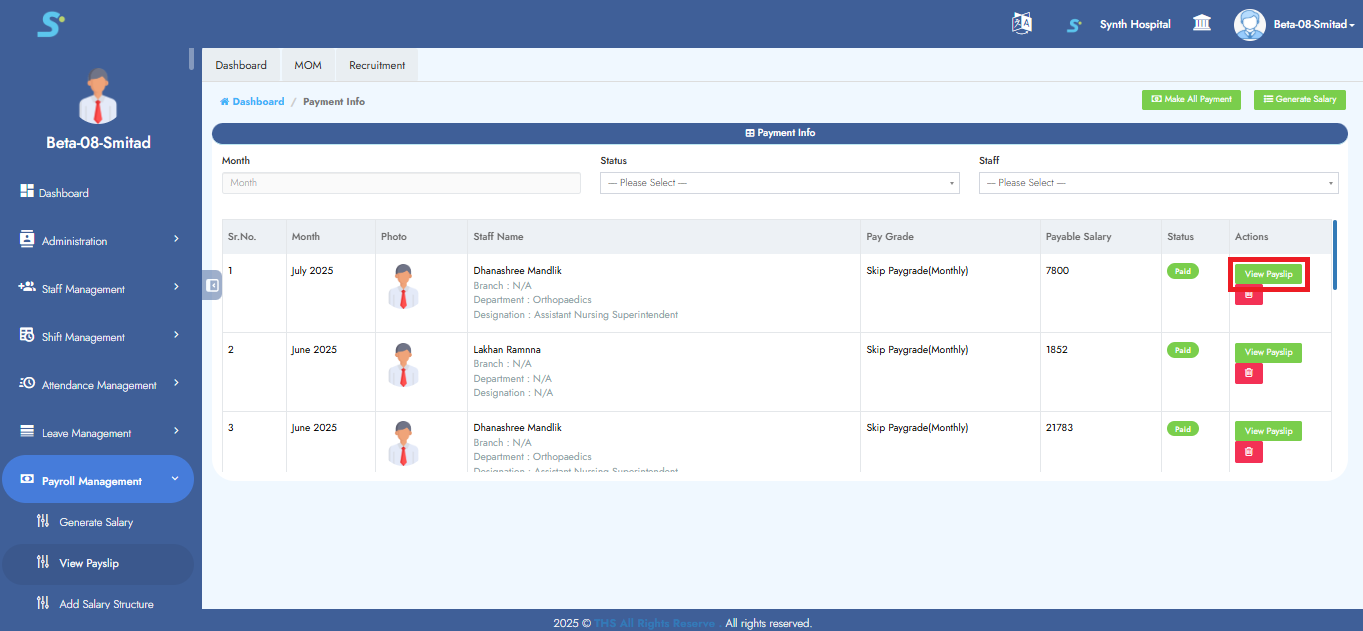
Step 22: Finalizing and Viewing the Payslip
Click the Pay button to finalize the payment.
The payslip for the selected staff member will be generated.
To view it, click on the View Payslip button.
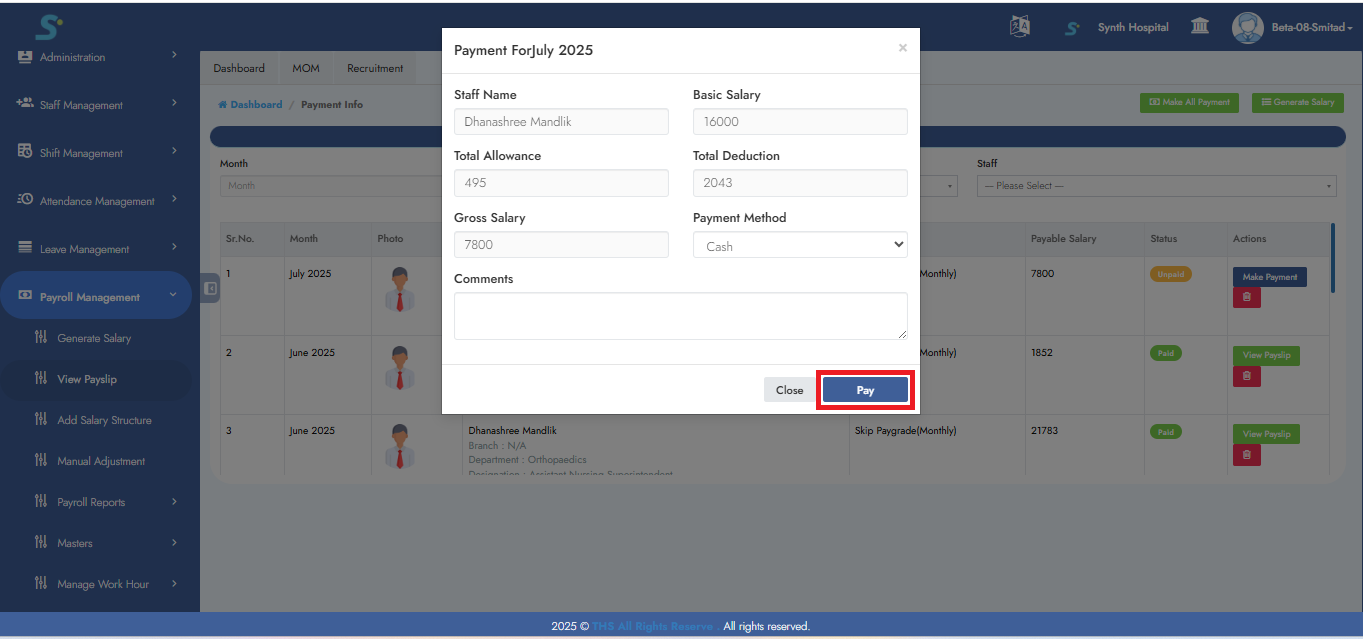
Note: To generate payslips for all staff at once, leave the Staff Name field empty.
Step 23: Viewing Generated Payslip
After initiating the payslip generation, a success message will appear at the top of the screen, followed by a progress bar.
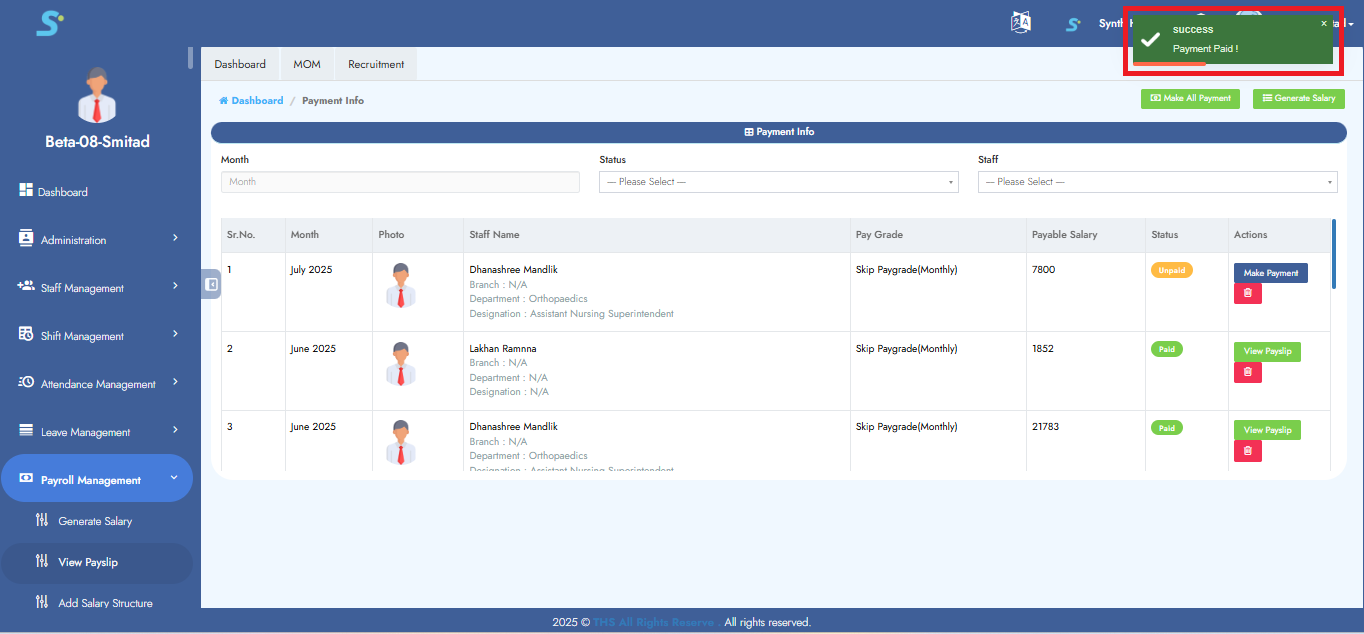
Step 24: Viewing Final Payslip Output
Once the process is complete, the payslip for the selected employee will be generated.
Click the View Payslip button to view it.
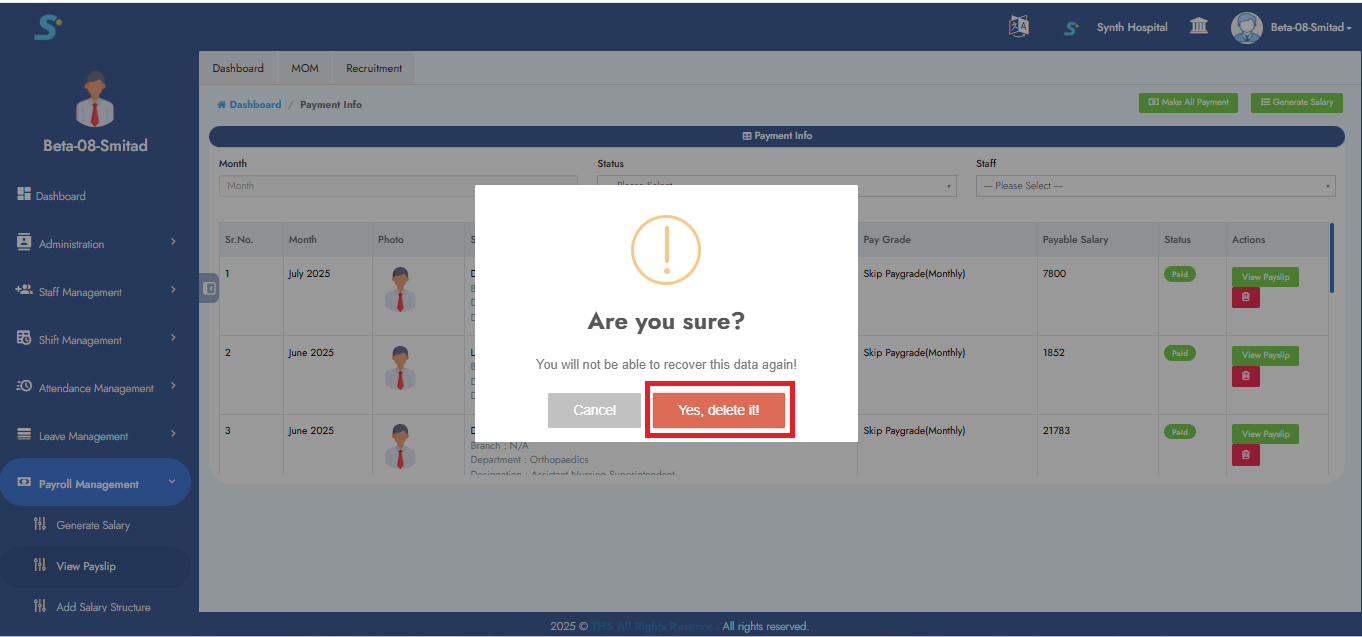
Step 25: Deleting a Payslip Record
To delete a payslip:
- Click the Delete button.
- A confirmation pop-up saying "Are you sure?" will appear.
- Click Yes, Delete to permanently remove the record.
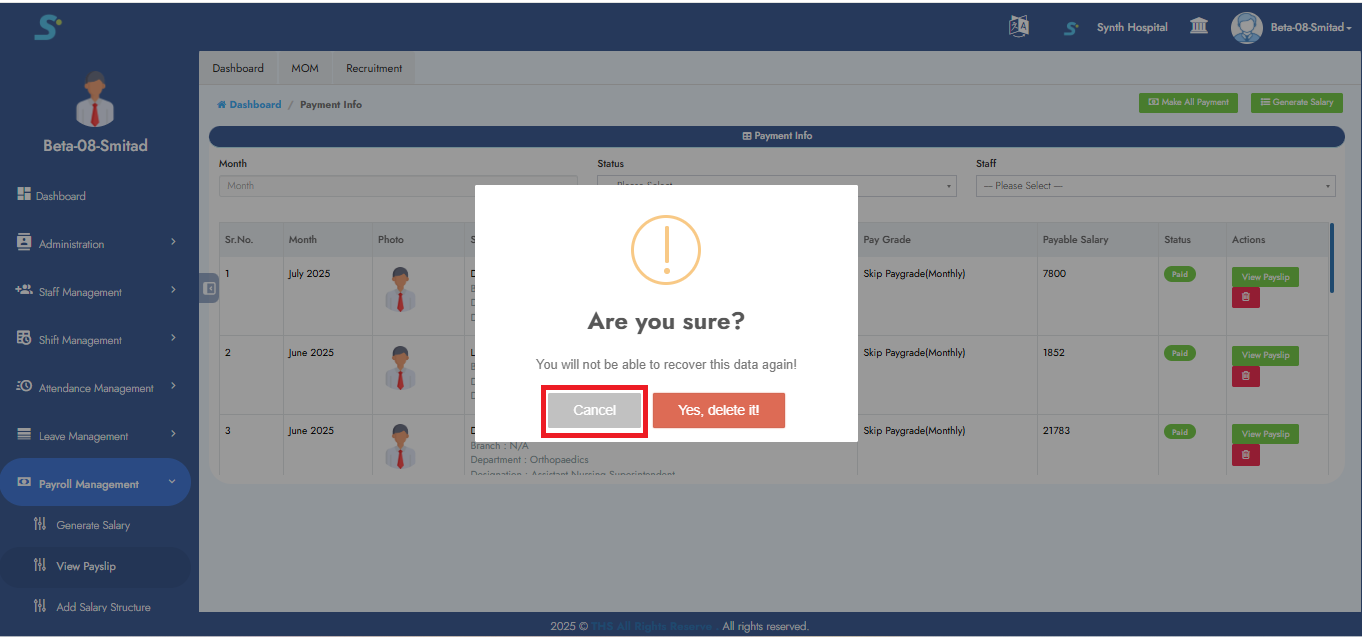
Step 26: Cancel Payslip Deletion
If you click the Cancel button in the confirmation dialog, the deletion will be aborted, and the record will remain unchanged.
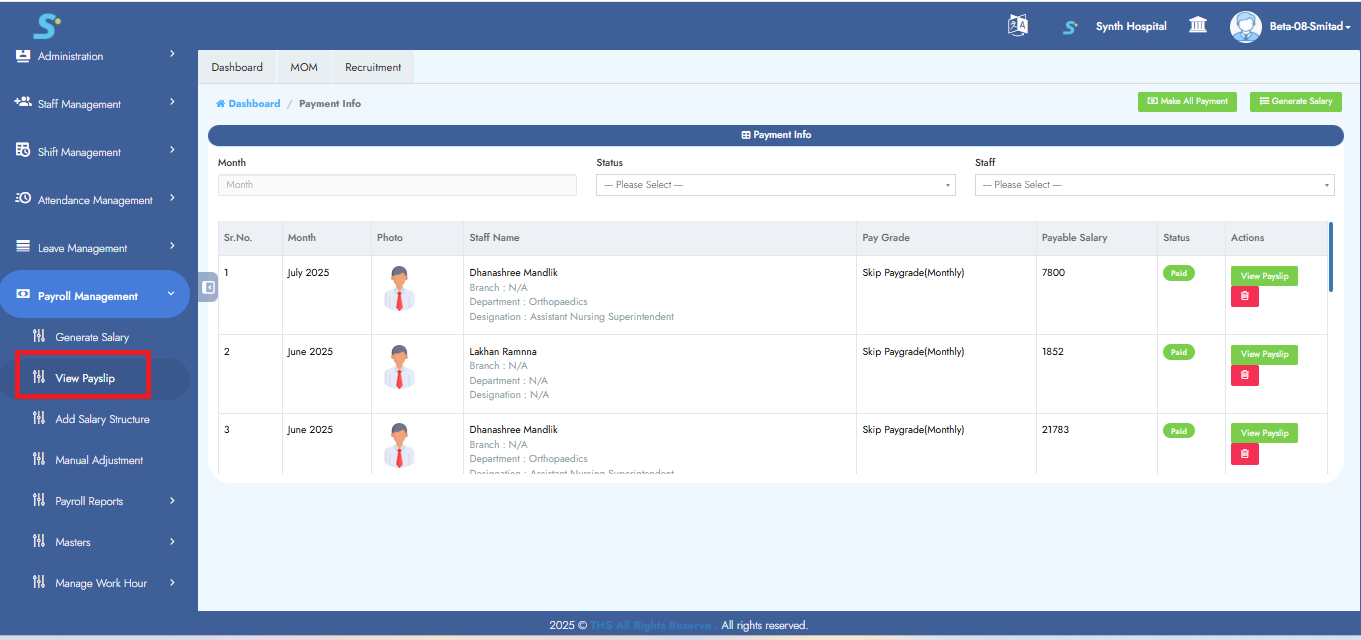
Step 27: View Payslip from Side Menu
You can also view the payslip by clicking on the ‘View Payslip’ option from the side menu.
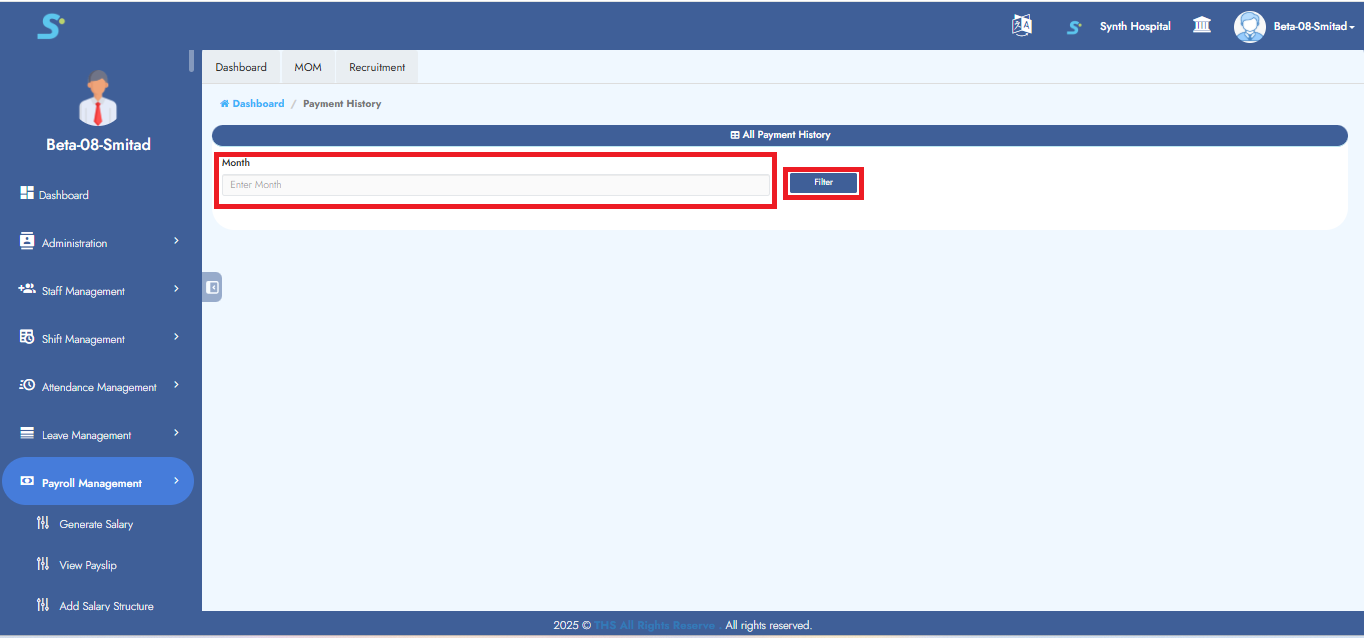
Step 28: Payment History
In the Payment History section, you can conveniently view the complete payment history of staff members.
Select the desired month and click the Filter button.
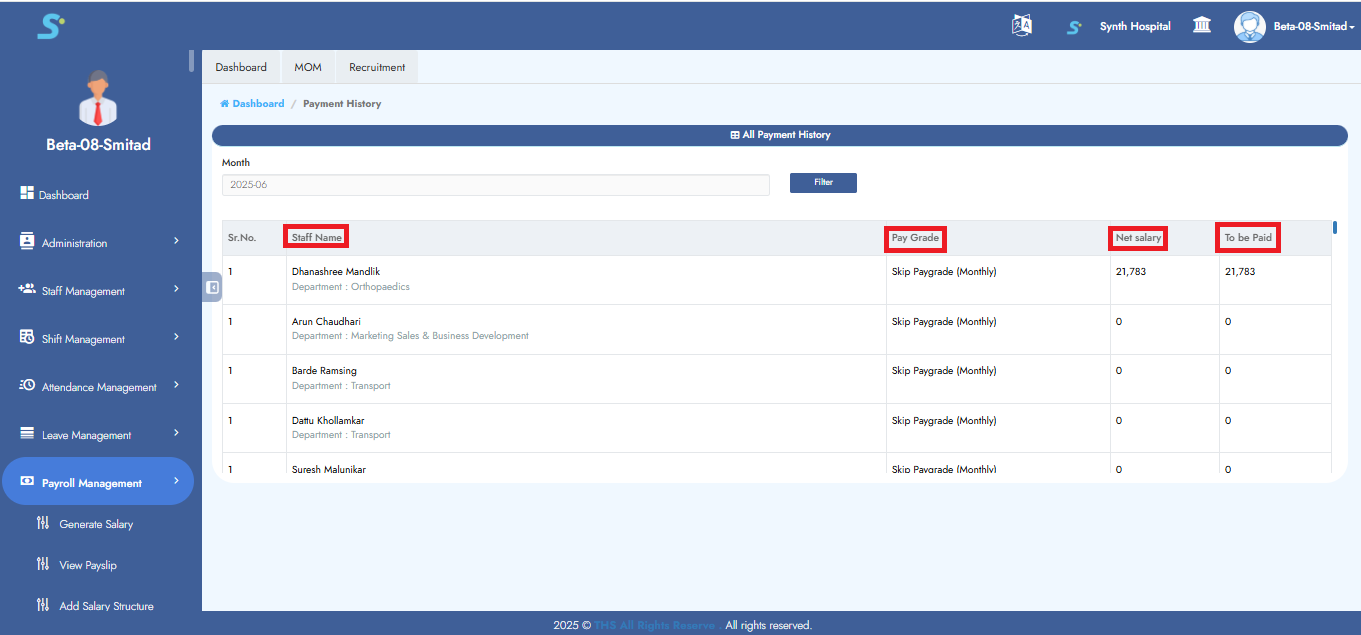
Step 29: Viewing Salary Summary of Staff
After applying the filter, you can view:
- Staff Name
- Pay Grade
- Net Salary
- Amount to be Paid
Step 30: Payroll Summary Report
Click on Payroll Summary Report from the Payroll Reports section in the side menu.
This report displays the payroll summary of staff for the selected payroll month.
Use the filters available on the screen:
- Department: Select a department or keep All Departments
- Pay Sheet: Select pay sheet or keep All Pay Sheets
- Month: Select salary month
- Show Attendance Data: Select attendance data option
- Click Filter
After filtering, the report displays payroll-related information such as:
- Total Staff
- Salary Generated Count
- Remaining Staff Count
- Finalized Attendance Count
- Professional details
- Attendance details
- Salary earning and deduction details
- Bank and statutory details
You can also export the report using:
- Excel
- Send to Accounts

Step 31: Employee Payroll Reports
Click on Employee Payroll Reports from the Payroll Reports section in the side menu.
This report is used to view payroll details of a selected employee for a selected month range.
Use the filters available on the screen:
- Staff Name: Select the employee
- Start Month: Select salary start month
- End Month: Select salary end month
- Show Attendance Data: Select attendance data option
- Click Filter
After filtering, the report displays employee-wise payroll information such as:
- Staff name
- Month of salary
- Gender
- Bank account details
- IFSC code
- UAN number
- Aadhaar number
- PAN number
- Biometric code
- Date of joining
- Designation and other payroll details
If Show Attendance Data is selected as Yes, attendance-related data will be included in the report.
If Show Attendance Data is selected as No, attendance-related data will not be shown.
You can export the report using:
- Excel

Step 32: PF Report
Click on PF Report from the Payroll Reports section in the side menu.
This report is used to view provident fund details for employees.
Use the filters available on the screen:
- Staff Name: Select an employee if you want employee-wise PF details
- Start Month: Select start month
- End Month: Select end month
- Click Filter
If a specific employee is selected, the report displays PF details for that employee for the selected month range.
If no employee is selected, the system displays PF details for all applicable employees based on the selected month.
The report displays PF-related fields such as:
- Staff name
- Month of salary
- Basic pay
- Total earning
- EPF wages
- EPS wages
- Employee contribution
- Employer contribution
- Total PF
- Pension-related details
You can export the report using:
- Excel

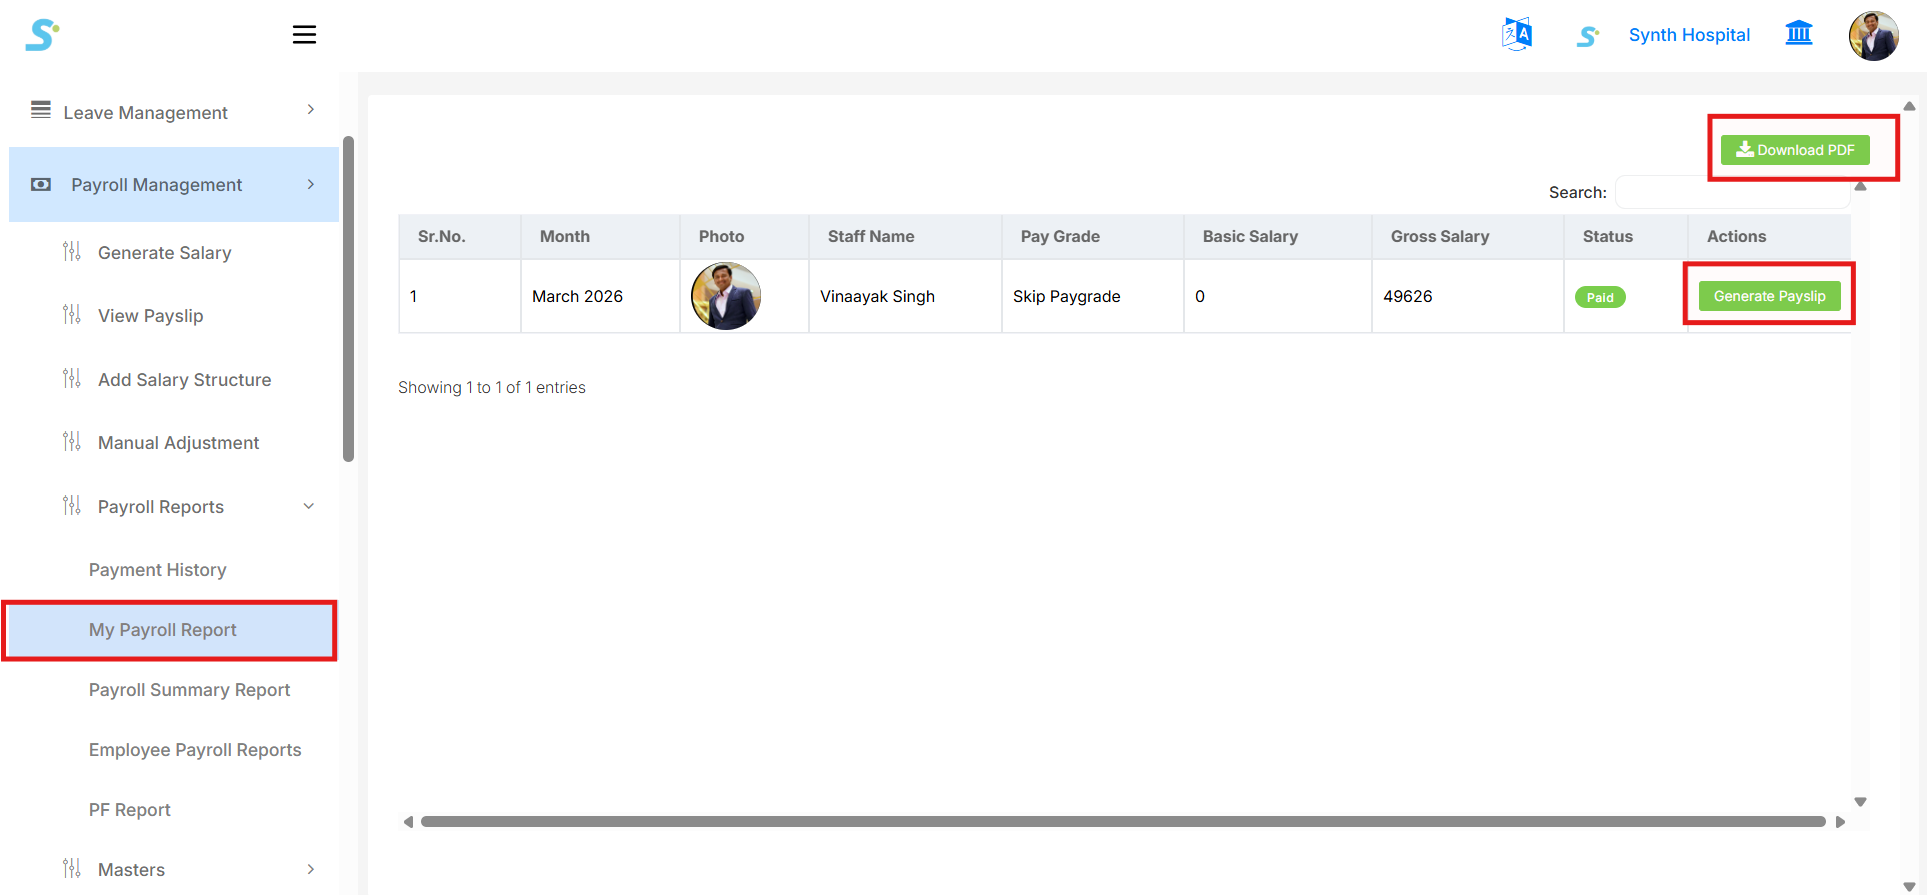
Step 33: My Payroll Report
Click on My Payroll Report from the Payroll Reports section in the side menu.
This page displays the logged-in employee’s salary/payment details for generated payroll records.
The report shows payroll information such as:
- Month
- Photo
- Staff Name
- Pay Grade
- Basic Salary
- Gross Salary
- Status
- Actions
If salary is generated and paid, the Status column displays Paid.
Available actions on this screen:
- Click Generate Payslip to generate/download the employee payslip.
- Click Download PDF to download the payroll report in PDF format.
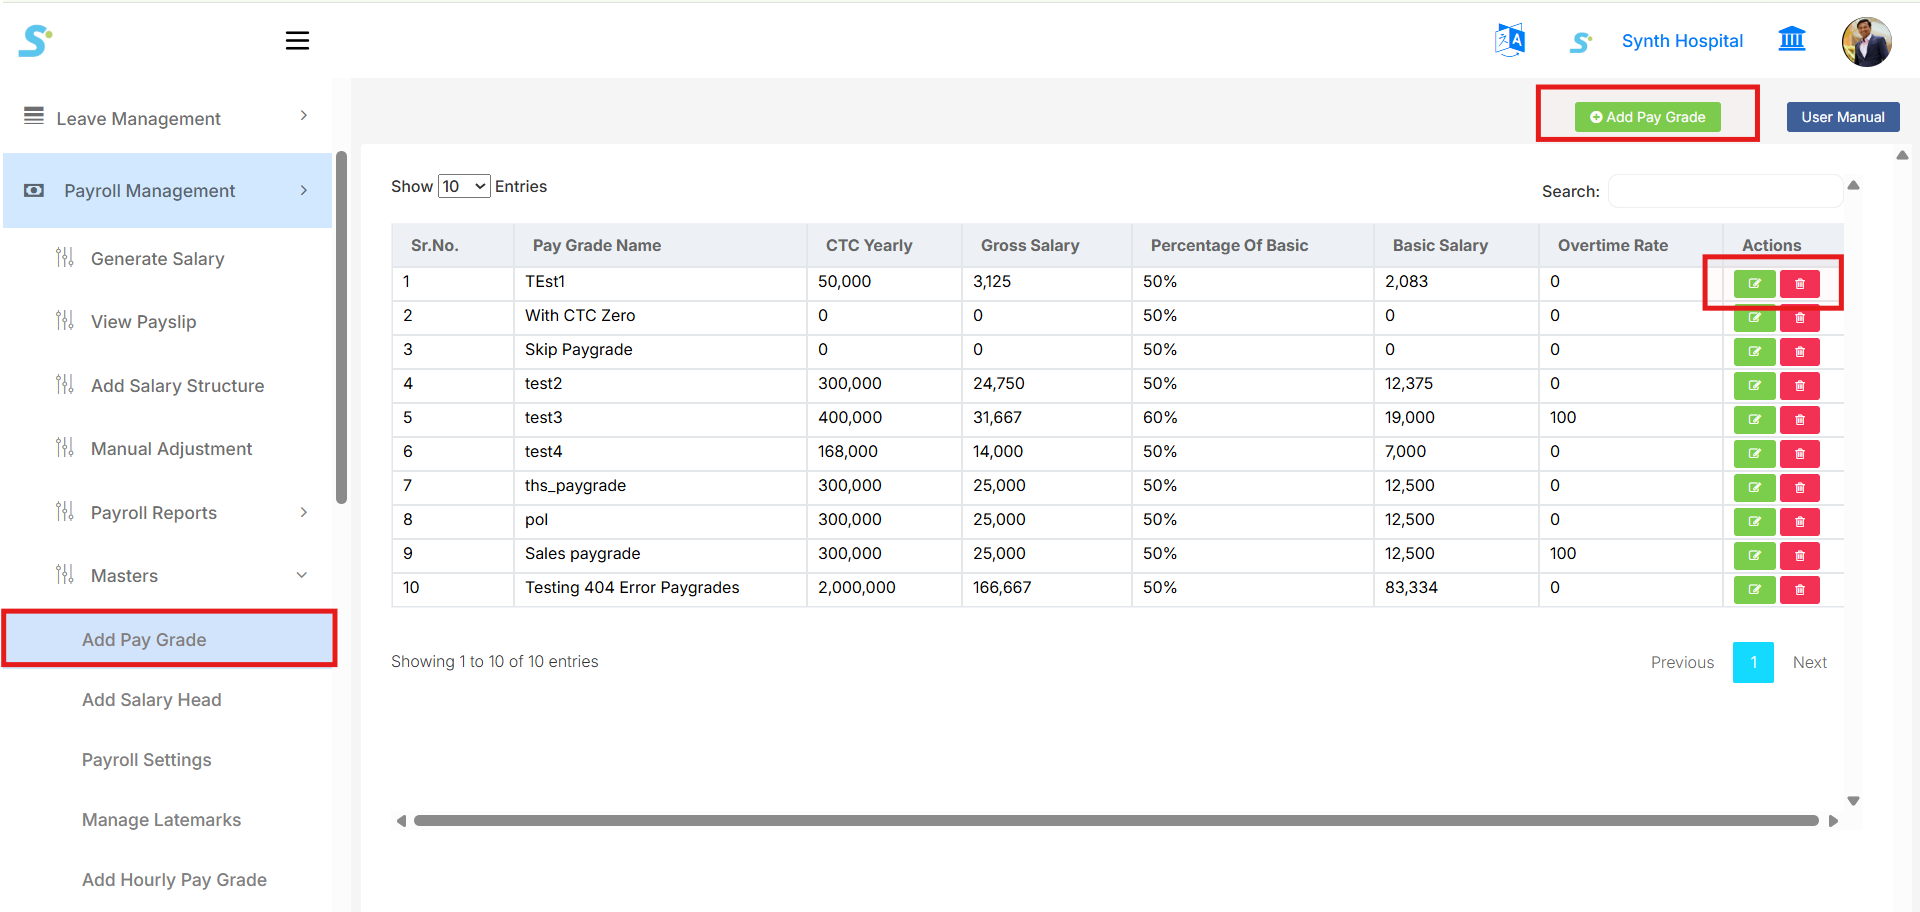
Step 34: Add Pay Grade
Go to Payroll Management > Masters > Add Pay Grade from the side menu.
This page is used to create and manage pay grades for employees.
The list page displays existing pay grades with details such as:
- Pay Grade Name
- CTC Yearly
- Gross Salary
- Percentage of Basic
- Basic Salary
- Overtime Rate
- Actions
From the top-right side, you can click:
- Add Pay Grade to create a new pay grade
- User Manual to open the related documentation
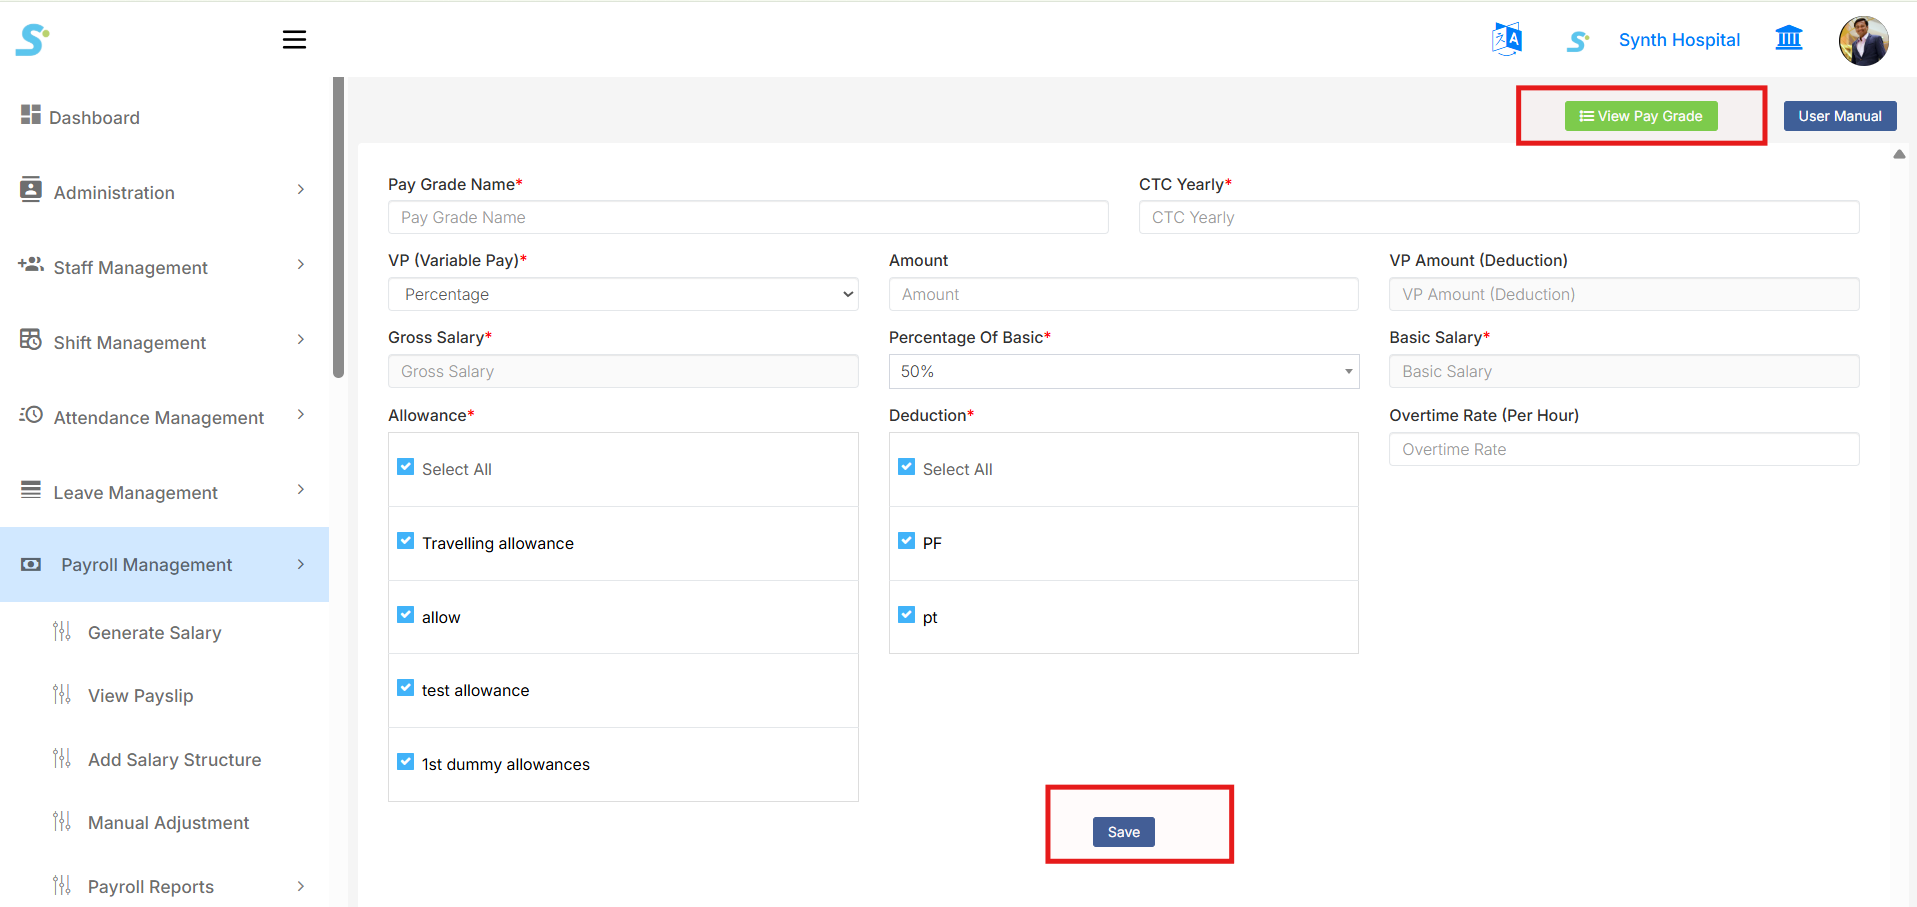
In the Add Pay Grade form, enter the required pay grade details:
- Pay Grade Name
- CTC Yearly
- VP (Variable Pay)
- Amount
- VP Amount (Deduction)
- Gross Salary
- Percentage of Basic
- Basic Salary
- Overtime Rate (Per Hour)
Then select applicable salary components:
- Allowance
- Deduction
You can use Select All to select all allowance or deduction heads.
After entering all required details, click the Save button to save the pay grade.
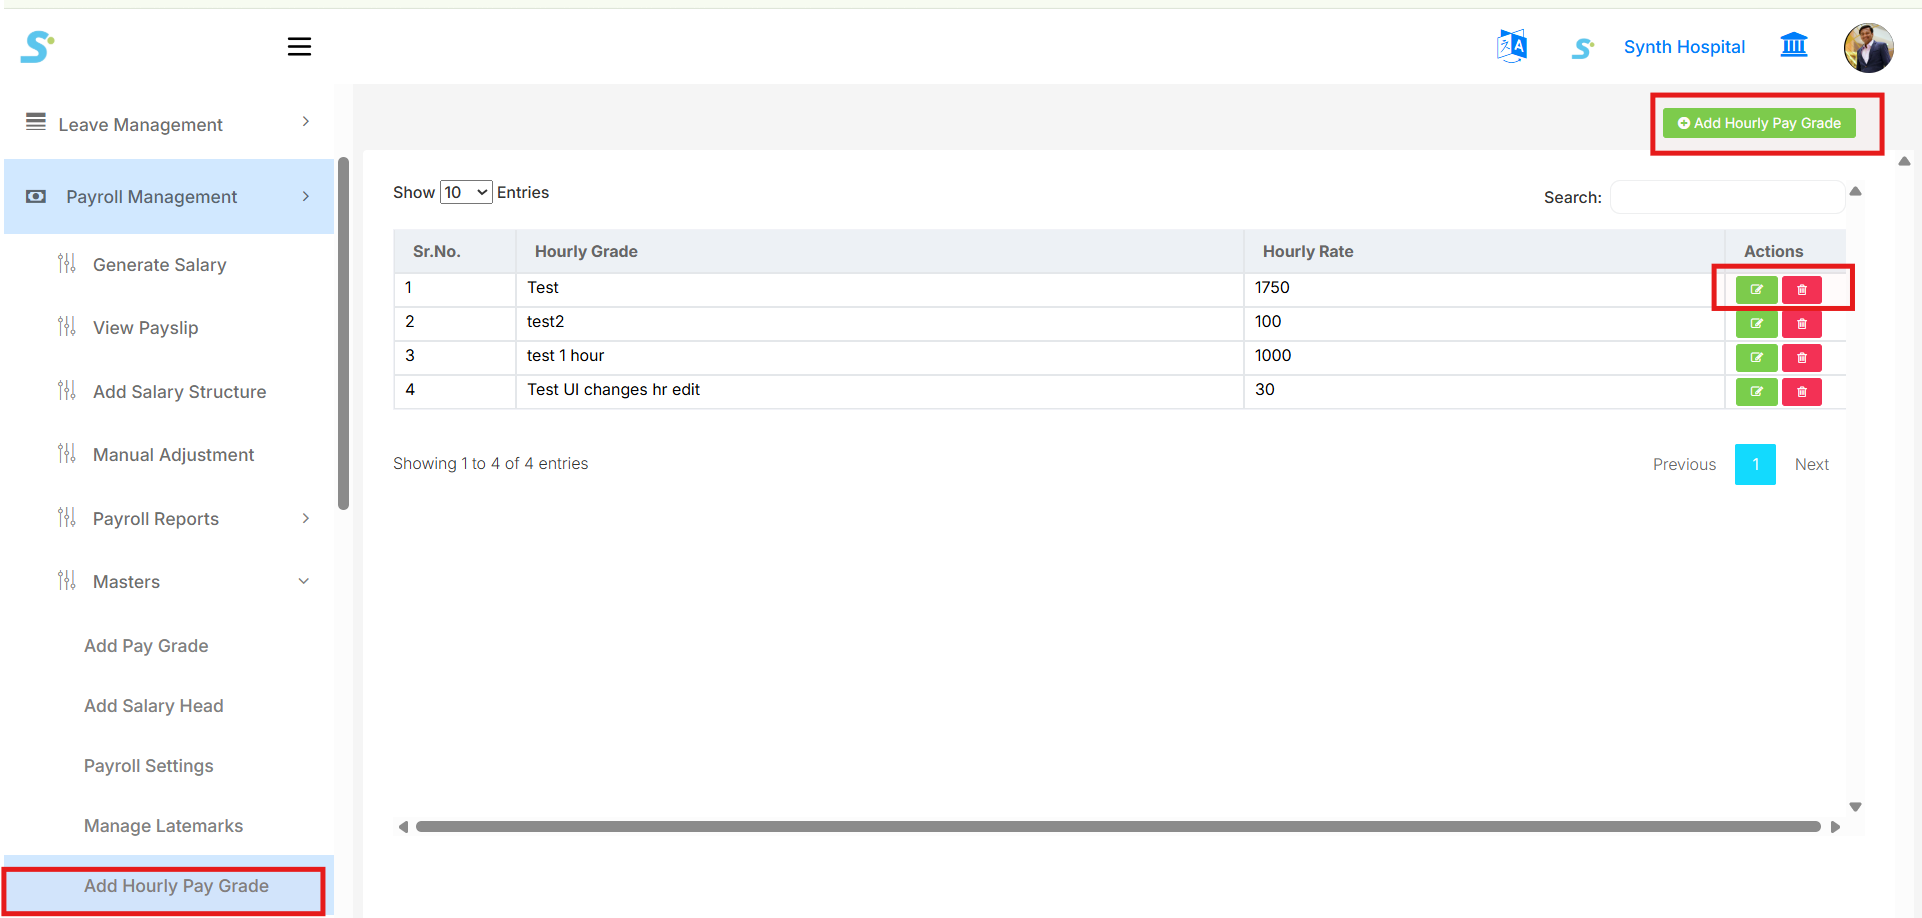
Step 35: Hourly Pay Grade
Go to Payroll Management > Masters > Add Hourly Pay Grade from the side menu.
This page is used to create and manage hourly pay grades for employees who are paid based on hourly wages.
The list page displays existing hourly pay grades with details such as:
- Hourly Grade
- Hourly Rate
- Actions
From the top-right side, you can click:
- Add Hourly Pay Grade to create a new hourly pay grade
- User Manual to open the related documentation
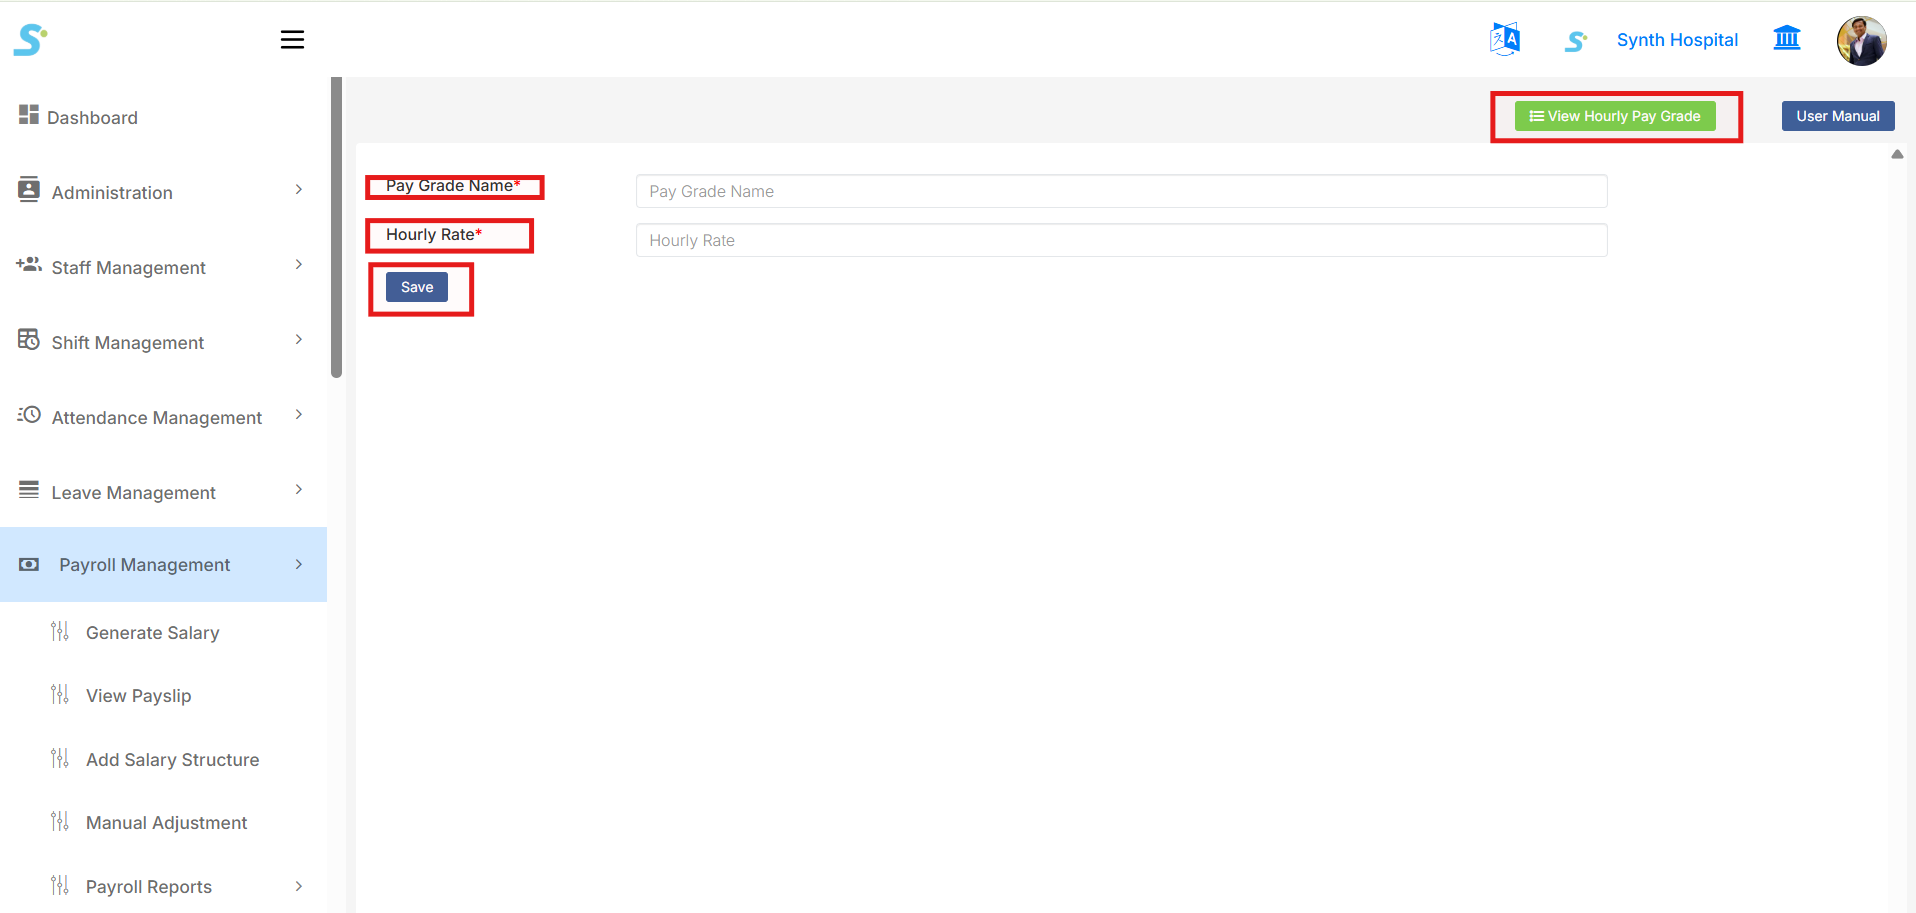
In the Add Hourly Pay Grade form, enter the required details:
- Pay Grade Name
- Hourly Rate
After entering the required details, click the Save button to save the hourly pay grade.
Once saved, the hourly pay grade will be displayed in the list.
You can use the Action buttons to:
- Edit the hourly pay grade
- Delete the hourly pay grade
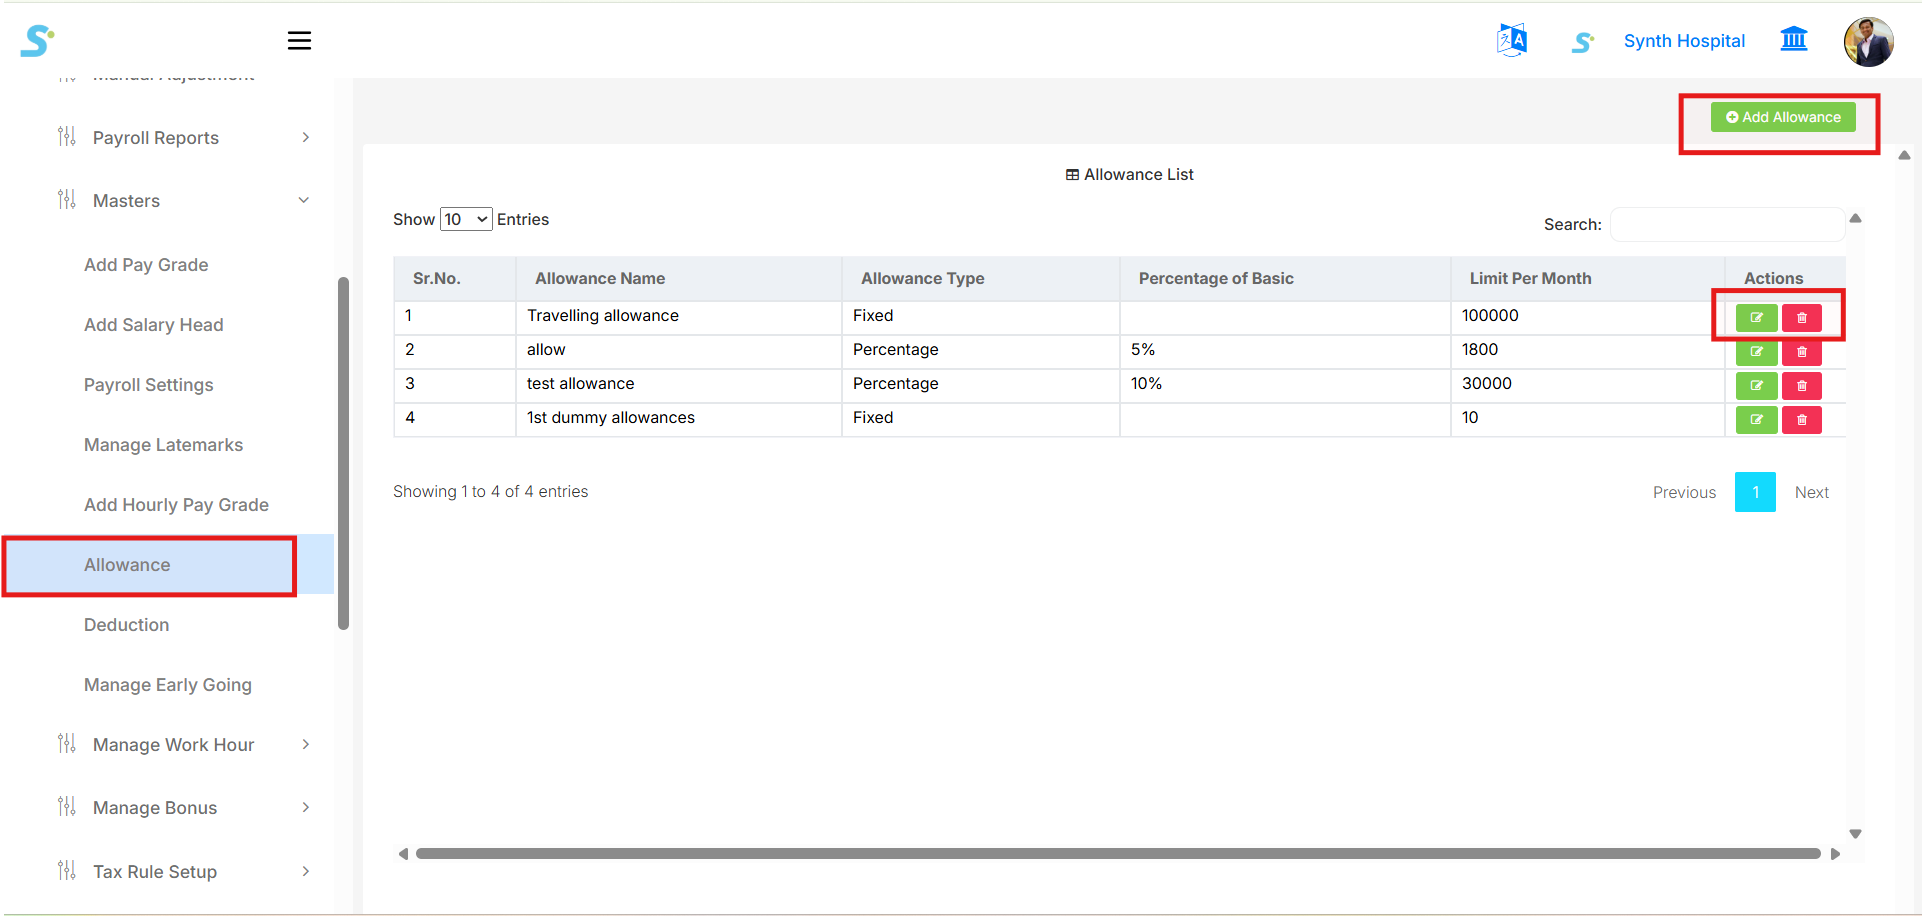
Step 36: Allowance
Go to Payroll Management > Masters > Allowance from the side menu.
This page is used to create and manage allowance salary components used in payroll calculation.
The Allowance List page displays all created allowances with details such as:
- Allowance Name
- Allowance Type
- Percentage of Basic
- Limit Per Month
- Actions
From the top-right side, you can click:
- Add Allowance to create a new allowance
- User Manual to open the related documentation
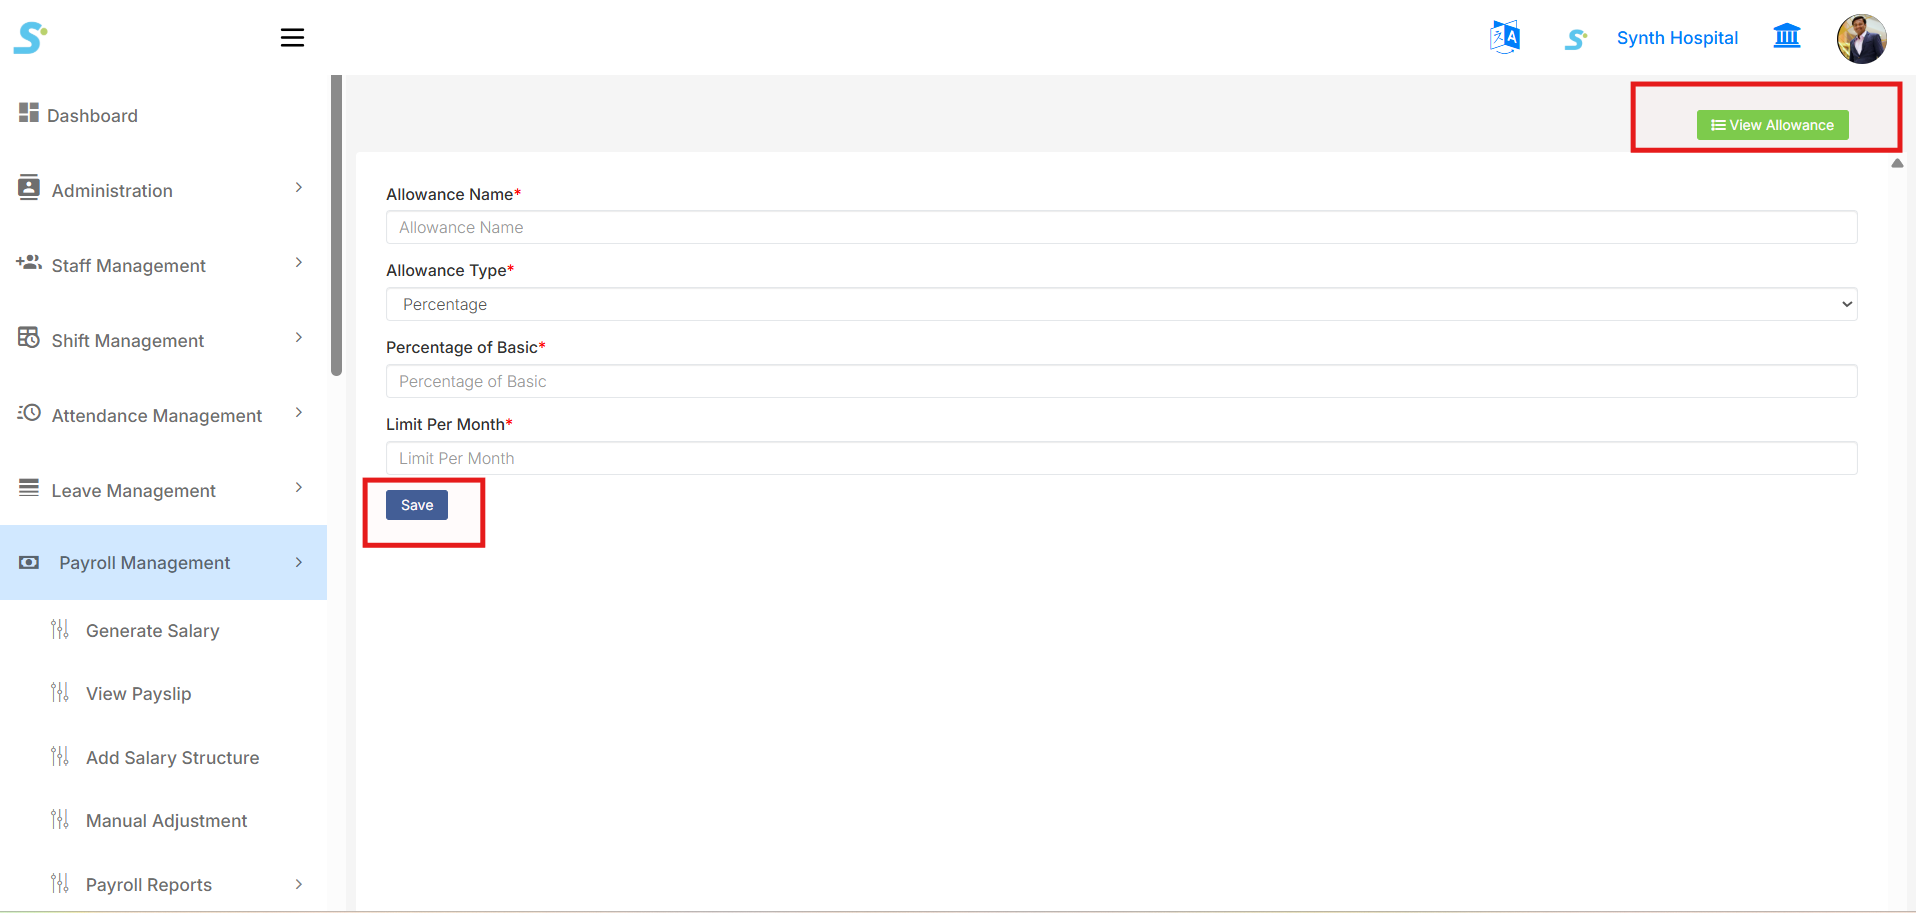
In the Add Allowance form, enter the required allowance details:
- Allowance Name
- Allowance Type
- Select Fixed if the allowance amount is fixed.
- Select Percentage if the allowance is calculated based on basic salary.
- Percentage of Basic
- Enter the percentage value when allowance type is percentage-based.
- Limit Per Month
- Enter the maximum monthly allowance limit.
After entering all required details, click the Save button to save the allowance.
Once saved, the allowance will be displayed in the allowance list.
You can use the Action buttons to:
- Edit the allowance
- Delete the allowance
Step 37: Deduction
Go to Payroll Management > Masters > Deduction from the side menu.
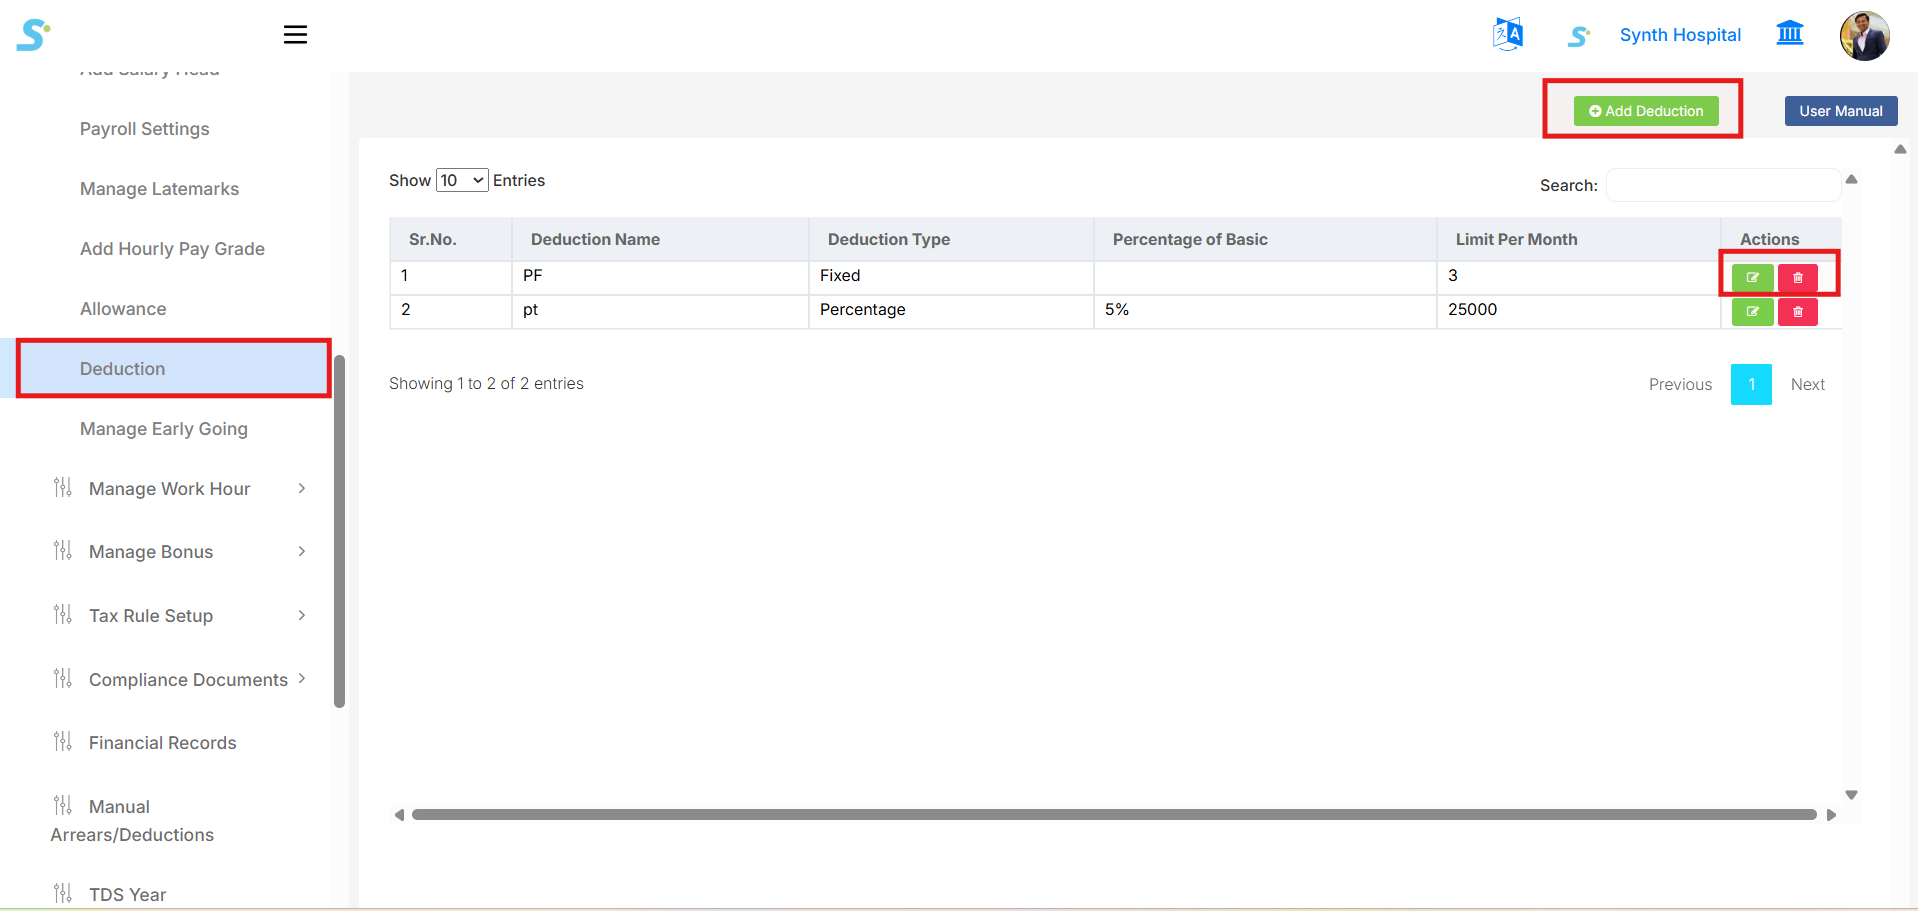
This page is used to create and manage deduction salary components used in payroll calculation.
The Deduction List page displays all created deductions with details such as:
- Deduction Name
- Deduction Type
- Percentage of Basic
- Limit Per Month
- Actions
From the top-right side, you can click:
- Add Deduction to create a new deduction
- User Manual to open the related documentation
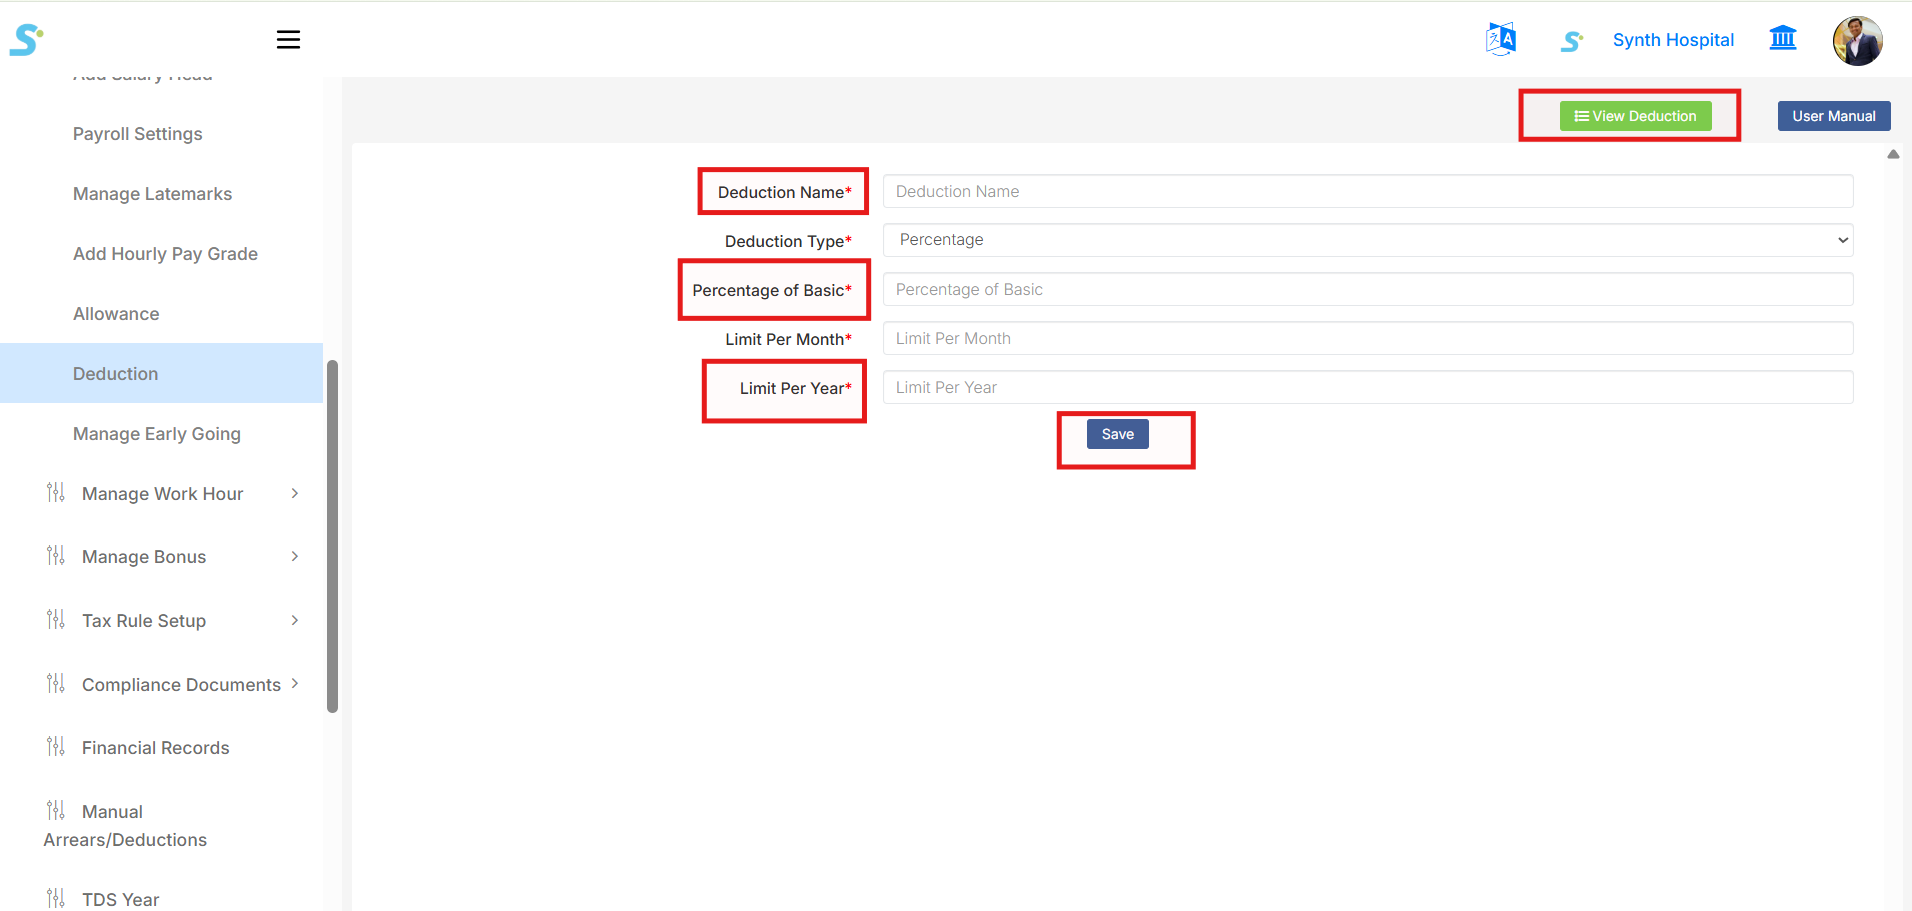
In the Add Deduction form, enter the required deduction details:
- Deduction Name
- Deduction Type
- Select Fixed if the deduction amount is fixed.
- Select Percentage if the deduction is calculated based on basic salary.
- Percentage of Basic
- Enter the percentage value when deduction type is percentage-based.
- Limit Per Month
- Enter the maximum monthly deduction limit.
- Limit Per Year
- Enter the yearly deduction limit, if applicable.
After entering all required details, click the Save button to save the deduction.
Once saved, the deduction will be displayed in the deduction list.
You can use the Action buttons to:
- Edit the deduction
- Delete the deduction
Step 38: Approve Work Hour
Go to Payroll Management > Manage Work Hour > Approve Work Hour from the side menu.
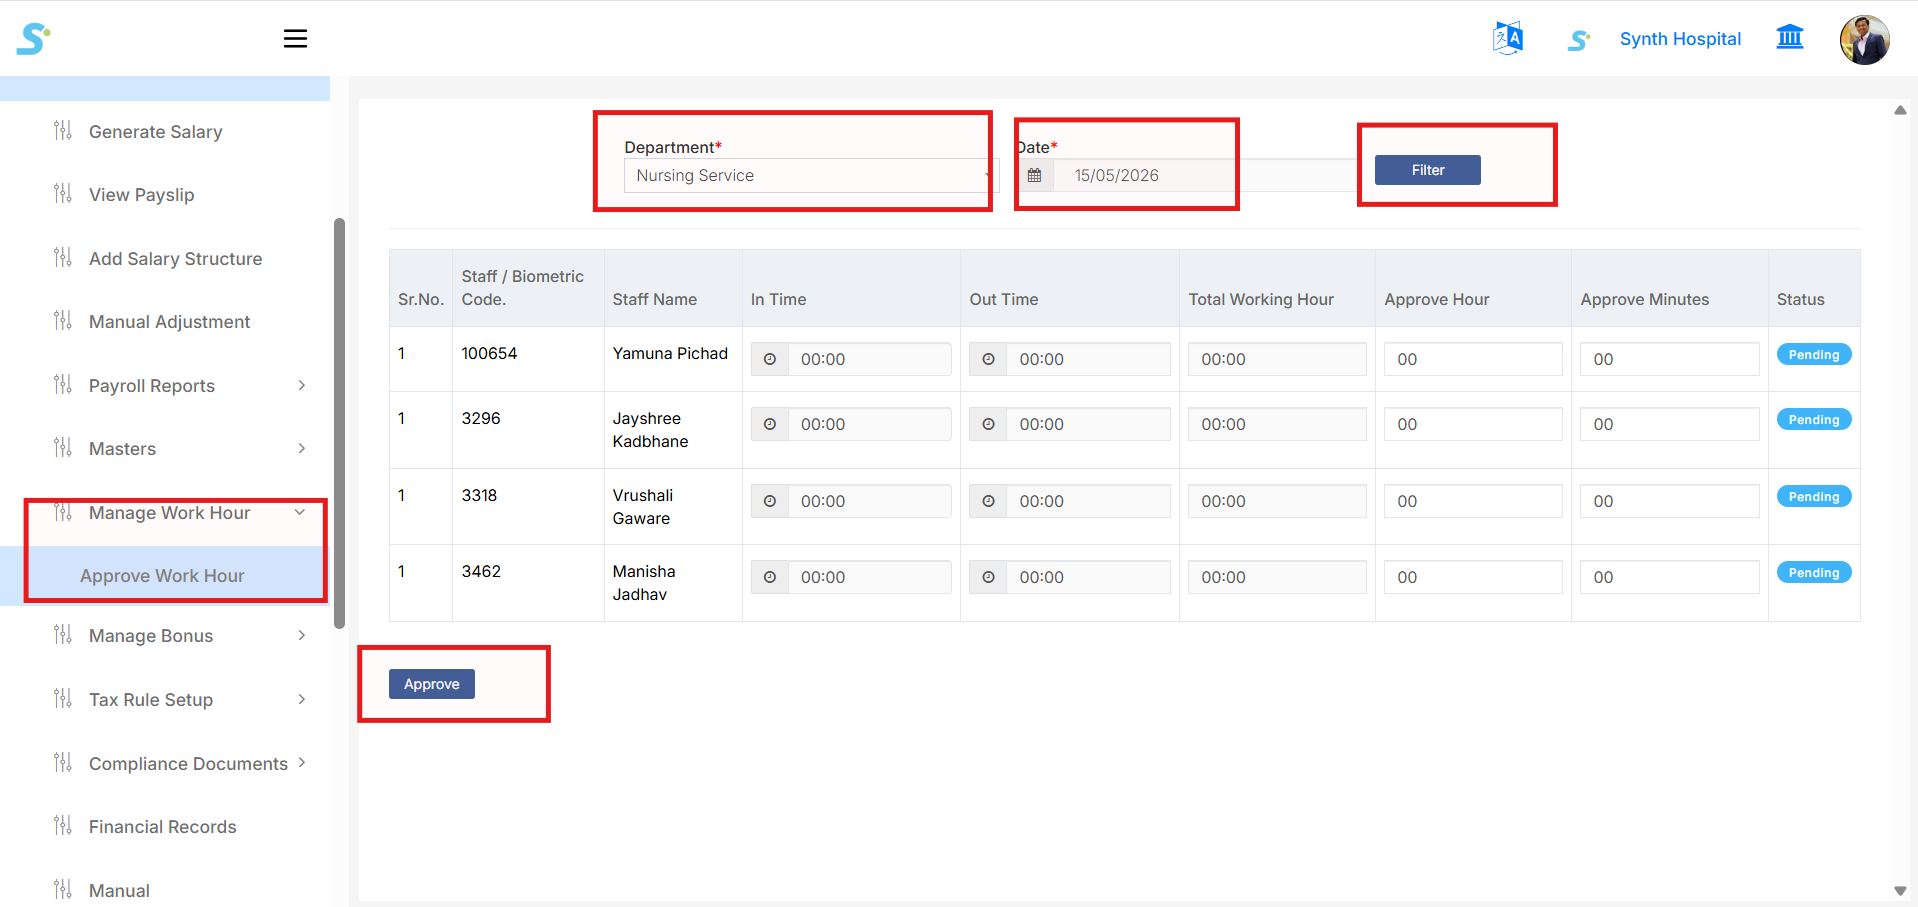
This page is used to review and approve employee work hours for a selected department and date.
Use the filters available on the screen:
-
Department
Select the department from the dropdown list. -
Date
Select the date for which you want to view work hour records. -
Filter
Click the Filter button to display employee work hour records based on the selected department and date.
After filtering, the system displays employee work hour details such as:
- Sr. No.
- Staff / Biometric Code
- Staff Name
- In Time
- Out Time
- Total Working Hour
- Approve Hour
- Approve Minutes
- Status
The Status column shows whether the record is still Pending or already processed.
To approve work hours:
- Check the displayed work hour details.
- Enter or update Approve Hour and Approve Minutes, if required.
- Click the Approve button.
- The selected work hour details will be approved and saved.
This screen helps manage employee working hours before payroll processing, especially for hourly wage or work-hour-based salary calculation.
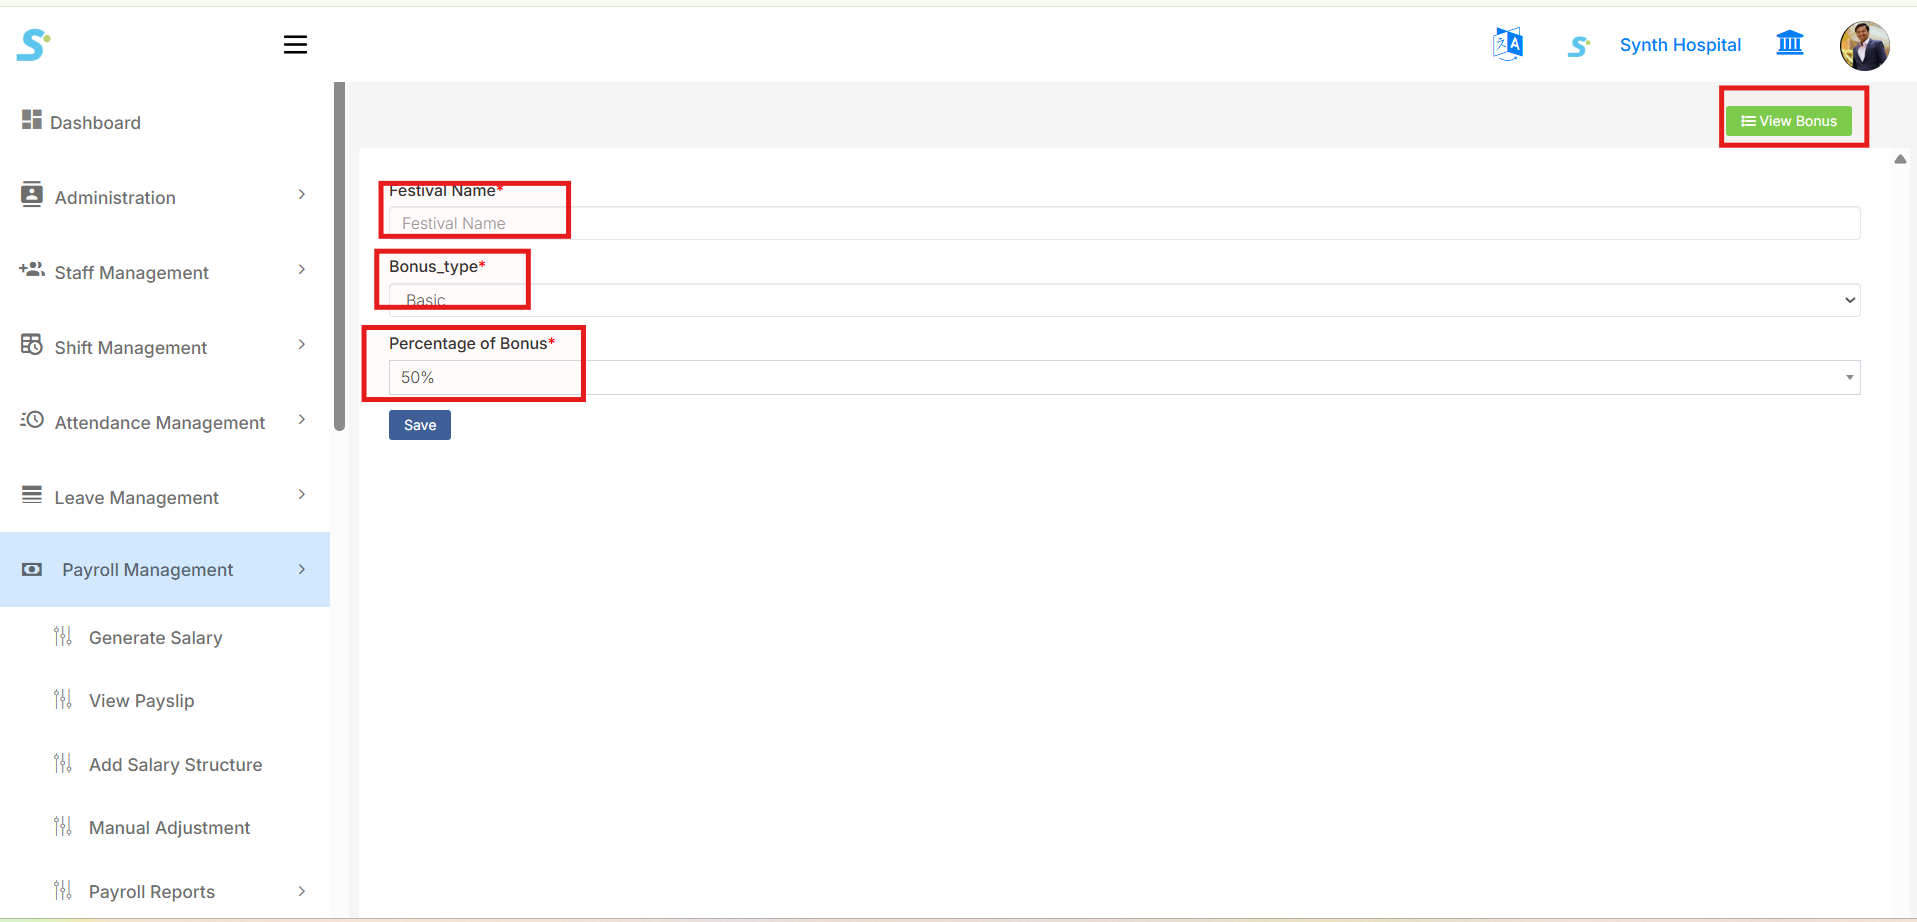
Step 39: Bonus Setting
Go to Payroll Management > Manage Bonus > Bonus Setting from the side menu.
This page is used to create and manage bonus settings for festivals or other bonus payments.
The Bonus Setting List page displays existing bonus settings with details such as:
- Festival Name
- Percentage of Bonus
- Actions
From the top-right side, you can click:
- Add New Bonus to create a new bonus setting
- User Manual to open the related documentation
In the Add Bonus form, enter the required bonus details:
- Festival Name
-
Enter the festival or bonus name, for example
Diwali. -
Bonus Type
-
Select the bonus calculation type, for example
Basic. -
Percentage of Bonus
- Select or enter the applicable bonus percentage, for example
50%.
After entering all required details, click the Save button to save the bonus setting.
Once saved, the bonus setting will be displayed in the bonus list.
You can use the Action buttons to:
- Edit the bonus setting
- Delete the bonus setting

Compliance Module
Step 40: Open Compliance Documents Module
- Go to the HRMS application portal and log in, then perform the below steps.
- From the left-side menu, click on Compliance Documents.
- Select PF-PT-ESIC from the dropdown list.
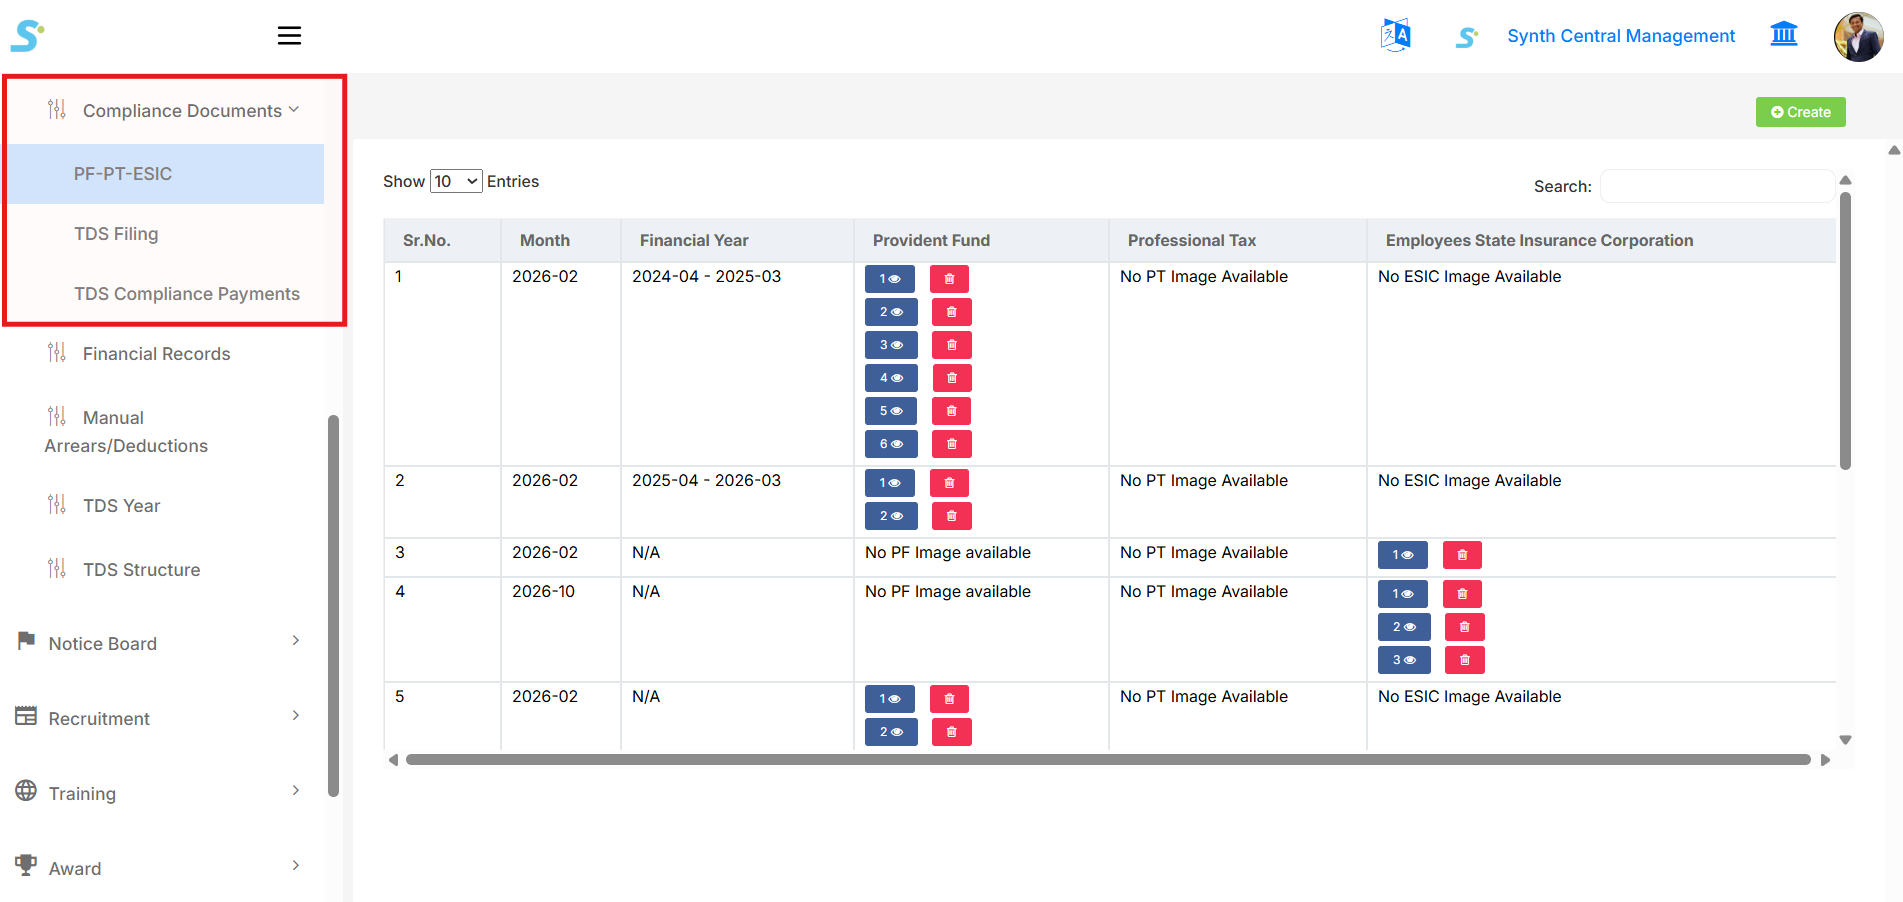
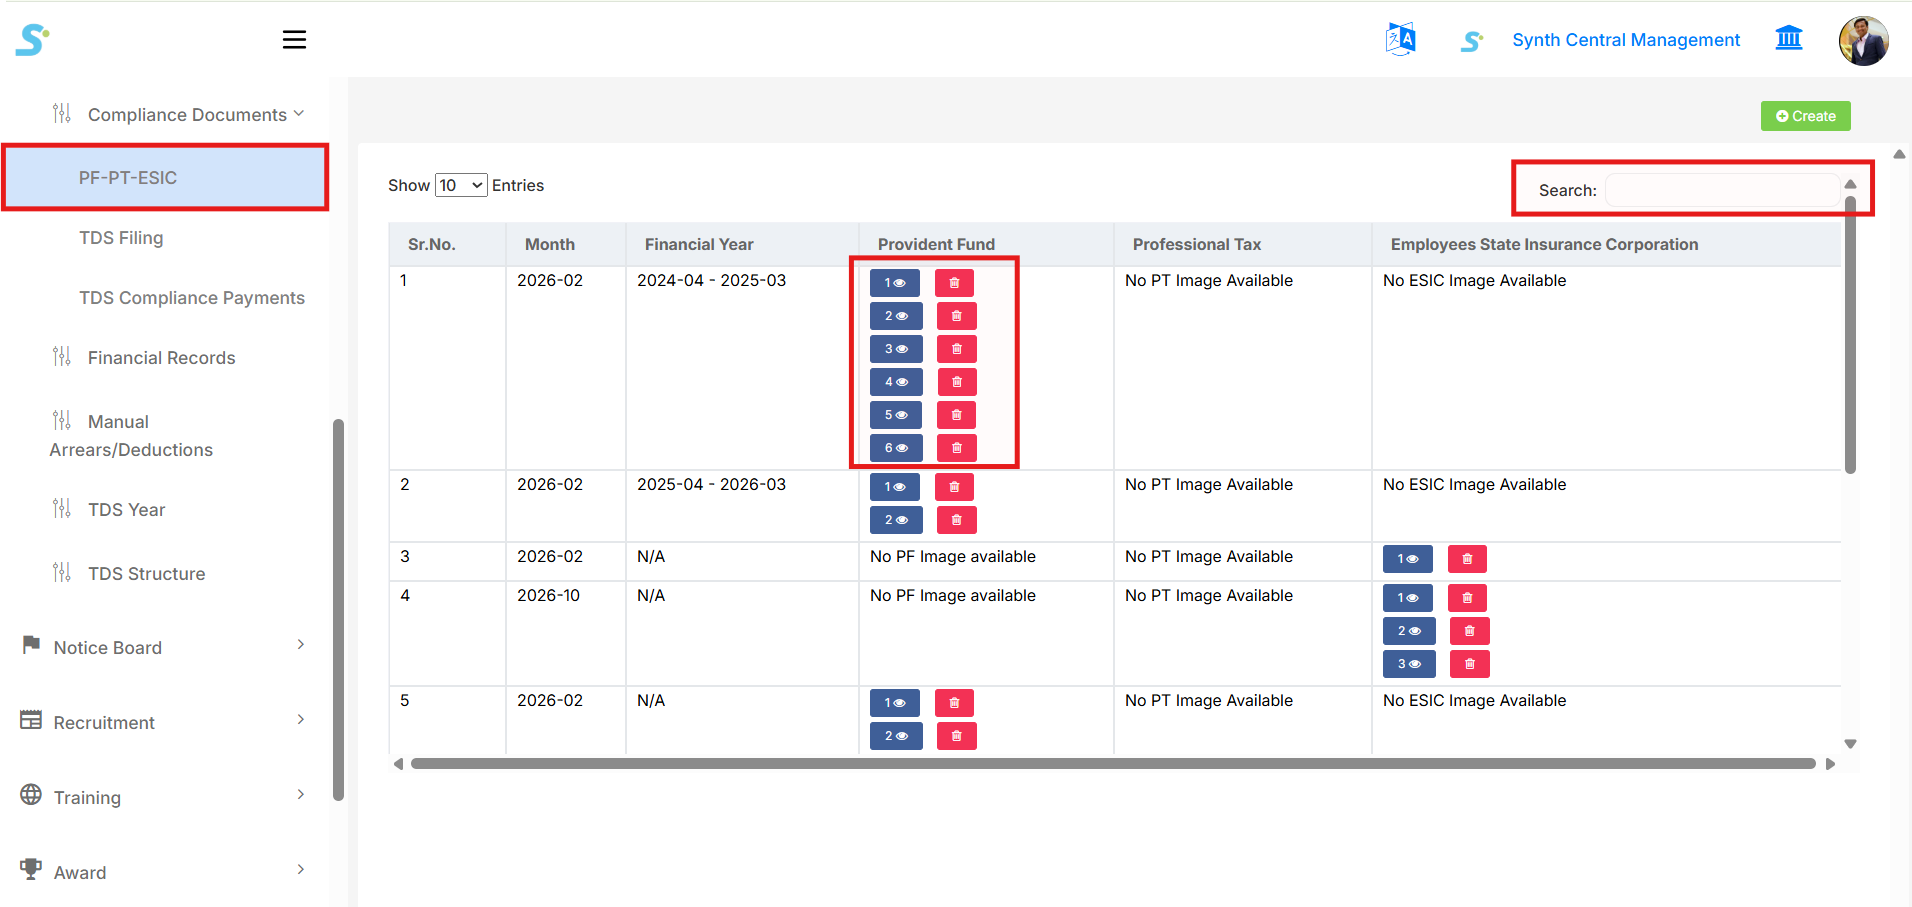
Step 41: View PF-PT-ESIC Records
After clicking on PF-PT-ESIC, the listing screen will open.
On this page, you can view:
- Sr. No.
- Month
- Financial Year
- Provident Fund (PF) Documents
- Professional Tax (PT) Documents
- Employees State Insurance Corporation (ESIC) Documents
You can also:
- Search records
- Change number of entries
- View uploaded documents
- Delete uploaded documents
Step 42: Create New Compliance Entry
- Click on the Create button located at the top-right corner of the screen.
- The Compliance Entry Form will open.
Step 43: Enter Compliance Details
- Select Type* (PF / PT / ESIC).
- Select Financial Year*.
- Select Month*.
- Click on Choose Files to upload the compliance document.
Fields marked with (*) are mandatory.
Step 44: Save Compliance Record
- After filling all required details, click on the Save button.
- The compliance document will be saved successfully.
- The uploaded record will now appear in the listing screen.
Step 45: View or Delete Uploaded Document
- Click on the Eye icon to view the uploaded document.
- Click on the Delete icon to remove the document if required.
Compliance Process Completed
- The document is stored month-wise.
- Records can be accessed anytime.
- Useful for audit and statutory compliance verification.
TDS Filing Module
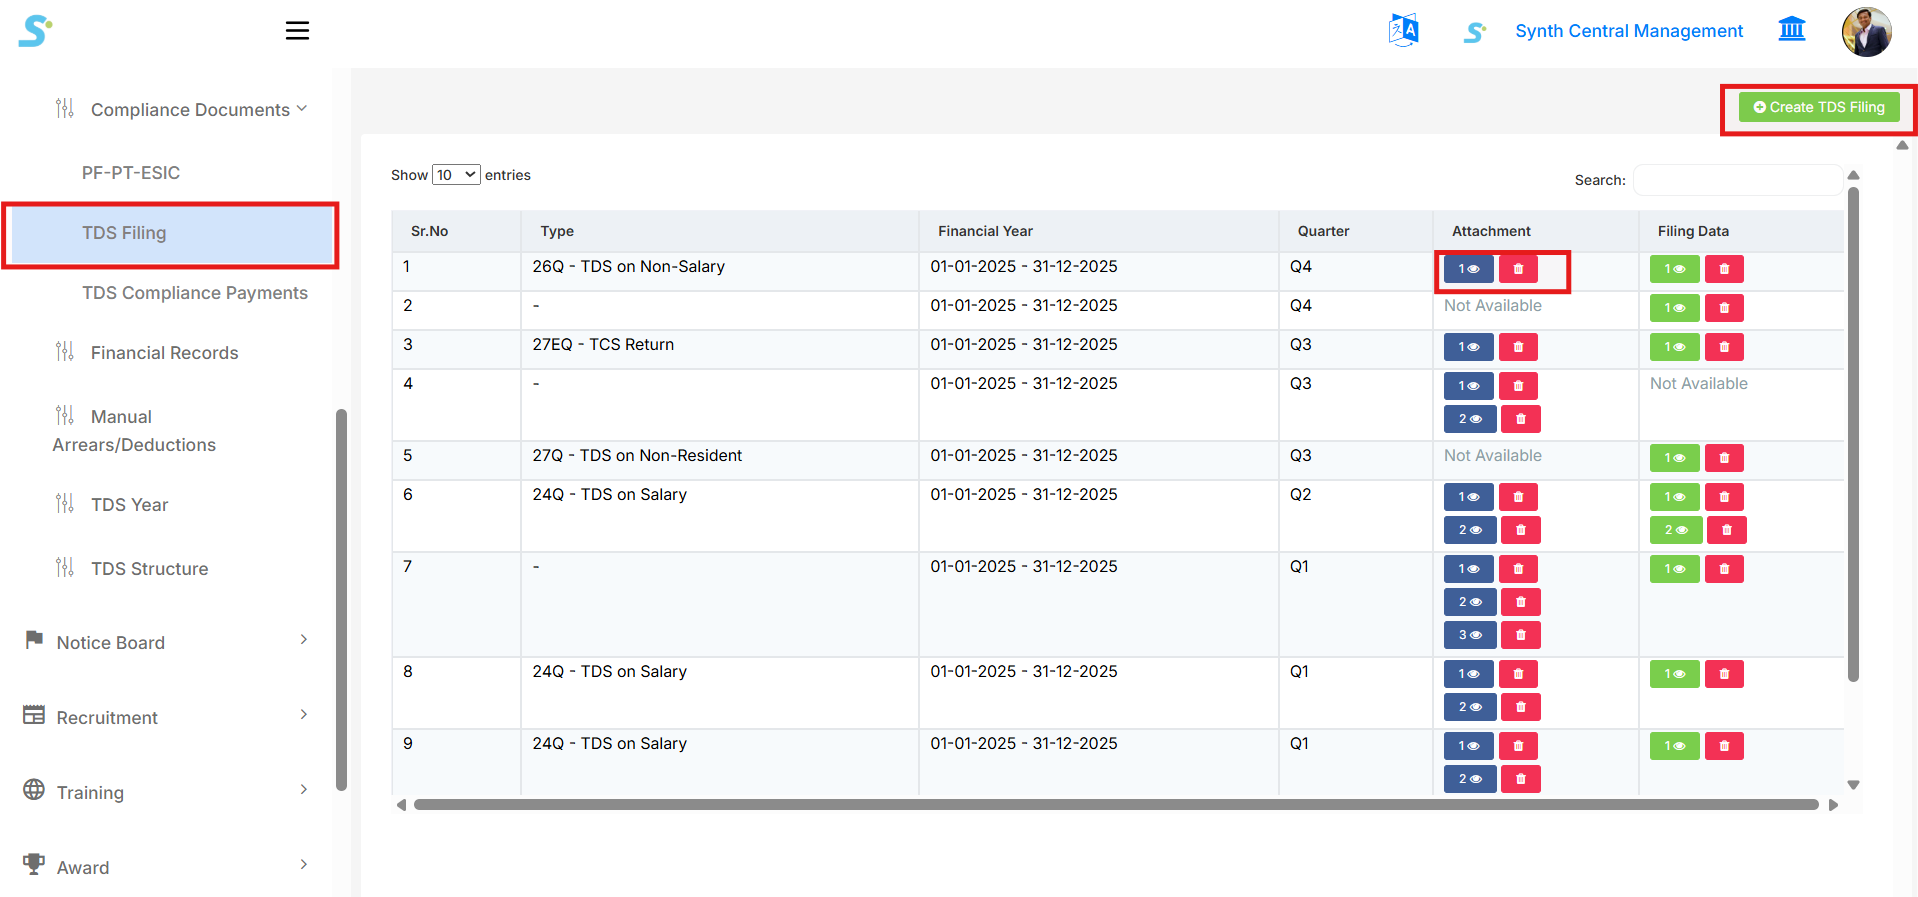
Step 46: Open TDS Filing Module
- Go to the HRMS application portal and log in, then perform the below steps.
- From the left-side menu, click on Compliance Documents.
- Select TDS Filing from the dropdown list.
Step 47: View TDS Filing Records
After clicking on TDS Filing, the listing screen will open.
On this page, you can view:
- Sr. No.
- Type (24Q, 26Q, 27Q, 27EQ, etc.)
- Financial Year
- Quarter
- Attachment
- Filing Data
You can also:
- Search records
- Change number of entries
- View uploaded attachments
- Delete attachments
- Create new TDS filing entry
Step 48: Create New TDS Filing
- Click on the Create TDS Filing button located at the top-right corner.
- The TDS Filing Form will open.
Step 49: Enter TDS Filing Details
- Select Type* (24Q / 26Q / 27Q / 27EQ).
- Select Financial Year*.
- Select Quarter* (Q1 / Q2 / Q3 / Q4).
- Upload Attachment (if applicable).
- Upload Filing Data file.
Fields marked with (*) are mandatory.
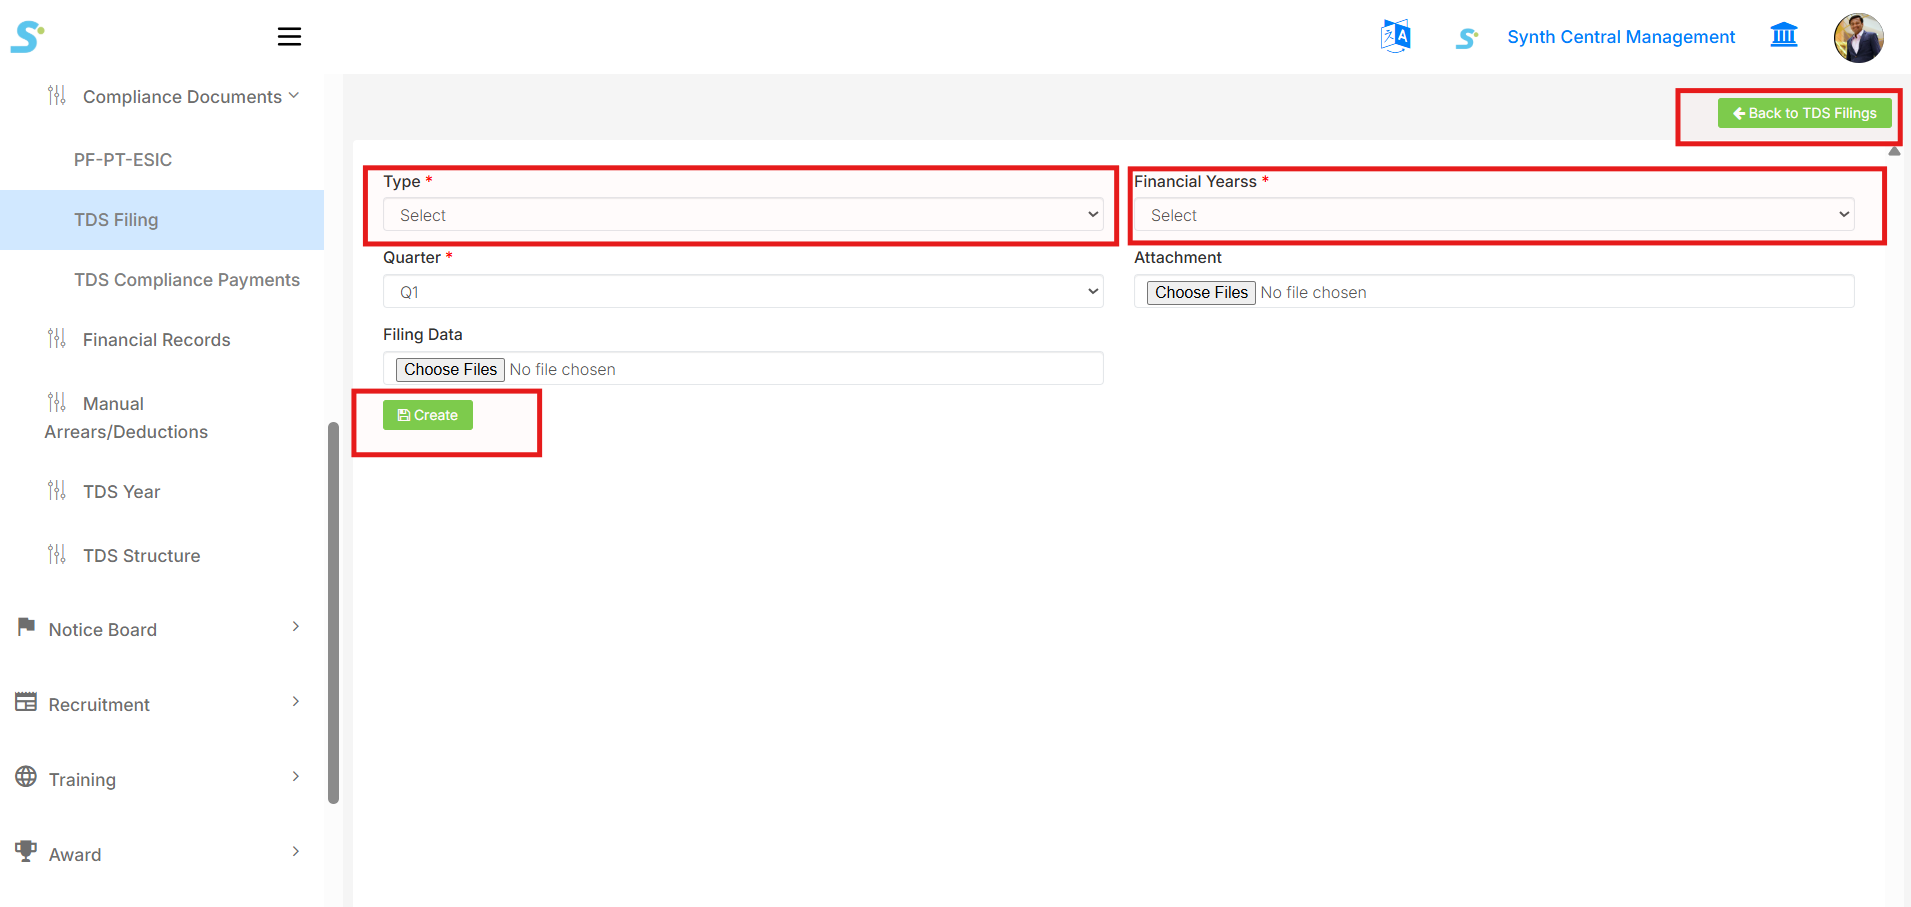
Step 50: Save TDS Filing Record
- After filling all required details, click on the Create button.
- The TDS filing record will be saved successfully.
- The uploaded record will now appear in the listing screen.
Step 51: View or Delete Uploaded Files
- Click on the Eye icon to view the uploaded attachment or filing data.
- Click on the Delete icon to remove the file if required.
TDS Filing Process Completed
- TDS records are stored quarter-wise.
- Records can be accessed anytime.
- Useful for audit and statutory compliance verification.
TDS Compliance Payments
Step 52: Open TDS Compliance Payments
- Go to the HRMS application portal and log in, then perform the below steps.
- From the left-side menu, click on Compliance Documents.
- Select TDS Compliance Payments from the dropdown list.
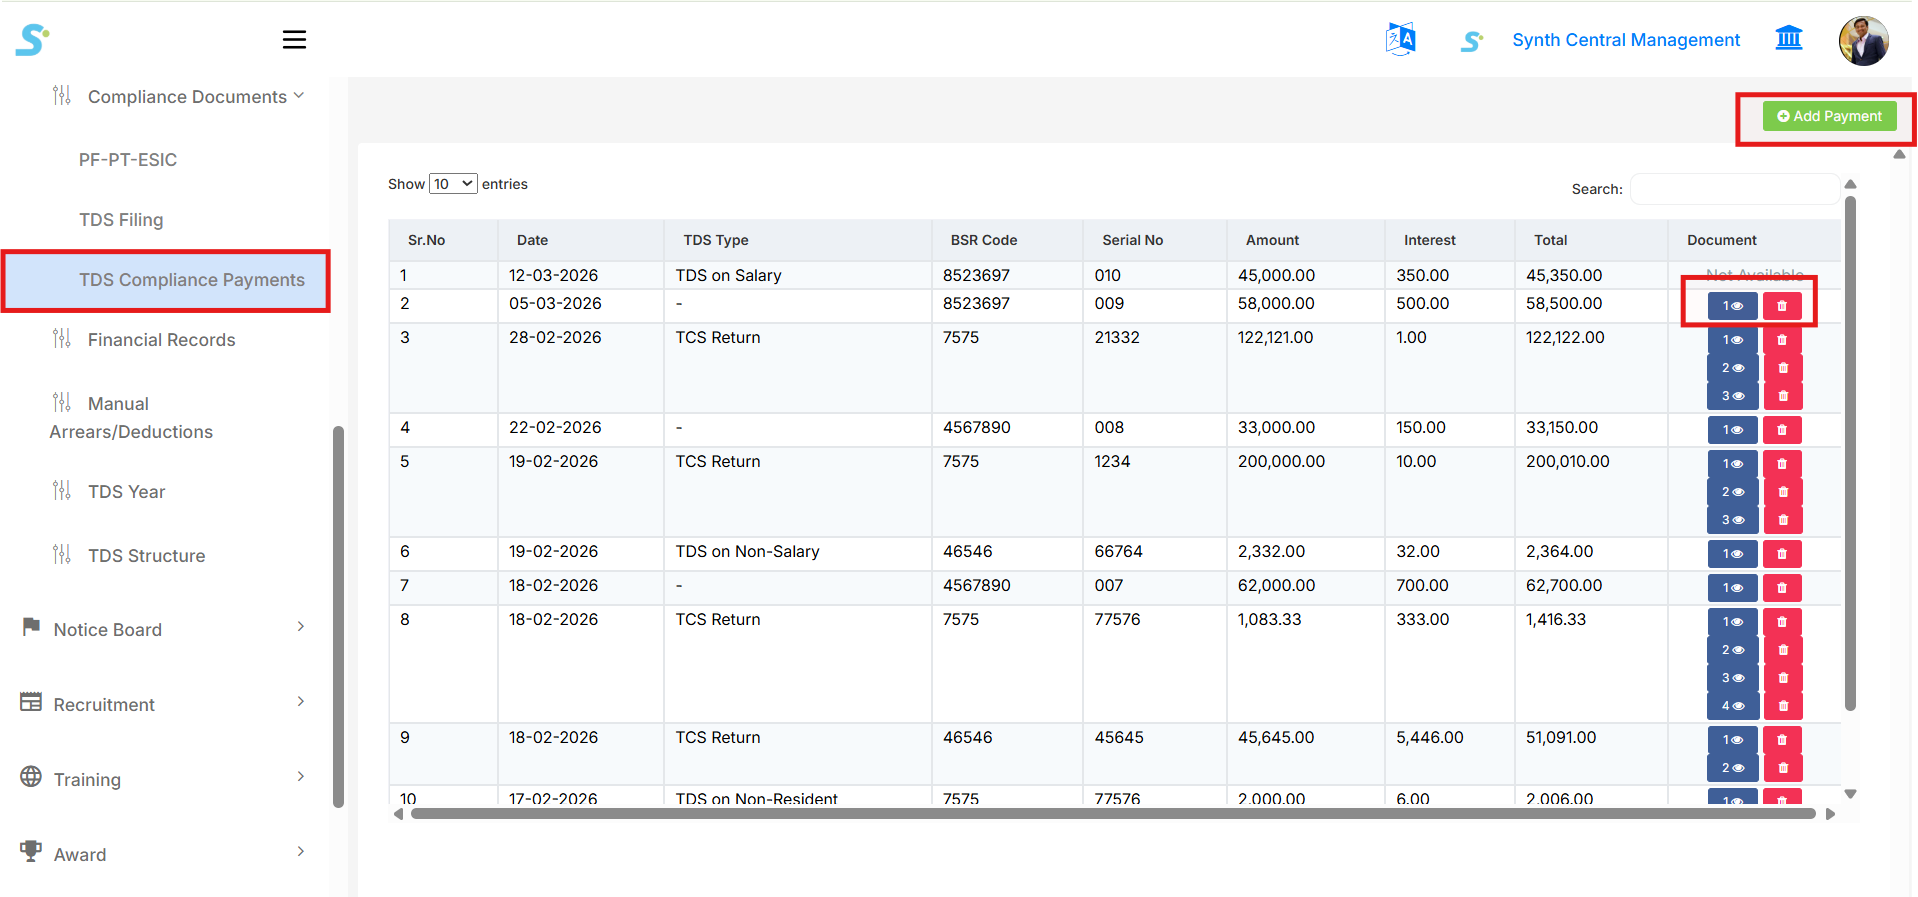
Step 53: View TDS Compliance Payments
After clicking on TDS Compliance Payments, the listing screen will open.
On this page, you can view:
- Sr. No.
- Date of Payment
- TDS Type (TDS on Salary, TCS Return, TDS on Non-Salary, etc.)
- BSR Code
- Serial No.
- Amount Paid
- Interest
- Total
- Document (if available)
You can also:
- Search records
- Change number of entries displayed
- View uploaded documents
- Delete records
- Add new TDS Compliance Payment entry
Step 54: Add New TDS Compliance Payment
- Click on the Add Payment button located at the top-right corner.
- The Payment Form will open.
Step 55: Enter Payment Details
- Select Payment Date.
- Enter BSR Code.
- Enter CIN No. (if applicable).
- Select TDS Type (TDS on Salary, TCS Return, etc.).
- Enter Serial No..
- Enter the Amount.
- Enter Interest (if applicable).
- Upload any relevant Document.
- Enter any Remarks.
Fields marked with (*) are mandatory.

Step 56: Save TDS Compliance Payment Record
- After filling all required details, click on the Save button.
- The TDS compliance payment record will be saved successfully.
- The uploaded record will now appear in the listing screen.
Step 57: View or Delete Uploaded Documents
- Click on the Eye icon to view the uploaded document.
- Click on the Delete icon to remove the document if needed.
TDS Compliance Payment Process Completed
- TDS compliance payments are tracked and stored.
- Records can be accessed anytimes.
- Useful for audit and statutory compliance verification.
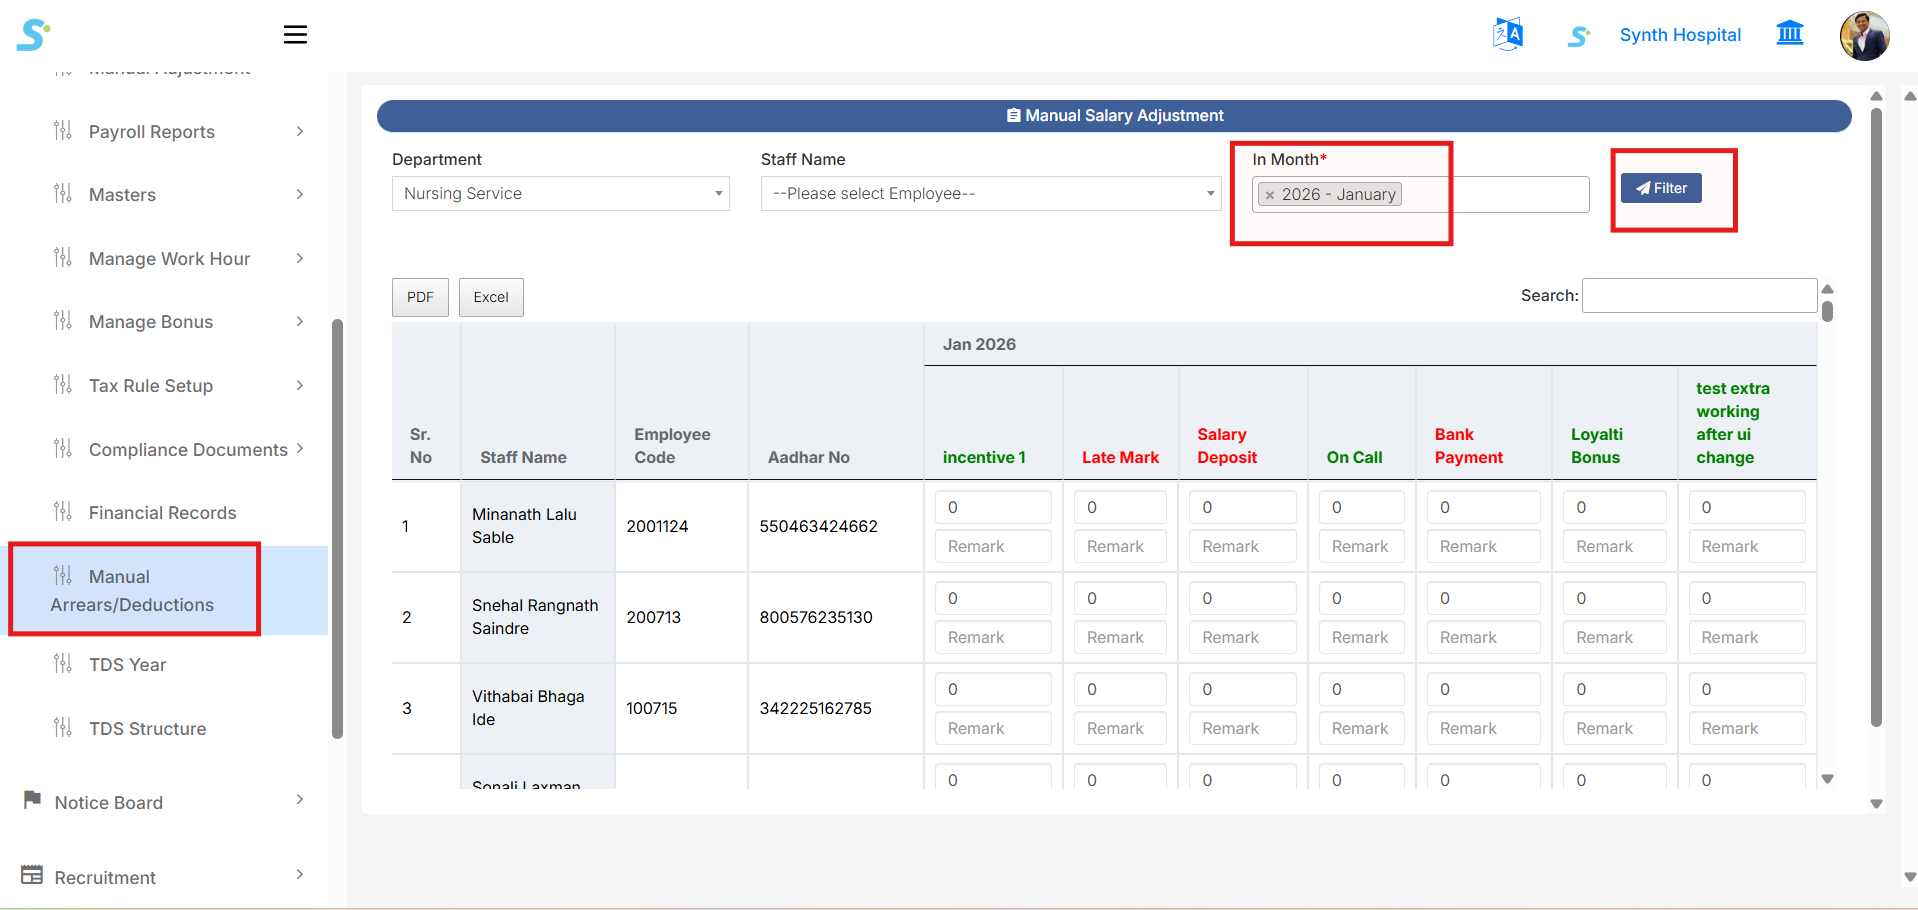
Step 58: Manual Arrears/Deductions
Go to Payroll Management > Manual Arrears/Deductions from the side menu.
This page is used to add or update manual salary adjustments for employees for a selected month.
Use the filters available on the screen:
- Department
-
Select the department from the dropdown list.
-
Staff Name
-
Select a specific employee or keep the default selection to view employees based on the selected department.
-
In Month
-
Select the salary month for which manual arrears or deductions need to be added.
-
Filter
- Click the Filter button to display employee records for the selected department, staff, and month.
After filtering, the system displays employee details such as:
- Sr. No
- Staff Name
- Employee Code
- Aadhaar No
- Manual adjustment heads for the selected month
The adjustment heads may include items such as:
- Incentive
- Late Mark
- Salary Deposit
- On Call
- Bank Payment
- Loyalty Bonus
- Other configured earning or deduction heads
For each employee, you can enter:
- Amount
-
Enter the adjustment amount under the required head.
-
Remark
- Enter a remark or reason for the adjustment.
After entering the required manual arrears or deductions, save/update the records as per the available action on the page.
This screen helps manage one-time manual additions or deductions before salary processing.