Settings HRMS Module
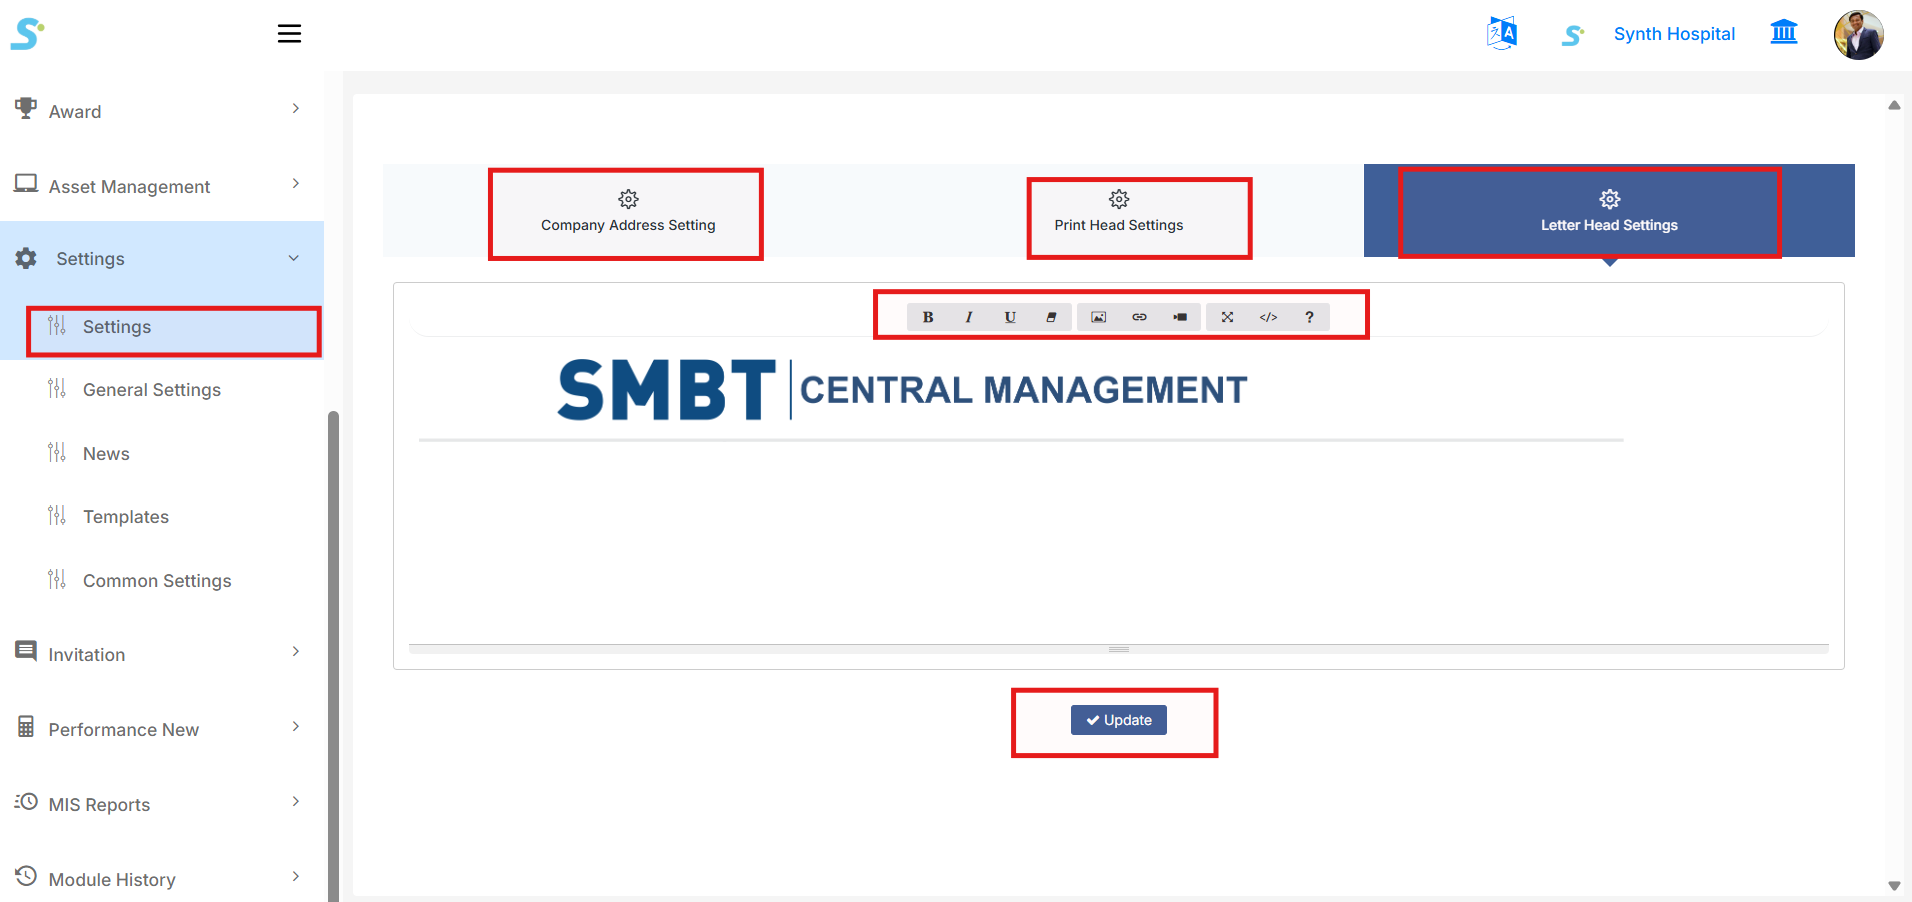
Step 1: Settings Configuration
Go to Settings > Settings from the side menu.
This page is used to configure organization-level settings such as:
- Company Address Setting
- Print Head Settings
- Letter Head Settings
Click the required tab to update the related setting.
Company Address Setting
Use this section to configure or update the organization address details.
Print Head Settings
Use this section to configure print header information used in reports, documents, and printable formats.
Letter Head Settings
Use this section to configure letterhead content for official documents.
The editor provides formatting options such as:
- Bold
- Italic
- Underline
- Alignment
- Insert image
- Insert link
- Code view
- Help option
After making the required changes, click the Update button to save the settings.
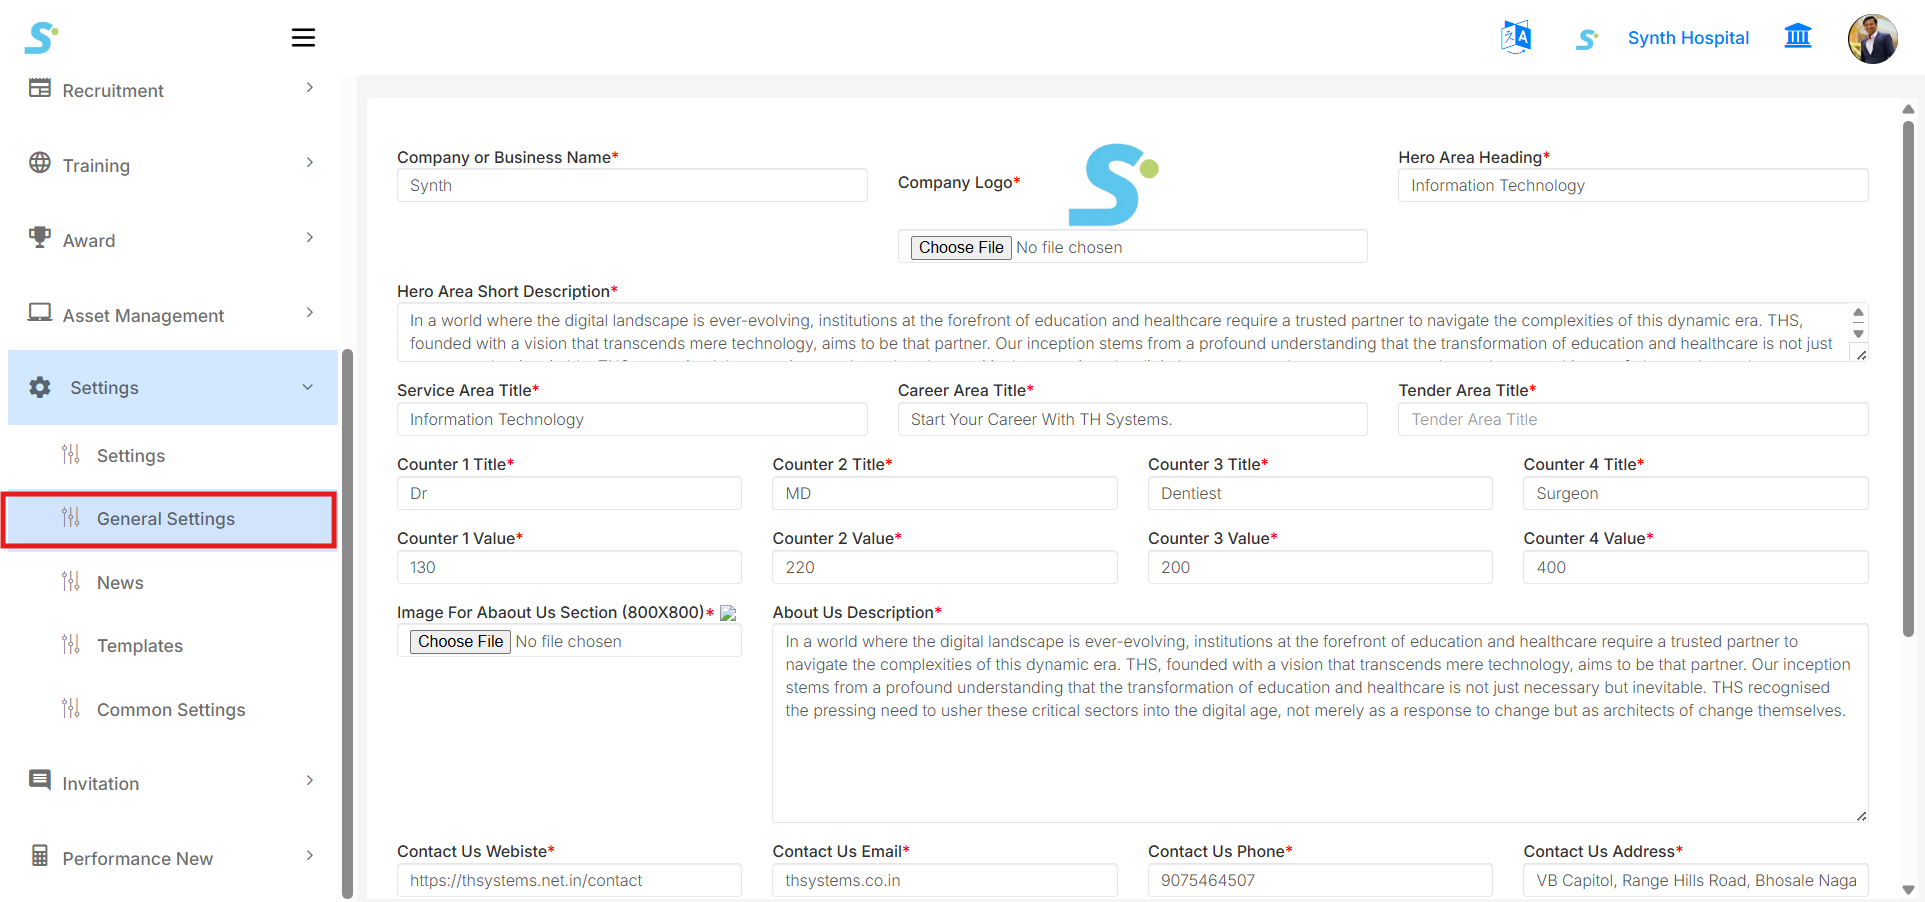
Step 2: General Settings
Go to Settings > General Settings from the side menu.
This page is used to manage company website and HRMS-related configuration details.
You can update general organization information such as:
- Company or Business Name
- Company Logo
- Hero Area Heading
- Hero Area Short Description
- Service Area Title
- Career Area Title
- Tender Area Title
- Counter Titles
- Counter Values
- About Us Image
- About Us Description
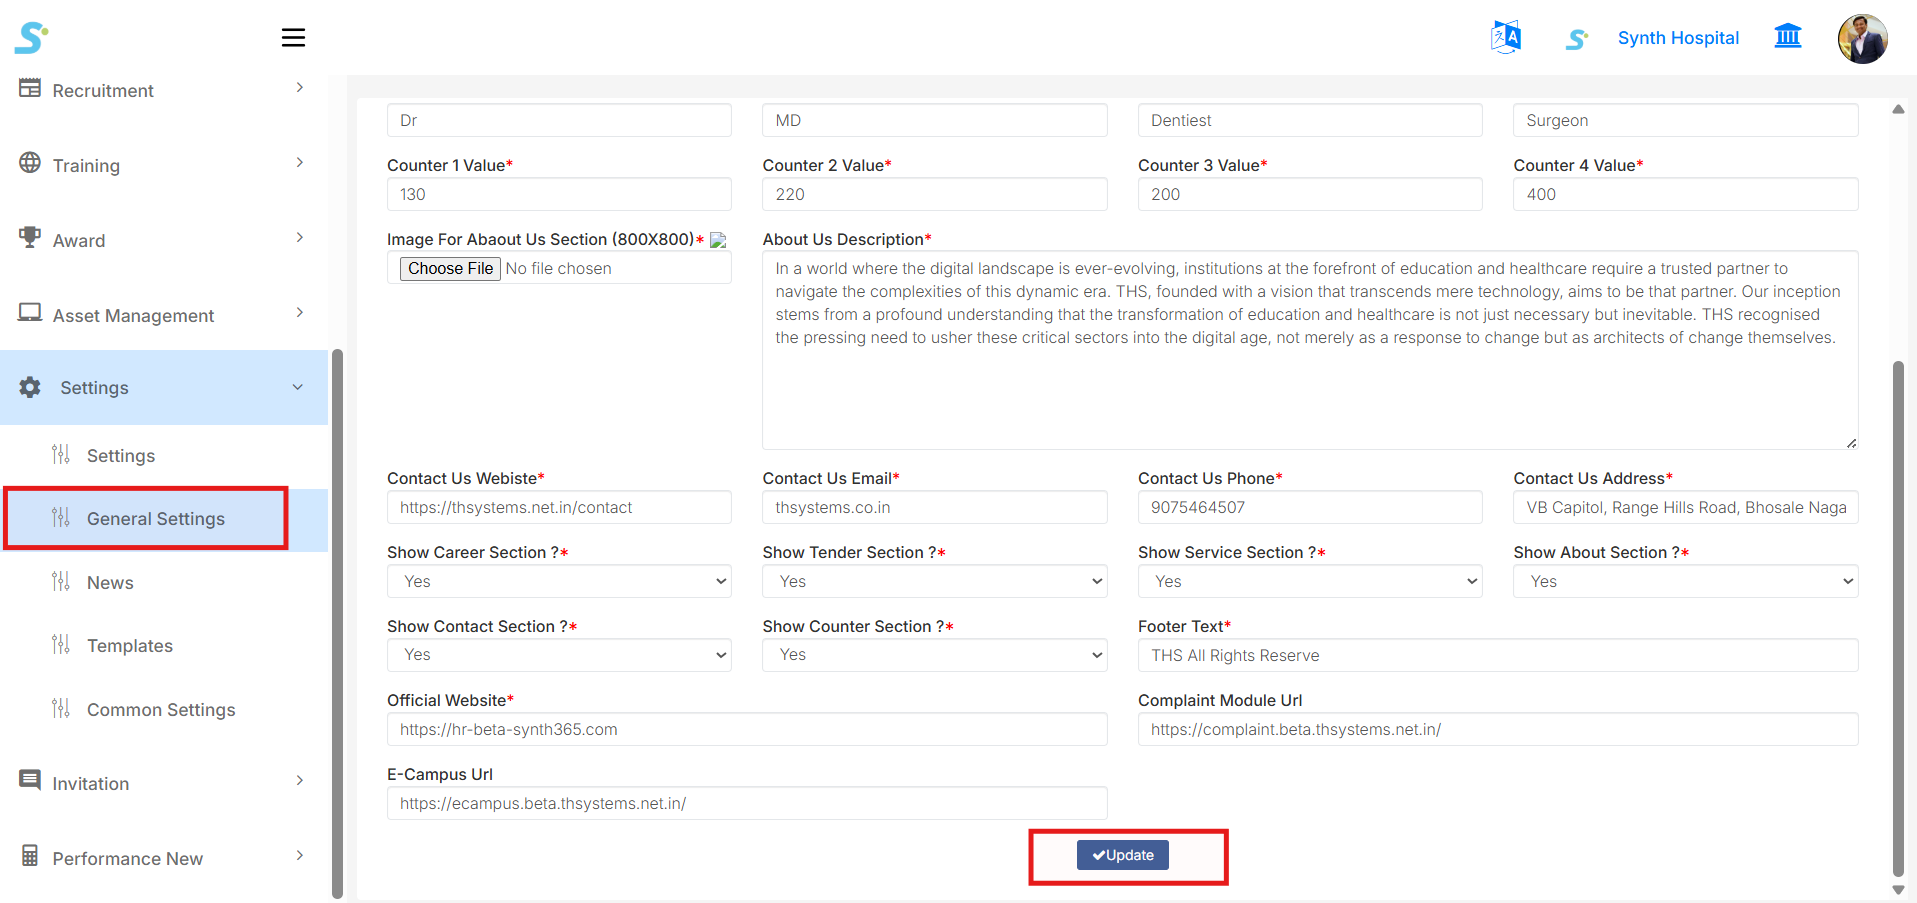
You can also configure contact and website-related details:
- Contact Us Website
- Contact Us Email
- Contact Us Phone
- Contact Us Address
- Official Website
- Complaint Module URL
- E-campus URL
- Footer Text
Section visibility settings are also available, such as:
- Show Career Section
- Show Tender Section
- Show Service Section
- Show About Section
- Show Contact Section
- Show Counter Section
Select Yes or No as required.
After updating all required information, click the Update button to save changes.
Step 3: General Settings Form Details
The General Settings form contains multiple fields used to control public-facing website content and organization information.
Important fields include:
- Company or Business Name
-
Enter the company or organization name.
-
Company Logo
-
Upload or update the company logo.
-
Hero Area Heading
-
Enter the heading shown in the hero/banner section.
-
Hero Area Short Description
-
Enter a short description for the hero section.
-
Service Area Title
-
Enter the title for the service section.
-
Career Area Title
-
Enter the title for the career section.
-
Tender Area Title
-
Enter the title for the tender section.
-
Counter 1 / 2 / 3 / 4 Title
-
Enter the counter labels.
-
Counter 1 / 2 / 3 / 4 Value
- Enter the counter numbers.
These fields help manage website content and basic display information.
Step 4: News List
Go to Settings > News from the side menu.
This page displays the list of created news records.
You can filter news records using:
- Choose Dates
- Type of Media
- Related Whom
The list displays news information such as:
- Sr. No.
- News Title
- Date
- Type of Media
- Type of News
- Newspaper Name
- Related Whom
- Photo
- Actions
Available actions include:
- Edit
- Delete
You can also export records using:
- Export Excel
- Export PDF
From the top-right side, click Add News to create a new news record.

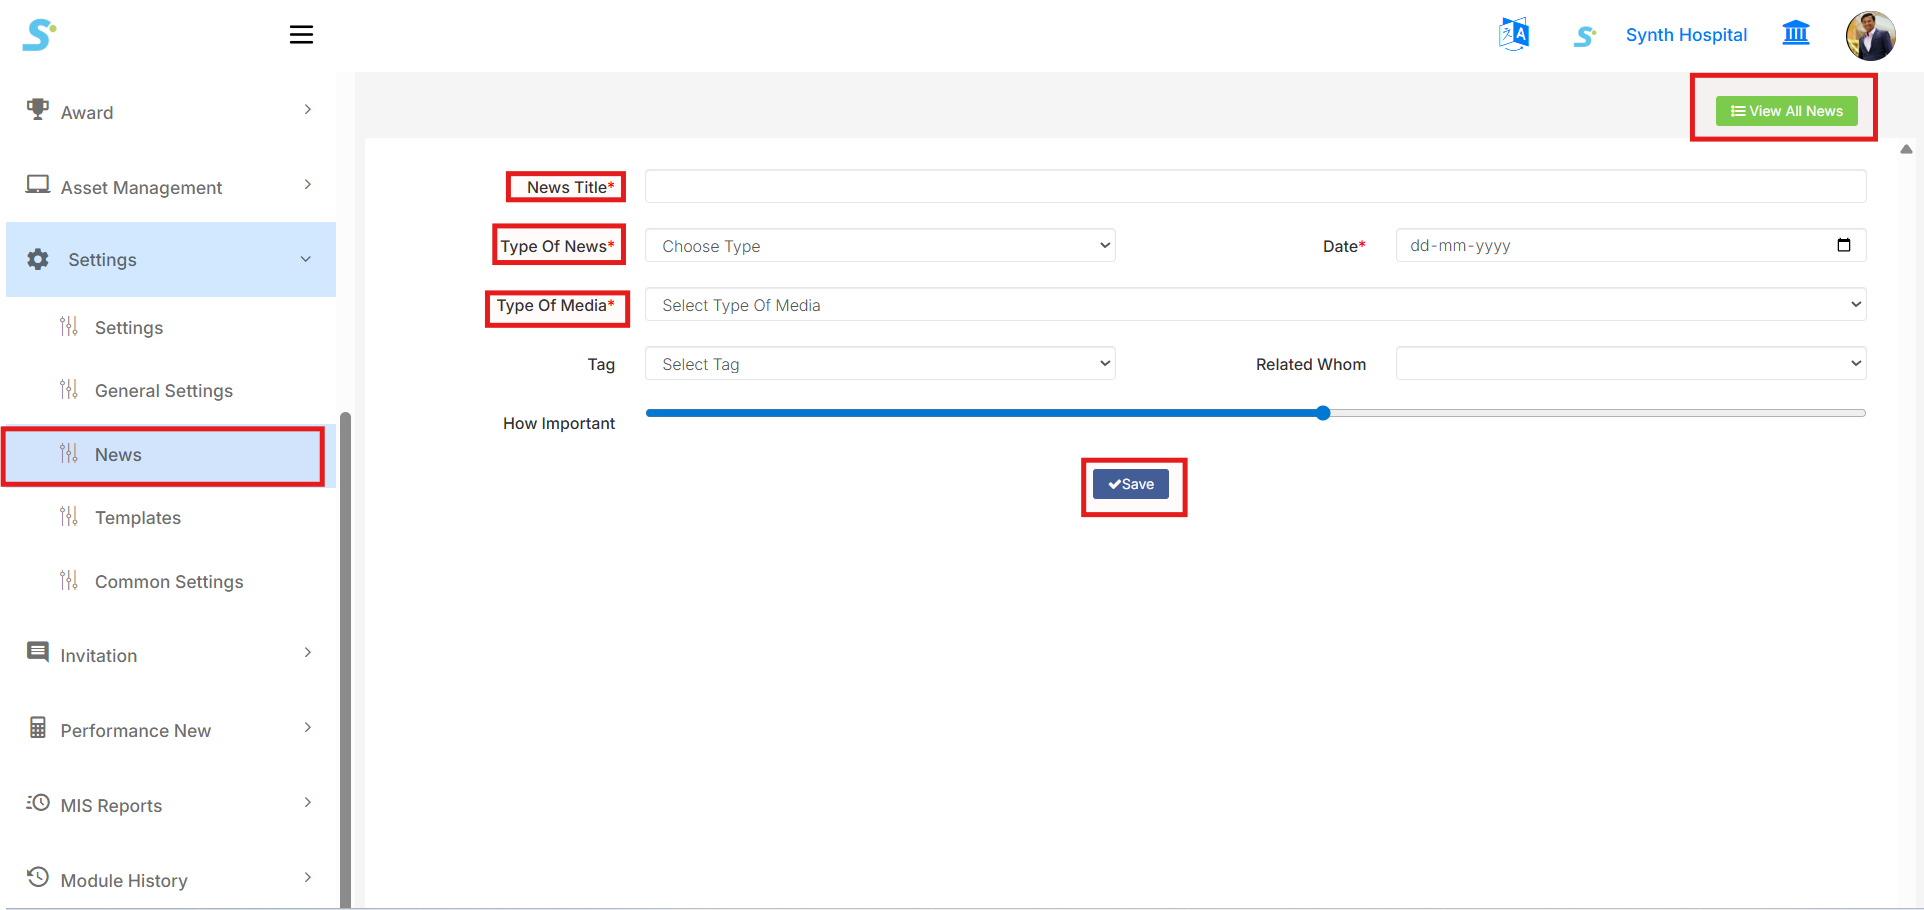
Step 5: Add News
Click Add News from the News list page.
Enter the required news details:
- News Title
-
Enter the title of the news.
-
Type of News
-
Select the news type from the dropdown.
-
Date
-
Select the news date.
-
Type of Media
-
Select the media type.
-
Tag
-
Select the related tag, if required.
-
Related Whom
-
Select the related person or category.
-
How Important
- Set the importance level using the slider.
After entering all required information, click the Save button.
Once saved, the news record will be displayed in the News list.
From the top-right side, click View All News to return to the news list page.
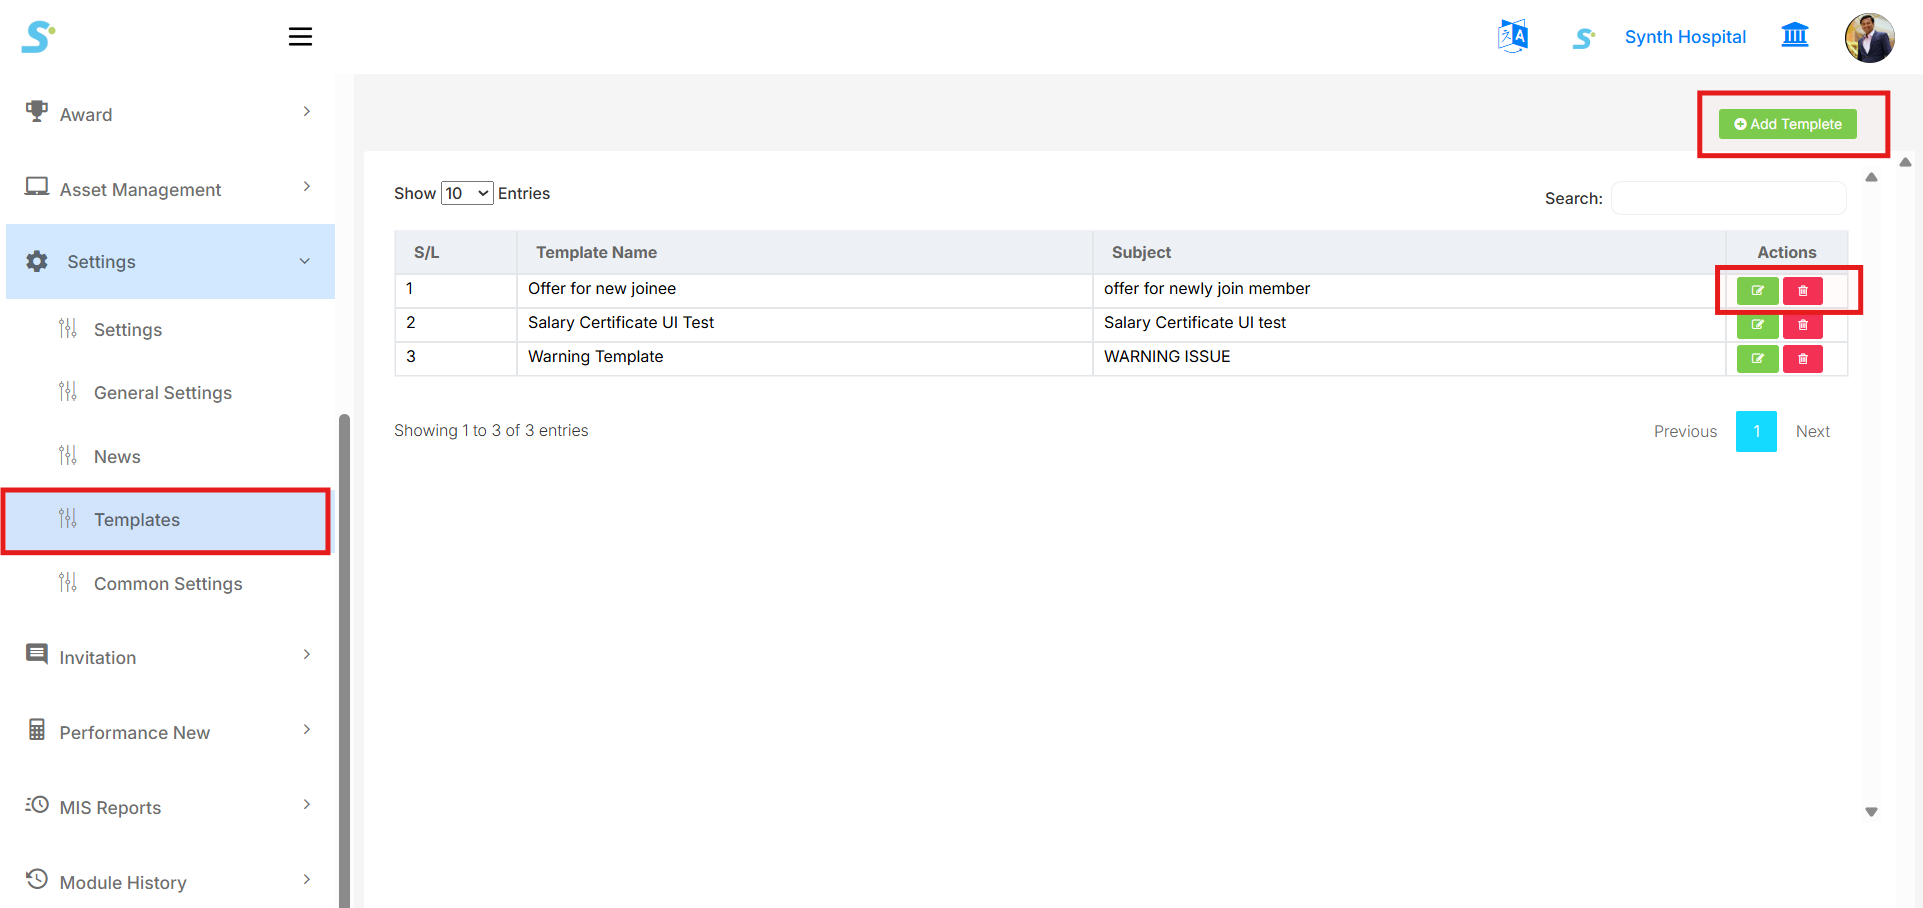
Step 6: Templates List
Go to Settings > Templates from the side menu.
This page displays the list of available templates.
The template list shows:
- S/L
- Template Name
- Subject
- Actions
Available actions include:
- Edit
- Delete
From the top-right side, click Add Template to create a new template.
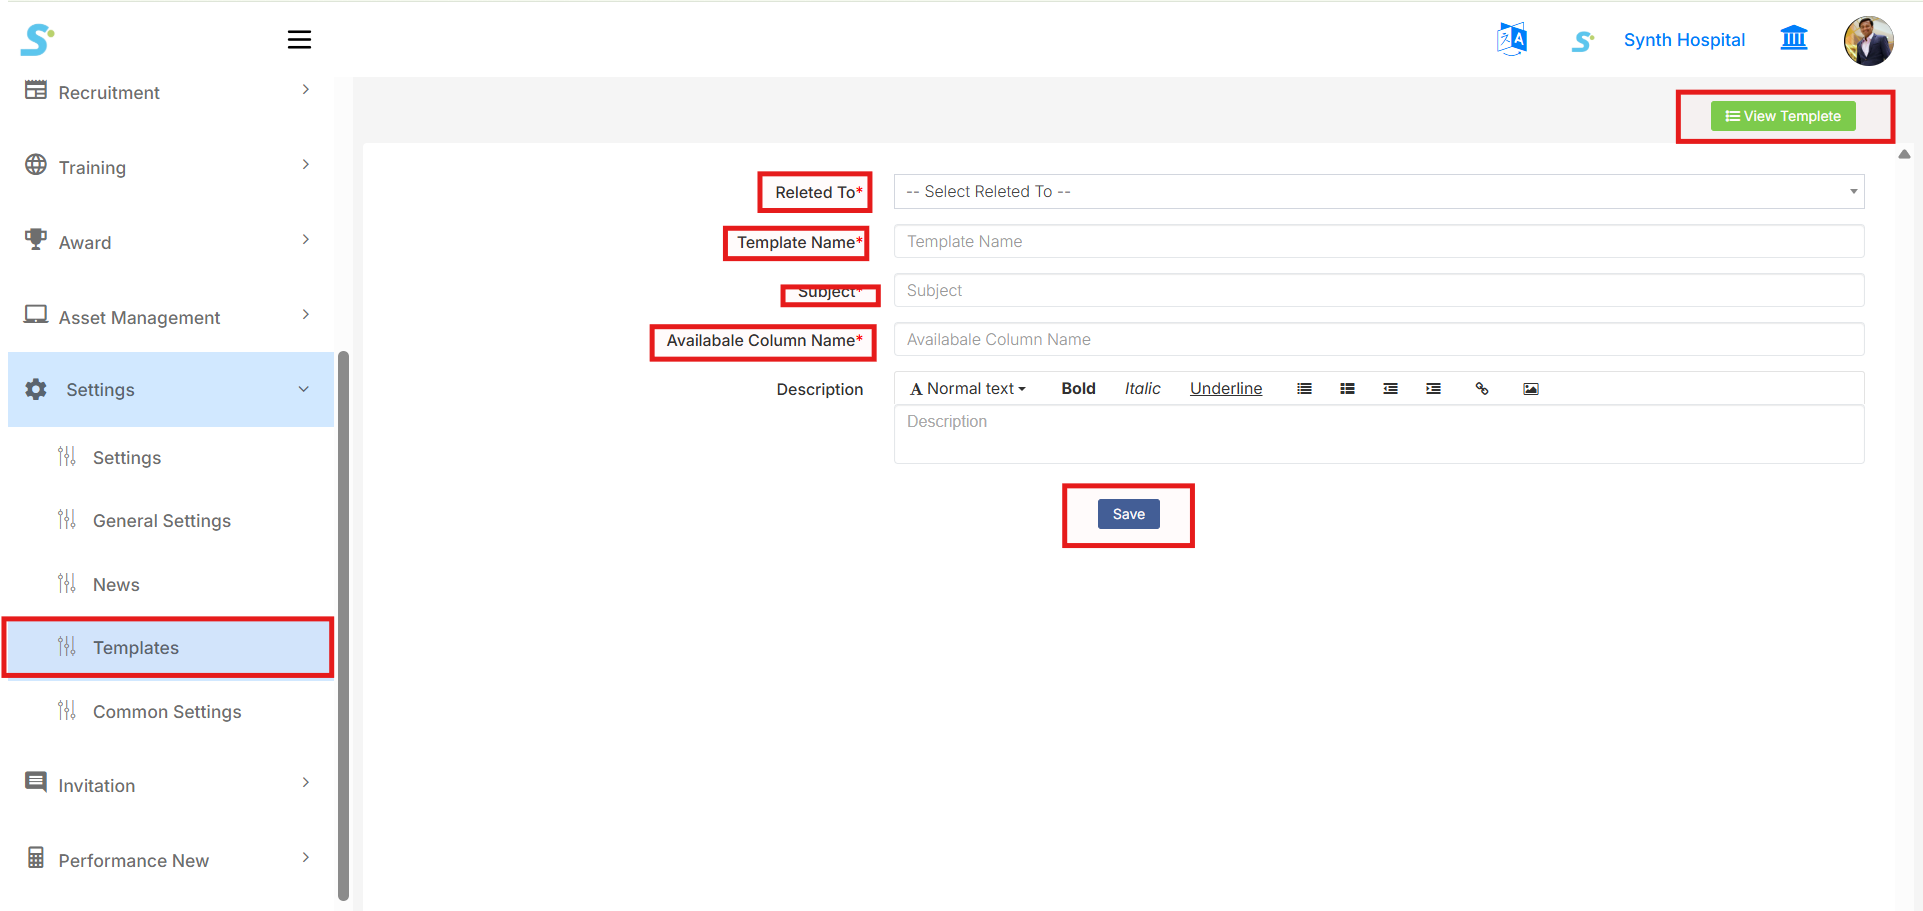
Step 7: Add Template
Click Add Template from the Templates list page.
Enter the required template details:
- Related To
-
Select where the template will be used.
-
Template Name
-
Enter the template name.
-
Subject
-
Enter the subject of the template.
-
Available Column Name
-
Enter or select available column names/parameters used in the template.
-
Description
- Enter the template content using the text editor.
The editor provides formatting options such as:
- Text style
- Bold
- Italic
- Underline
- List
- Alignment
- Link
- Image
After entering all required details, click the Save button.
Once saved, the template will be displayed in the Templates list.
From the top-right side, click View Template to return to the template list page.
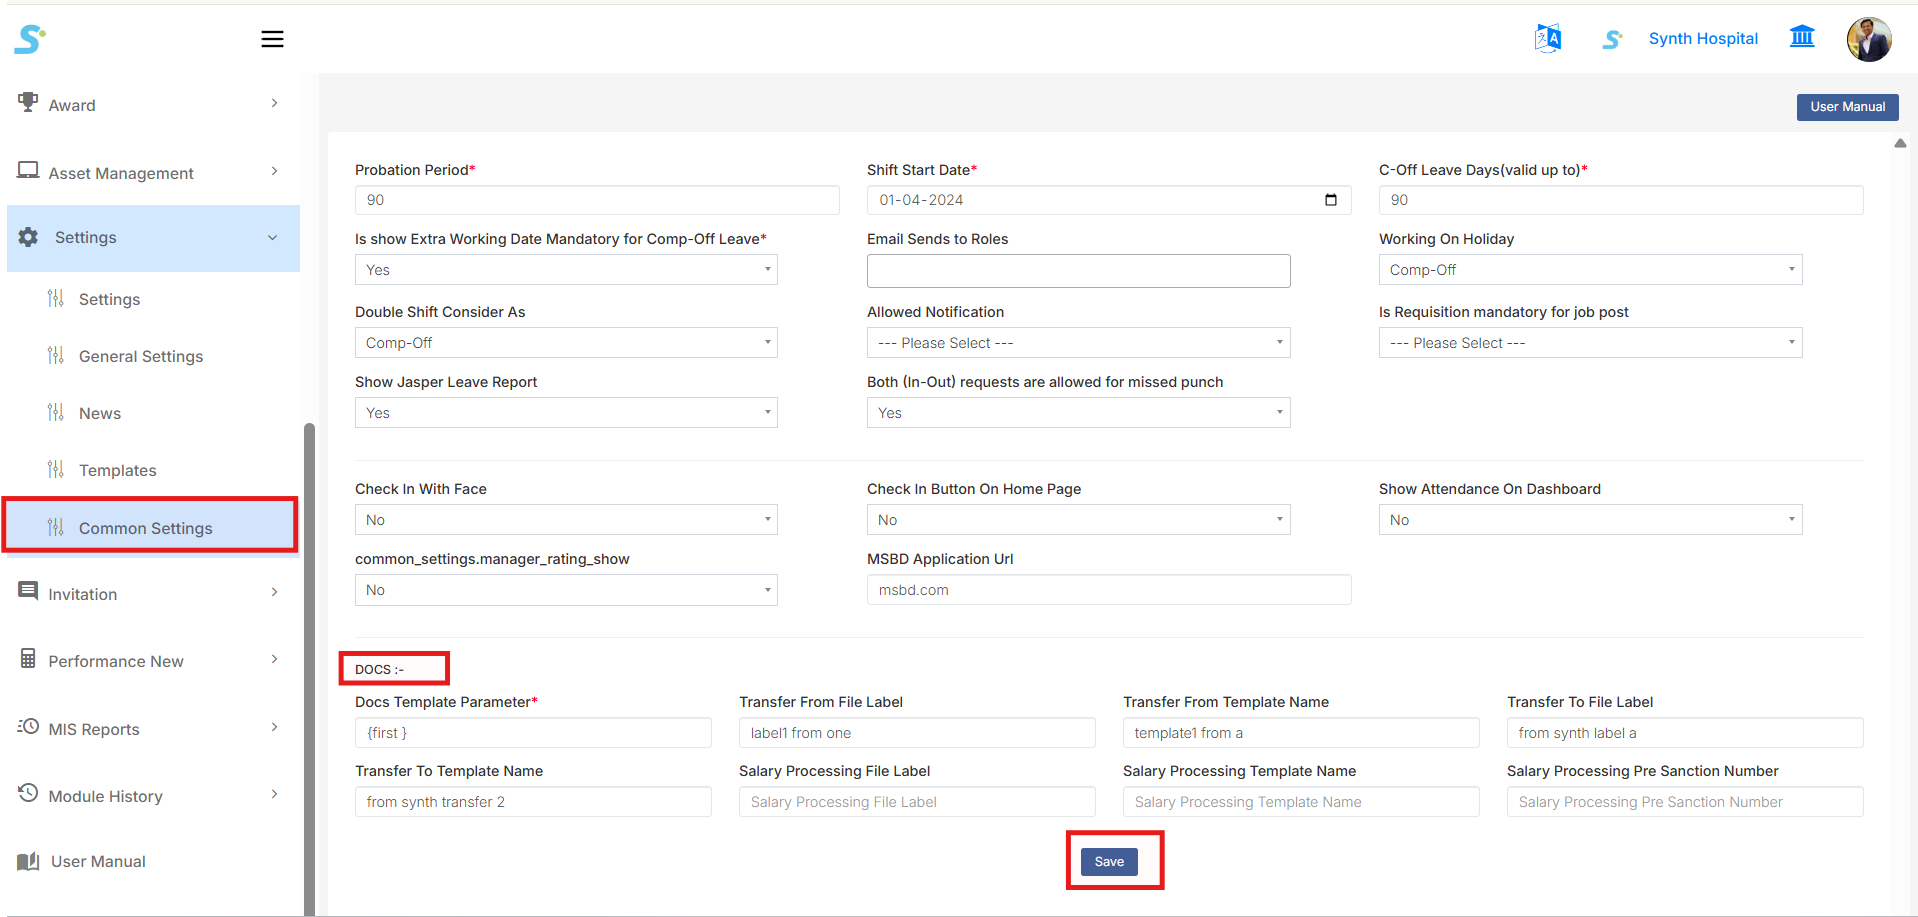
Step 8: Common Settings
Go to Settings > Common Settings from the side menu.
This page is used to configure HRMS common settings used across different modules.
The settings include attendance, leave, recruitment, document, and system-related options.
Important fields include:
- Probation Period
-
Enter the probation period in days.
-
Shift Start Date
-
Select the shift start date.
-
C-Off Leave Days (valid up to)
-
Enter the validity days for comp-off leave.
-
Is show Extra Working Date Mandatory for Comp-Off Leave
-
Select whether extra working date is mandatory.
-
Email Sends to Roles
-
Select roles that should receive email notifications.
-
Working On Holiday
-
Select the working-on-holiday setting.
-
Double Shift Consider As
-
Select how double shift should be considered.
-
Allowed Notification
-
Select the notification setting.
-
Is Requisition mandatory for job post
-
Select whether requisition is mandatory before creating a job post.
-
Show Jasper Leave Report
-
Select whether Jasper leave report should be shown.
-
Both In-Out requests are allowed for missed punch
-
Select whether both in and out missed punch requests are allowed.
-
Check In With Face
-
Enable or disable face-based check-in.
-
Check In Button On Home Page
-
Enable or disable check-in button on the home page.
-
Show Attendance On Dashboard
-
Select whether attendance should be shown on dashboard.
-
Manager Rating Show
-
Enable or disable manager rating visibility.
-
MSBD Application URL
- Enter the MSBD application URL.
DOCS Settings
The DOCS section contains document-related parameters such as:
- Docs Template Parameter
- Transfer From File Label
- Transfer From Template Name
- Transfer To File Label
- Transfer To Template Name
- Salary Processing File Label
- Salary Processing Template Name
- Salary Processing Pre Sanction Number
After updating all required settings, click the Save button.
The User Manual button is available on the top-right side to open related documentation.