Staff Management Module
Step 1: Add Department
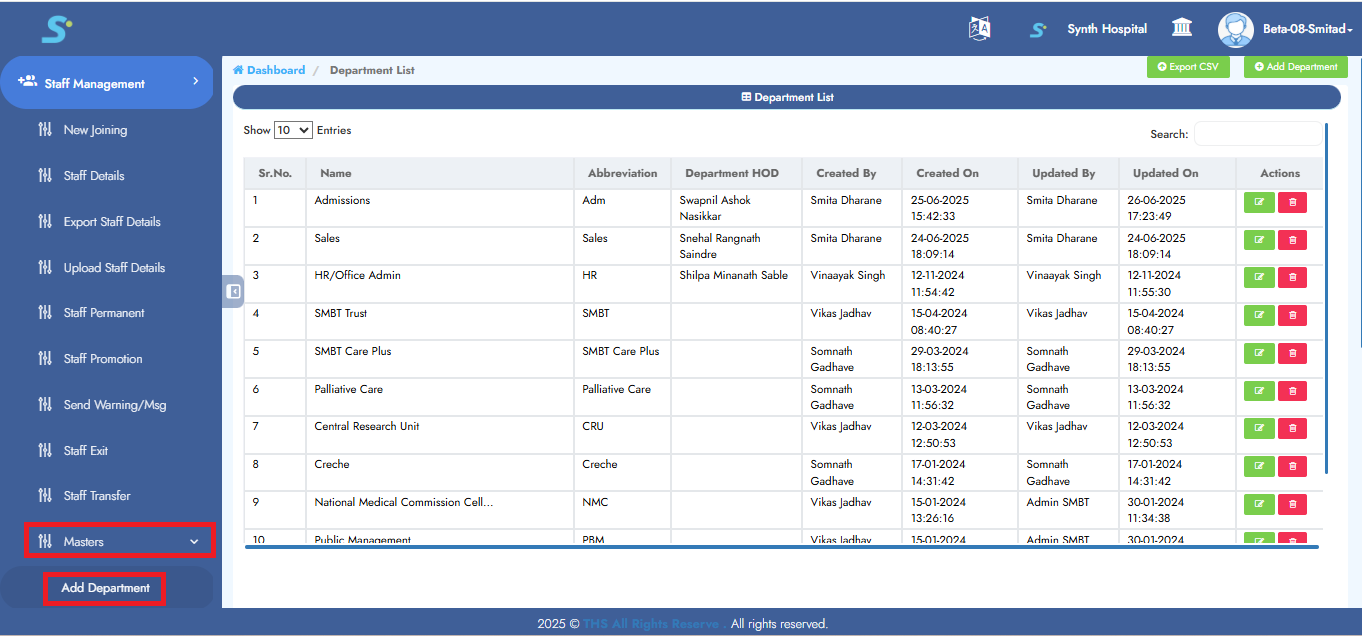
Go to Staff Management > Masters > Add Department, then click on Add Department from the side menu.
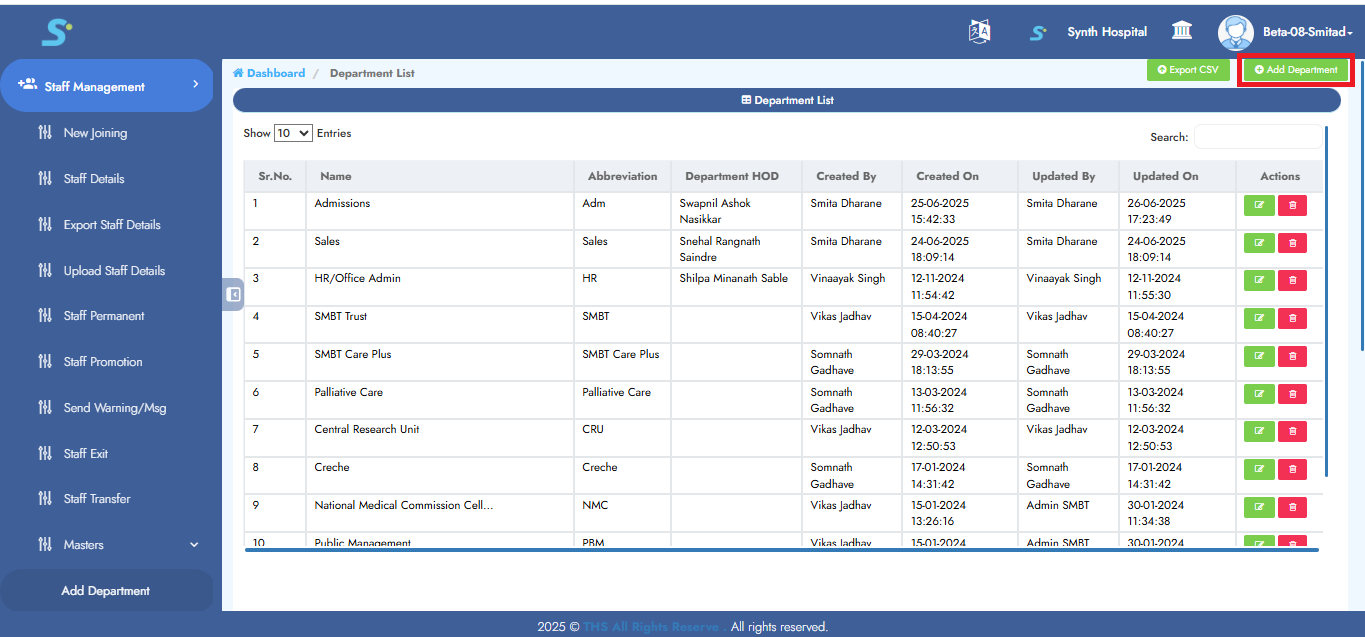
Click the Add Department button located at the top right.
Step 2: Adding a New Department
Click the Add Department button located at the top right corner.
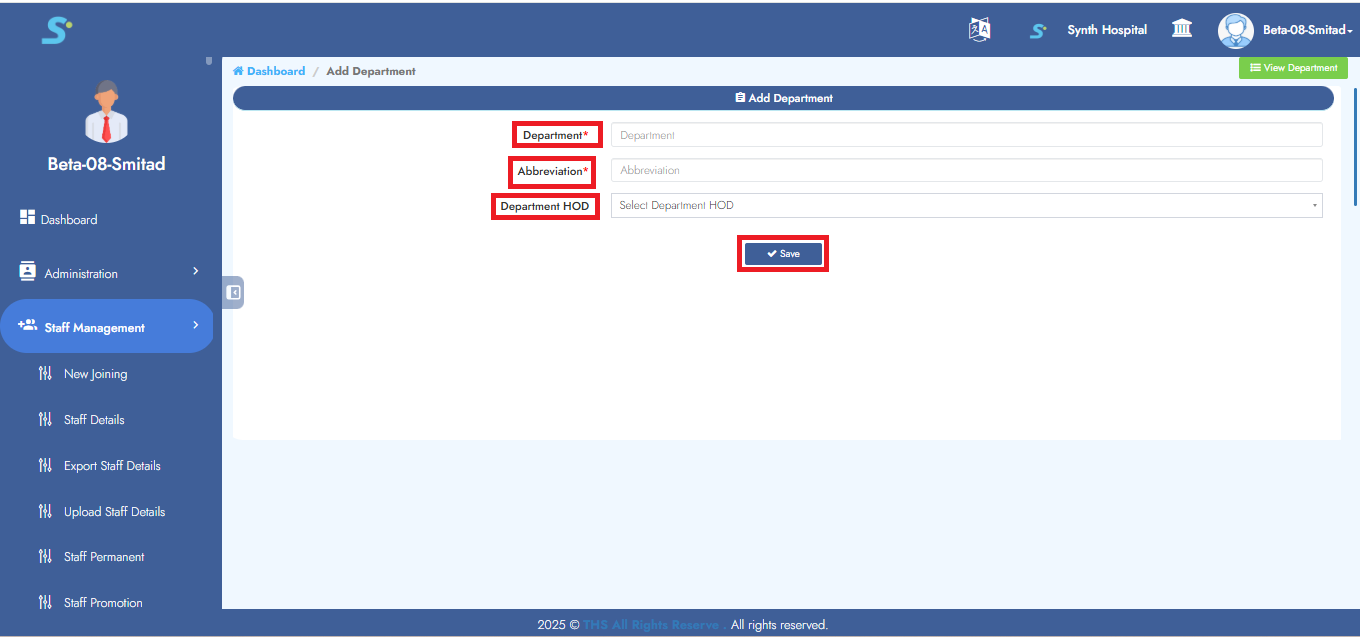
Step 3: Saving Department Information
Enter the department name, abbreviation, and optionally the department HOD as shown in the image.
Click the Save button to successfully add the record.
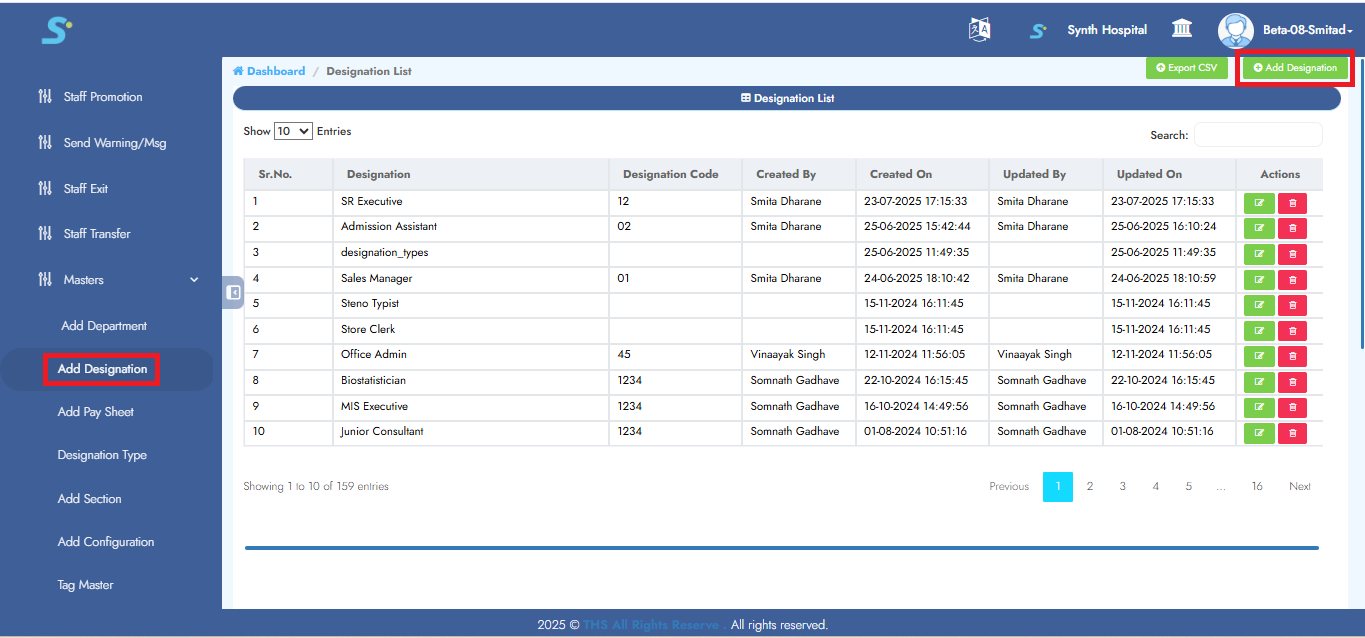
Step 4: Add Designation
Go to Staff Management > Masters > Add Designation, then click on Add Designation from the side menu.
Click the Add Designation button located at the top right corner.
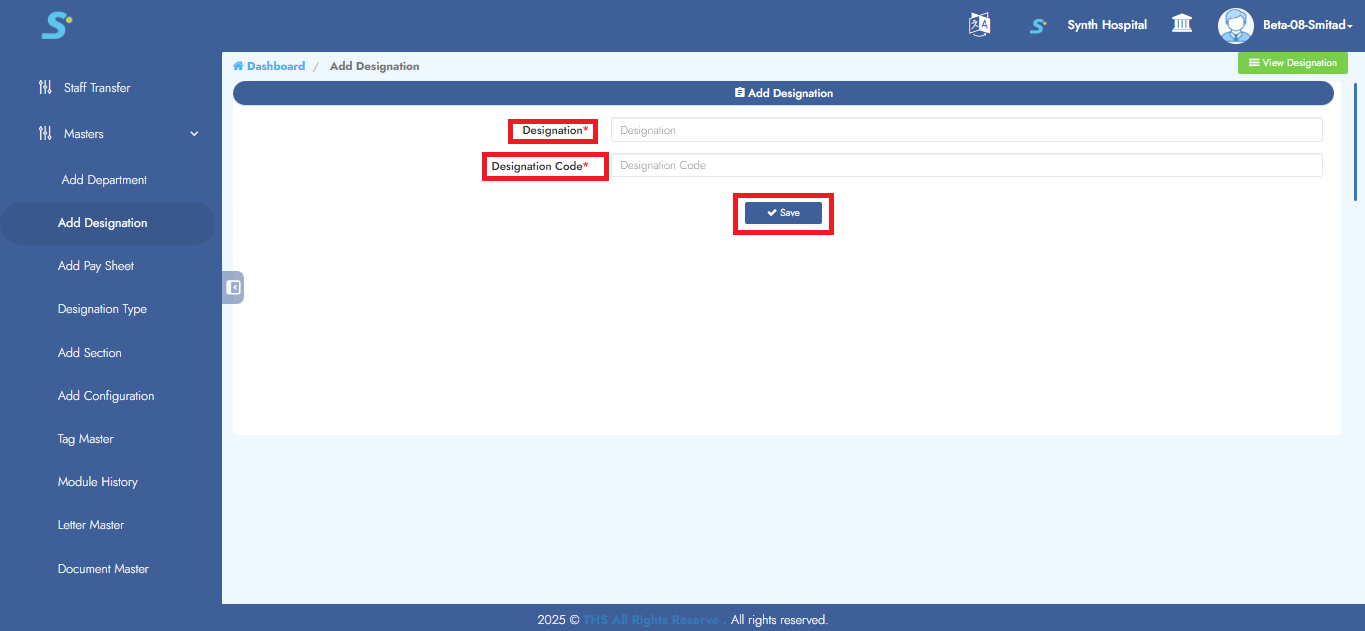
Step 5: Saving Designation Information
Enter the designation and designation code as shown in the image.
Click the Save button to successfully add the record.
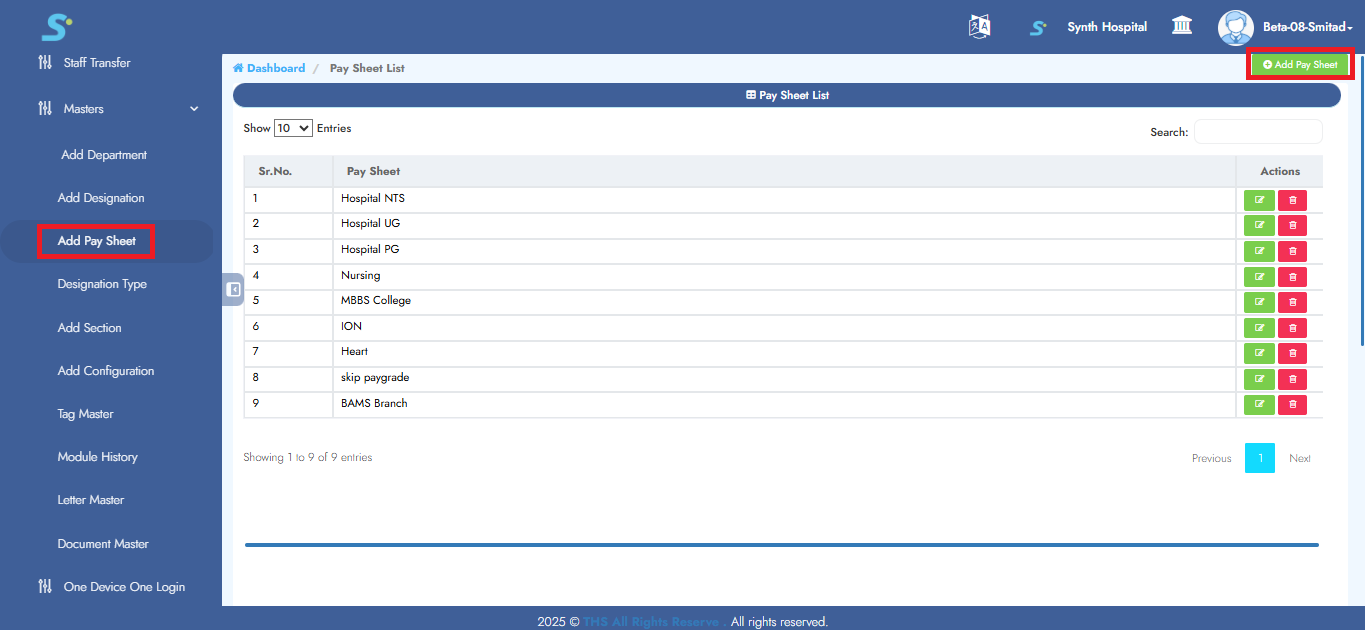
Step 6: Add Paysheet
Go to Staff Management > Masters > Add Pay Sheet, then click on Add Pay Sheet from the side menu.
Click the Add Pay Sheet button located at the top right corner.
Step 7: Saving Pay Sheet Information
Enter the Pay Sheet as shown in the image.
Click the Save button to successfully add the record.

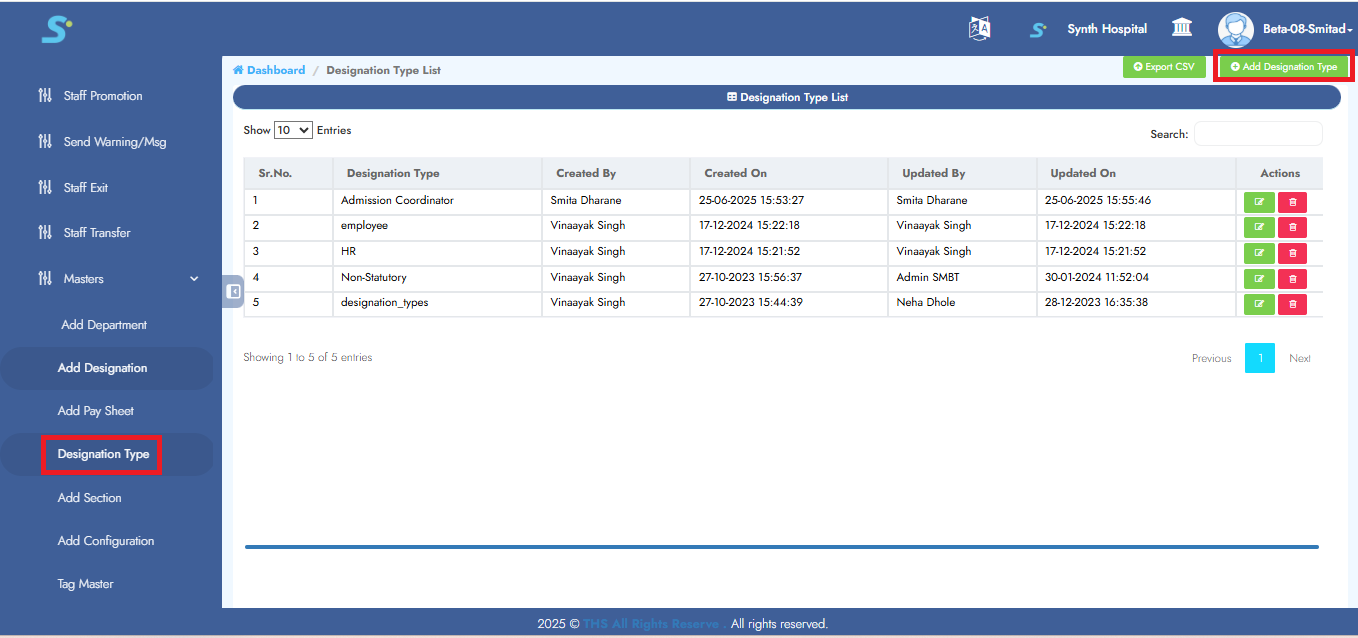
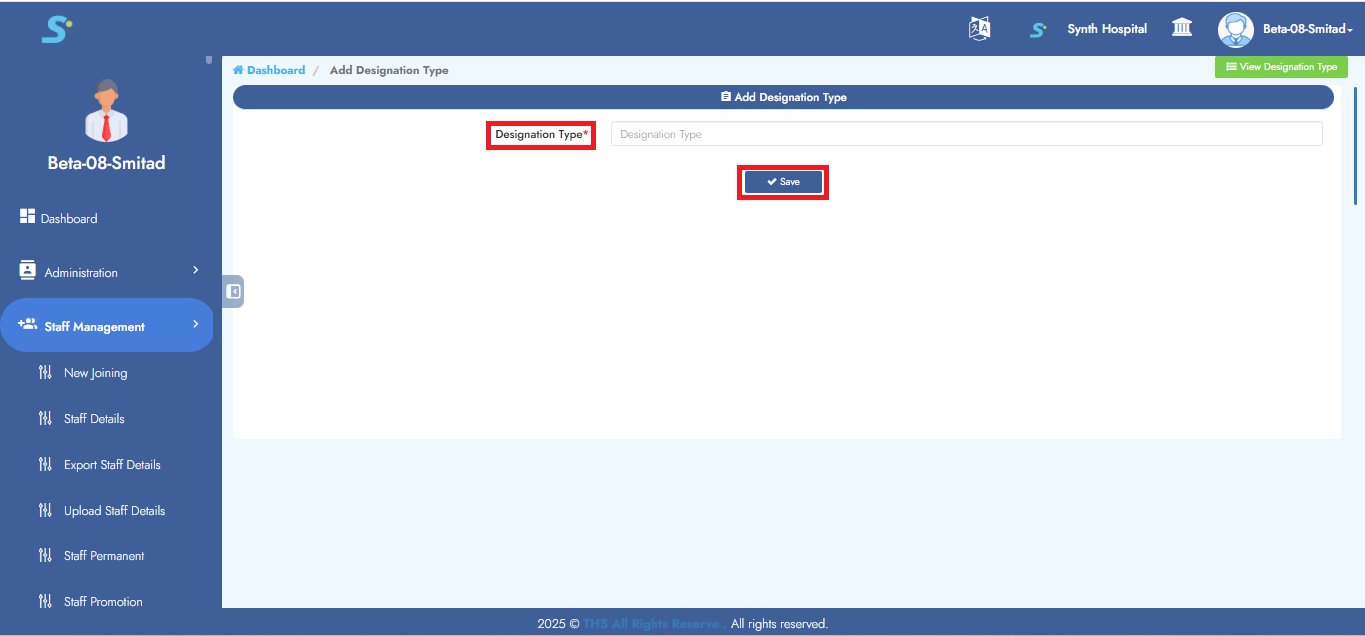
Step 8: Add Designation Type
Go to Staff Management > Masters > Add Designation Type, then click on Add Designation Type from the side menu.
Click the Add Designation Type button located at the top right corner.
Step 9: Saving Designation Type Information
Enter the designation type as shown in the image.
Click the Save button to successfully add the record.
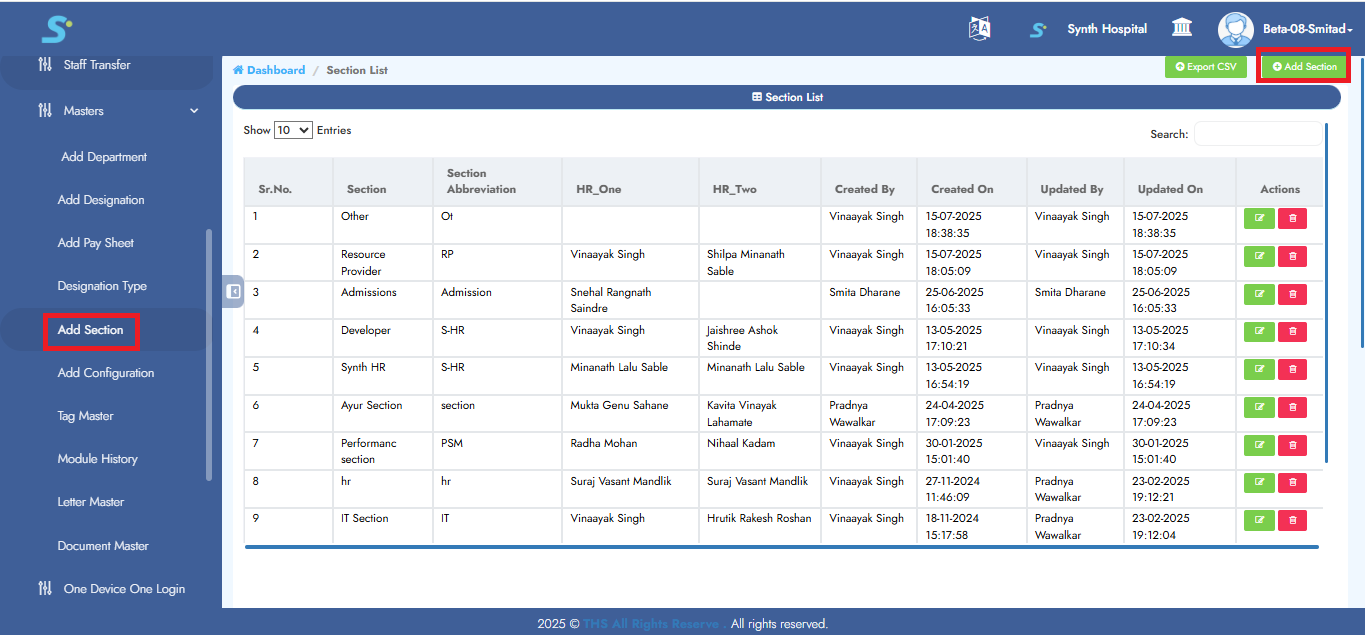
Step 10: Add Section
Go to Staff Management > Masters > Add Section, then click on Add Section from the side menu.
Click the Add Section button located at the top right corner.
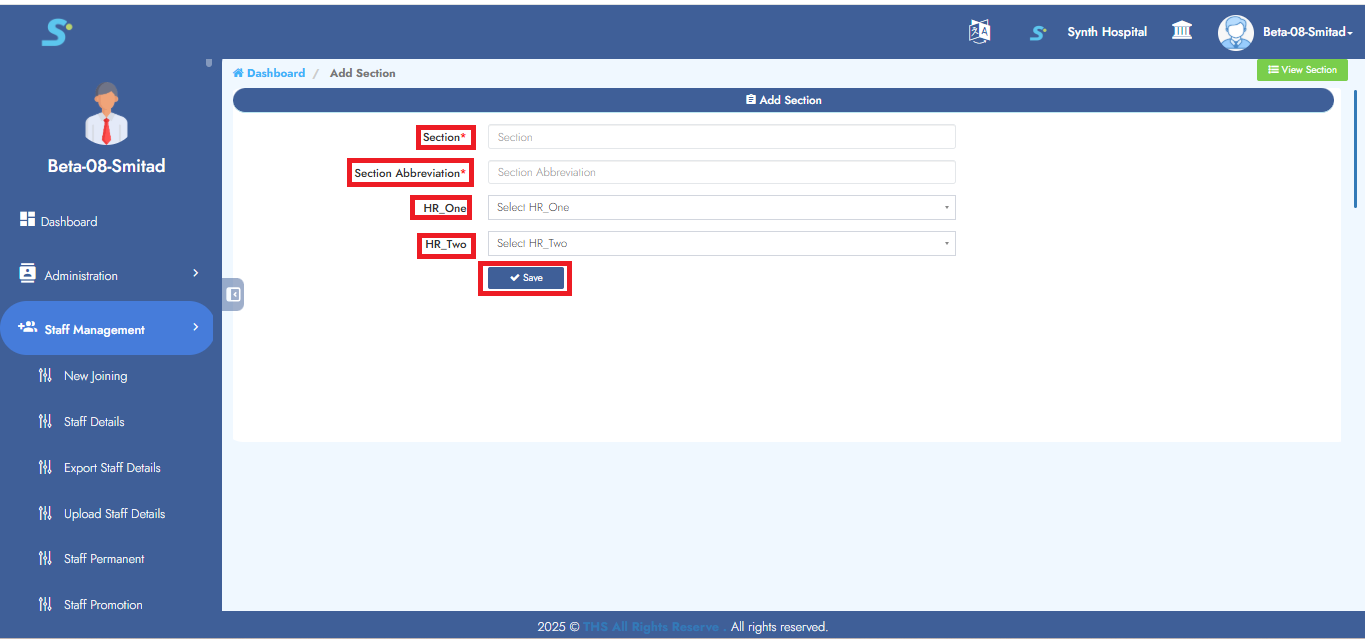
Step 11: Saving Section Information
Enter the section, section abbreviation, HR one (optional), HR two (optional) as shown in the image.
Click the Save button to successfully add the record.
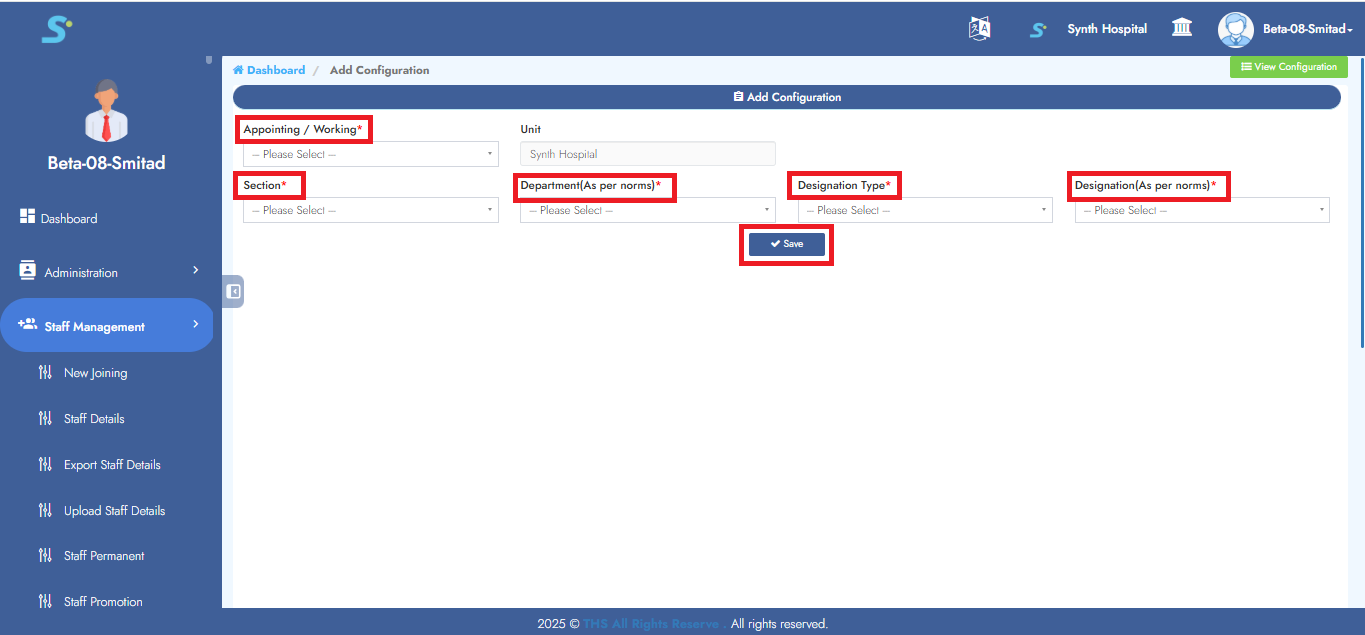
Step 12: Add Configuration
Go to Staff Management > Masters > Add Configuration, then click on Add Configuration from the side menu.
Click the Add Configuration button located at the top right corner.
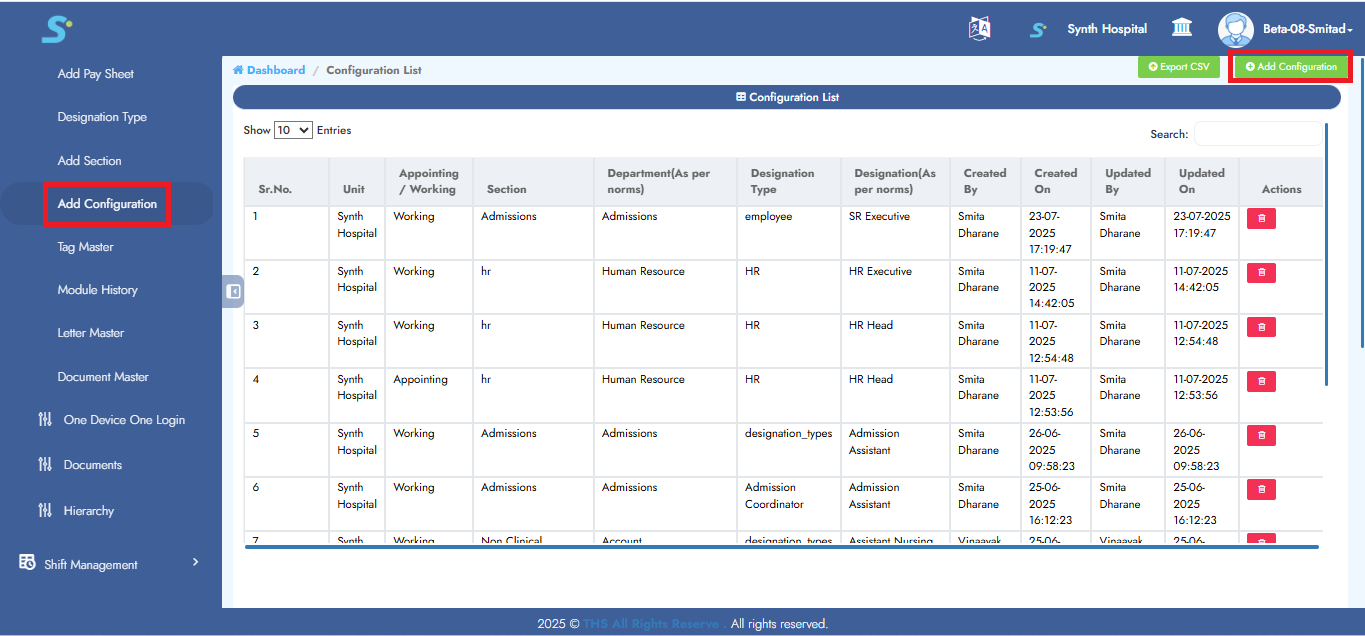
Step 13: Saving Configuration Information
Enter the appointing/working, section, department, designation type, designation as shown in the image.
Click the Save button to successfully add the record.
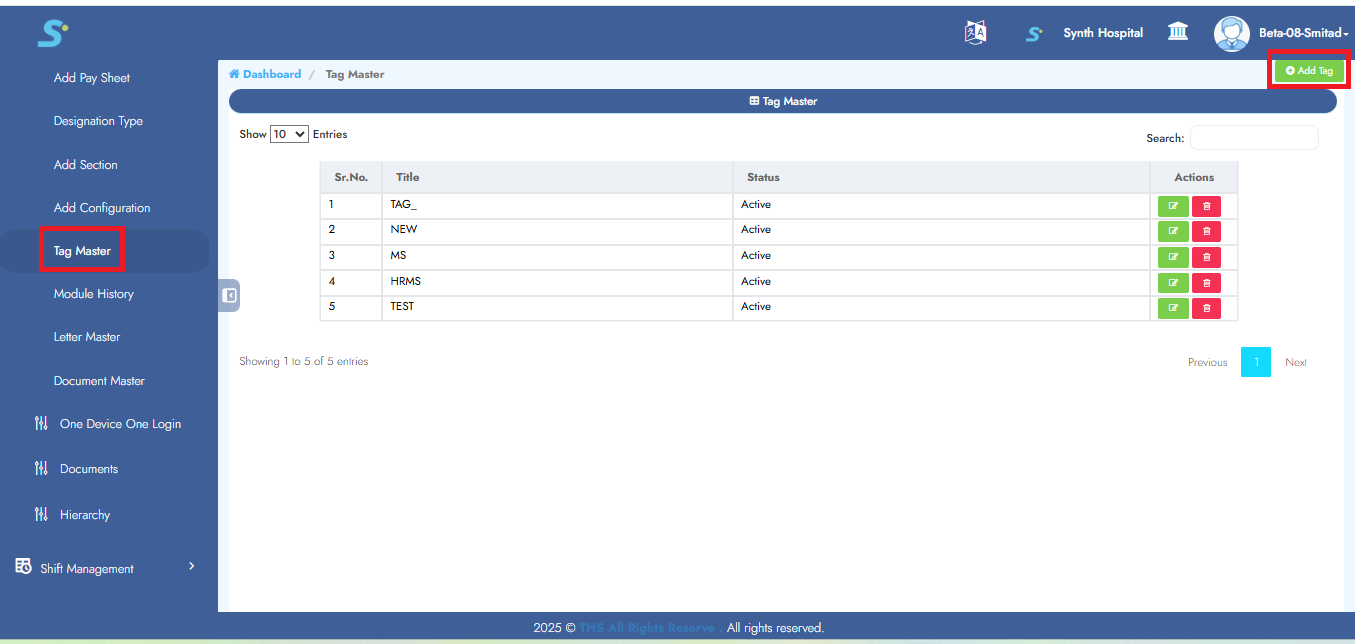
Step 14: Tag Master
Go to Staff Management > Masters > Add Tag, then click on Add Tag from the side menu.
Click the Add Tag button located at the top right corner.
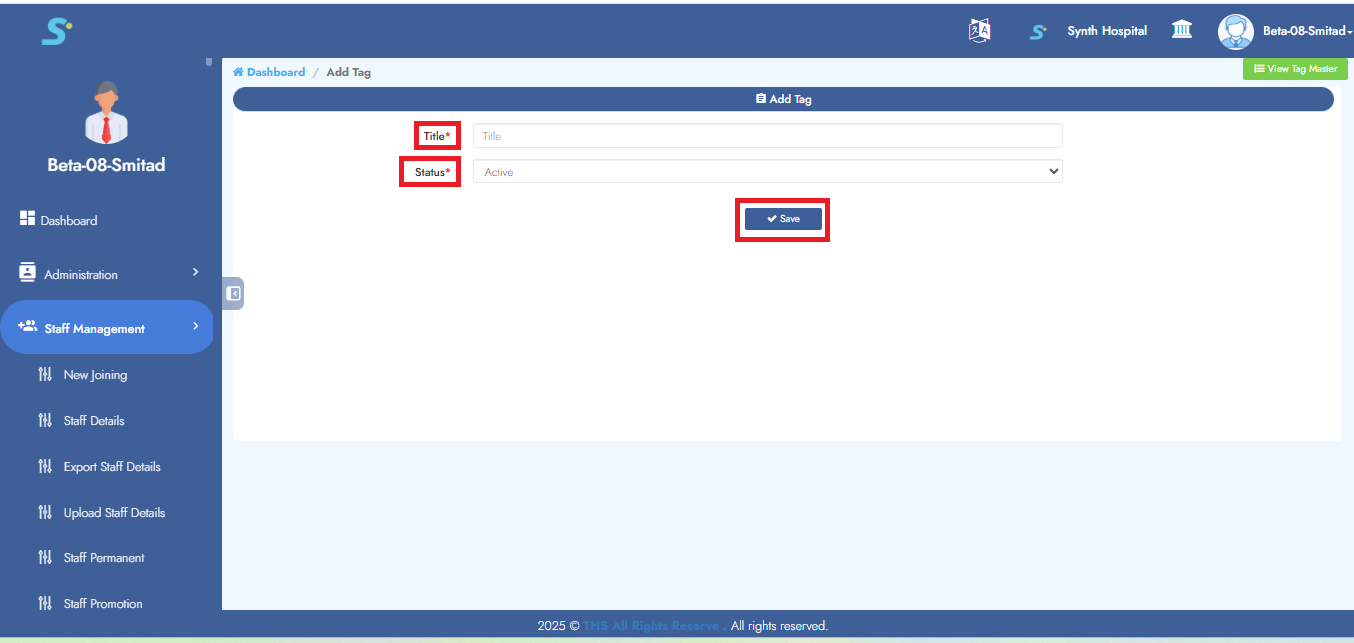
Step 15: Saving Tag Master
Enter the title, status as shown in the image.
Click the Save button to successfully add the record.
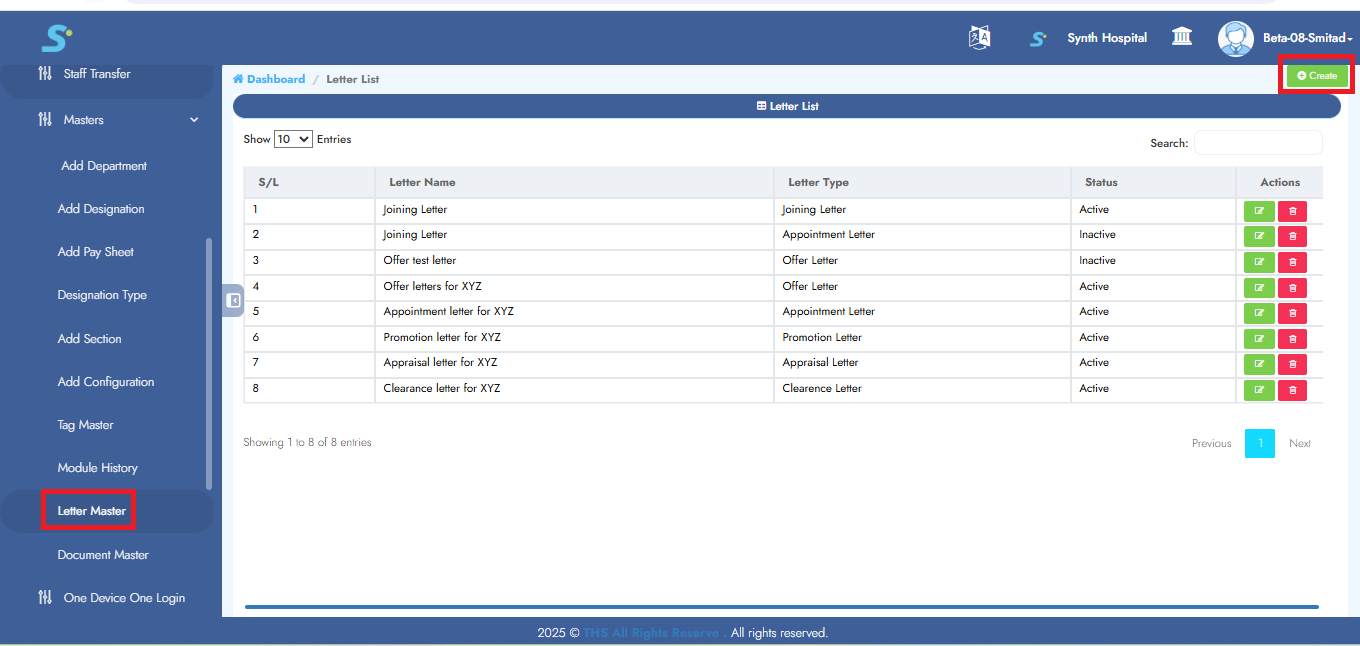
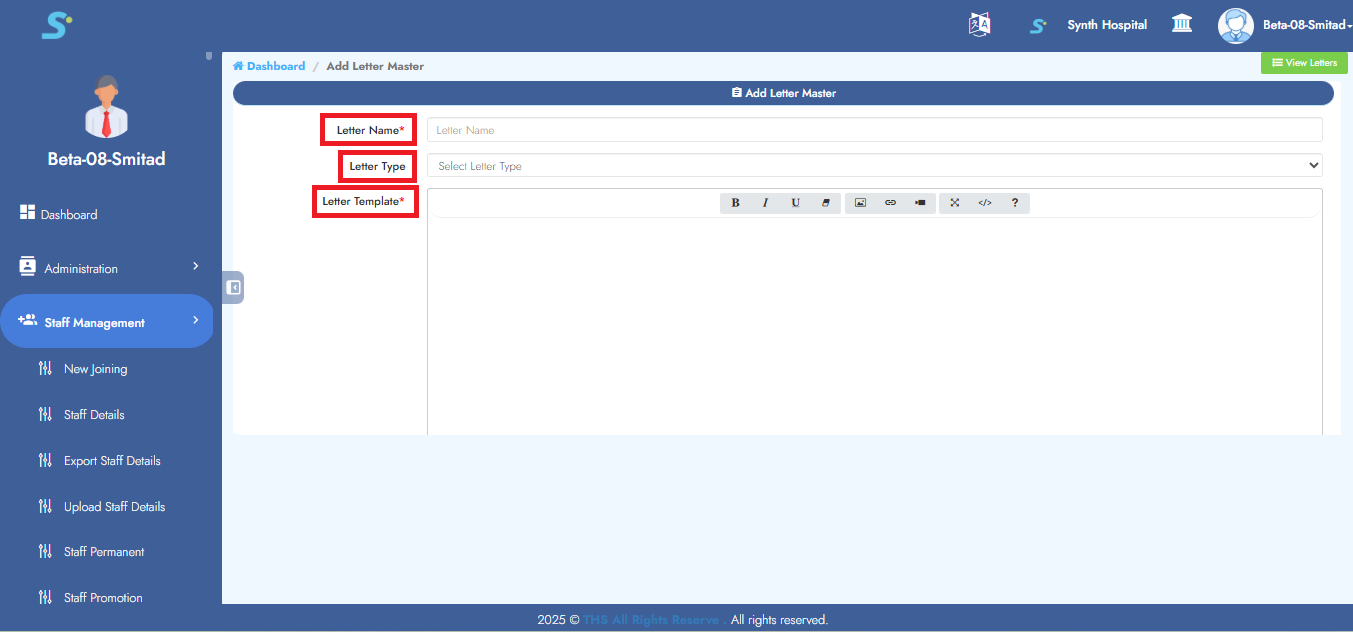
Step 16: Letter Master
Go to Staff Management > Masters > Letter Master, then click on Create located at the top right corner.
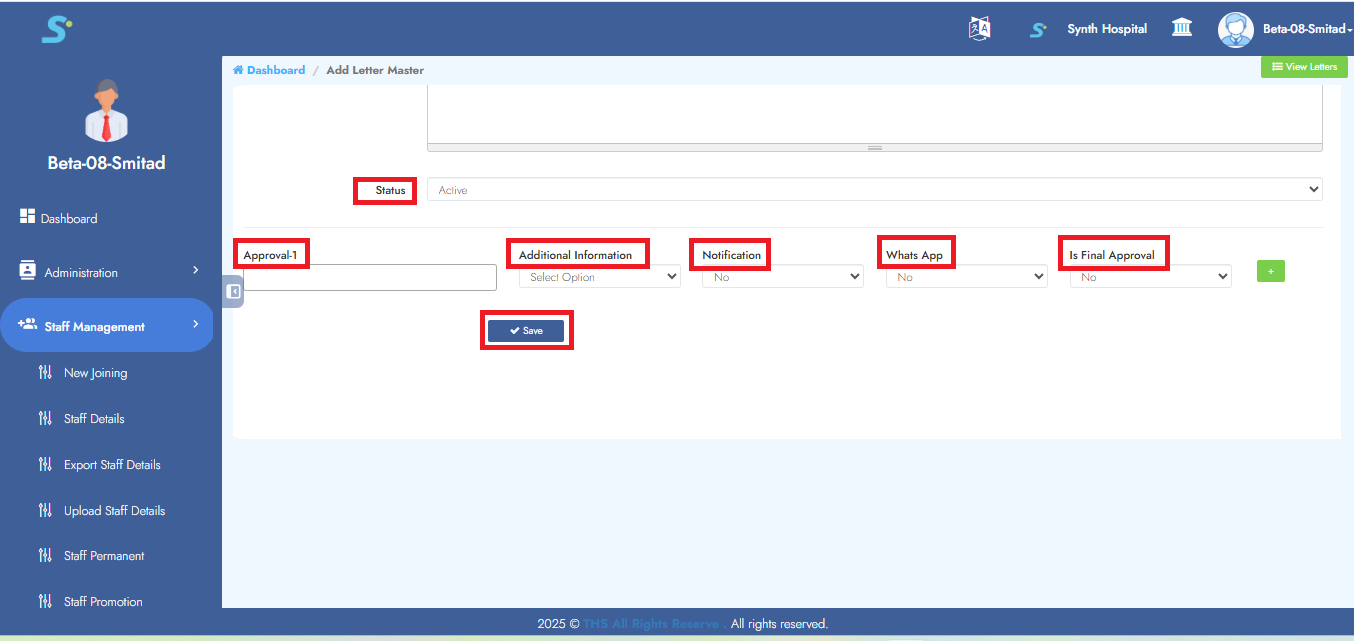
Step 17: Saving Letter Master
Enter the letter name, letter type (select from drop-down list), letter template, status and set approvals as shown in the image.
In approval setting, enter approval-1, additional information, notification (yes/no), WhatsApp (yes/no), is final approval (yes/no) and to add more approvals, click on the Add button.
Click the Save button to successfully add the record.
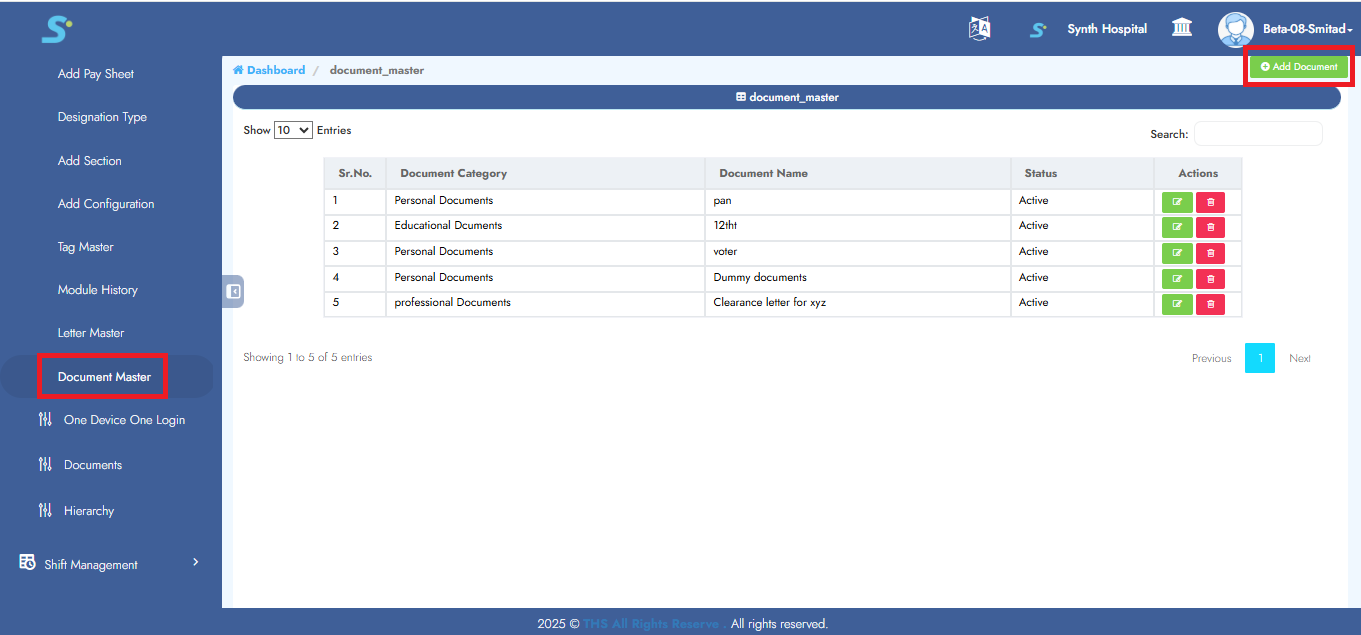
Step 18: Document Master
Go to Staff Management > Masters > Document Master, then click on Add Document from the side menu.
Click the Add Document button located at the top right corner.
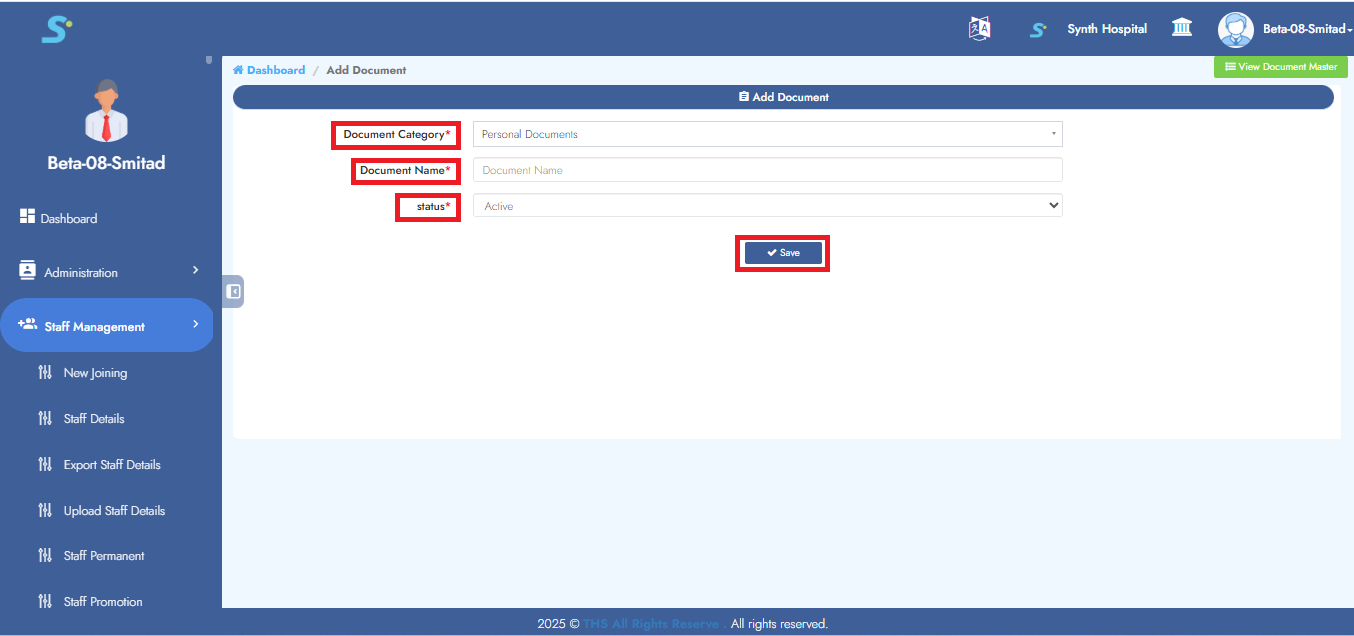
Step 19: Saving Document Master
Enter the document category (select from drop-down list), document name and status (active/inactive as shown in the image).
Click the Save button to successfully add the record.
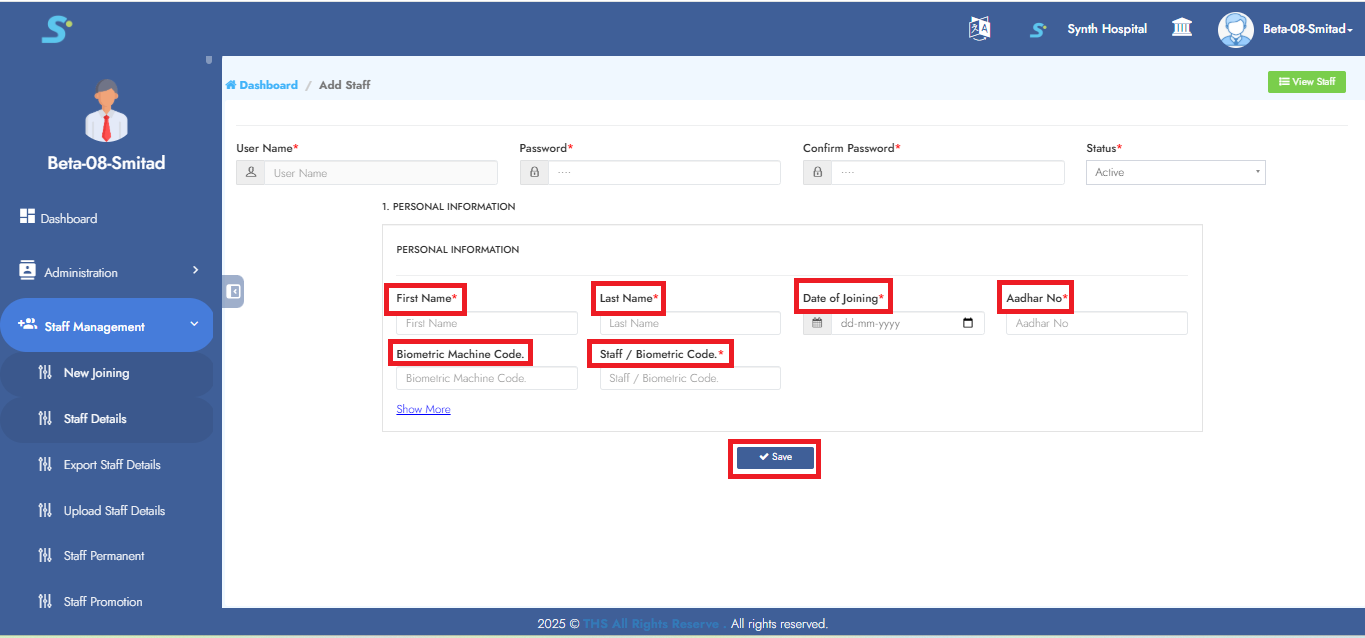
Step 20: New Joining
Enter first name, last name, date of joining, Aadhar no, biometric machine code, staff/biometric code as shown in the image.
Click the Save button to successfully add the record.
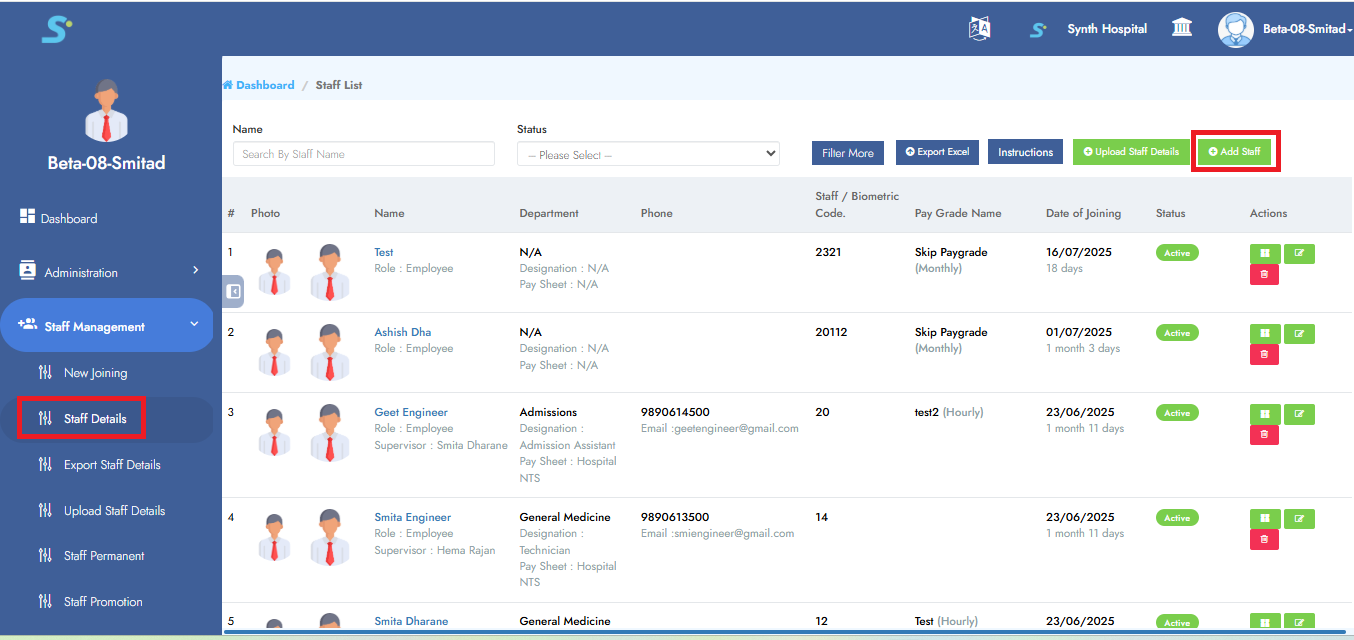
Step 21: Staff Details
Go to Staff Management > Staff Details, then click on the Add Staff button located at the top right corner.
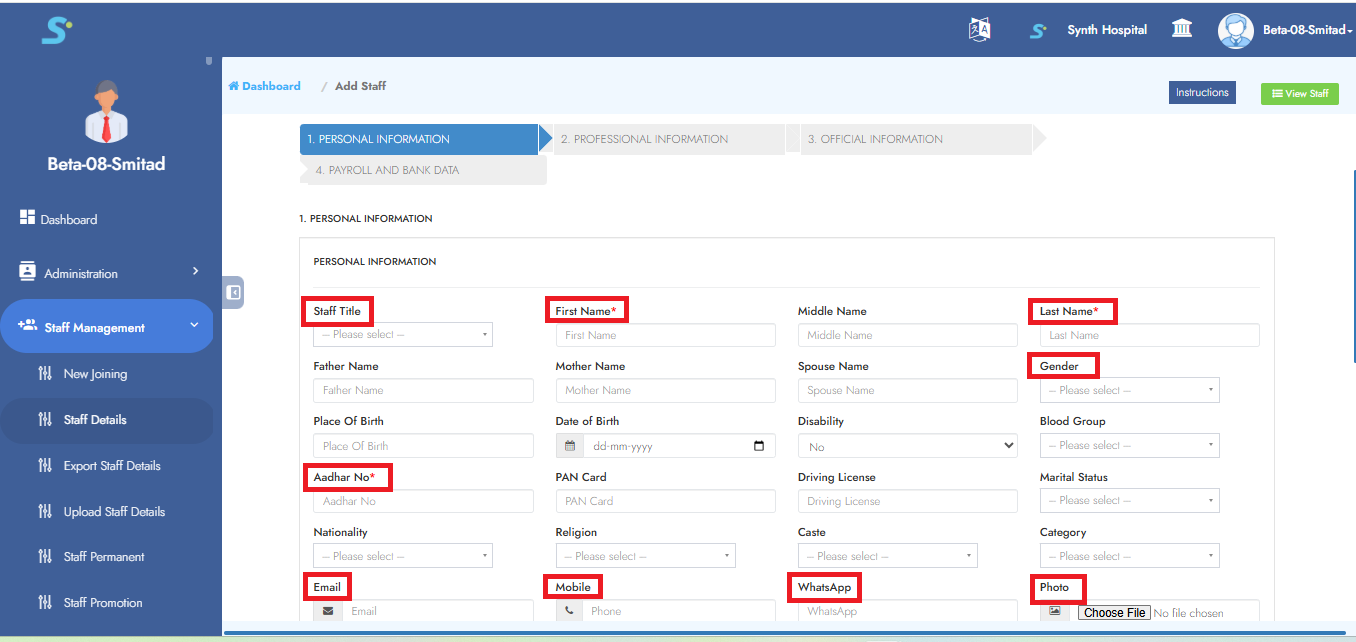
Step 22: Enter Personal Information
Enter required personal details in the Personal Information tab as shown in the image.
Enter personal information, educational information as shown in the image.
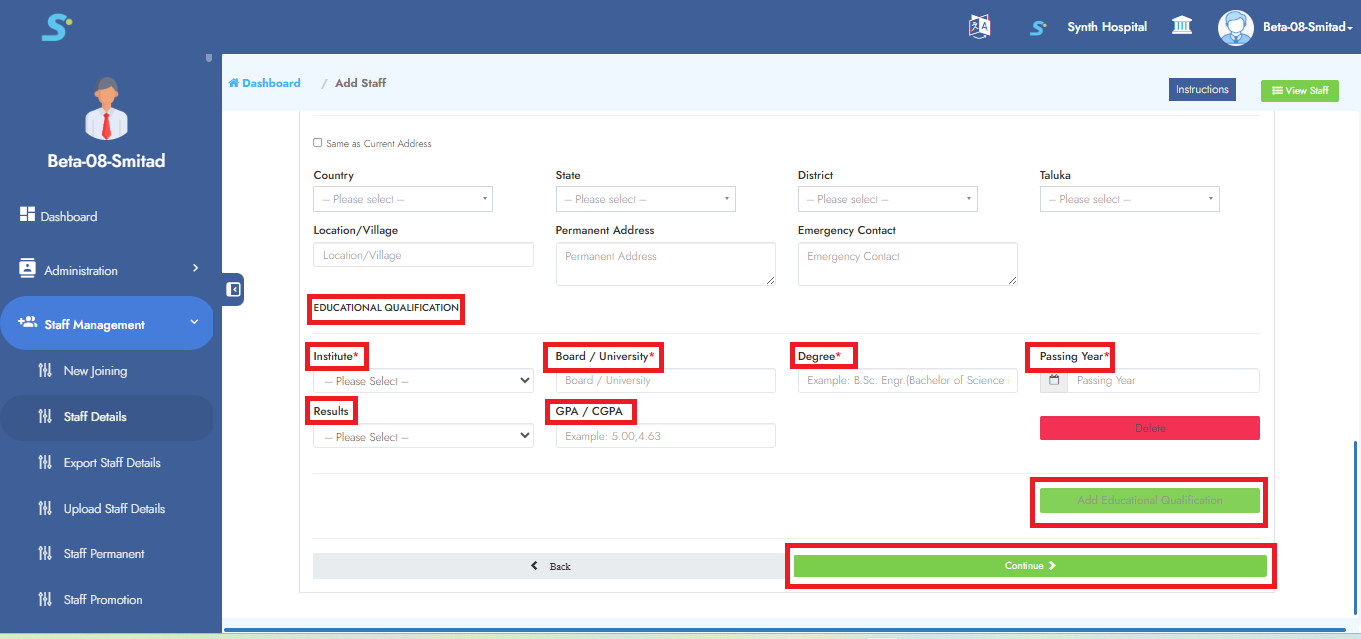
 Enter current address and permanent address as shown in the image.
Click on the Add Educational Qualification button. Enter educational information as shown in the image.
Enter current address and permanent address as shown in the image.
Click on the Add Educational Qualification button. Enter educational information as shown in the image.
To add more educational qualifications, click on the Add Educational Qualification button.
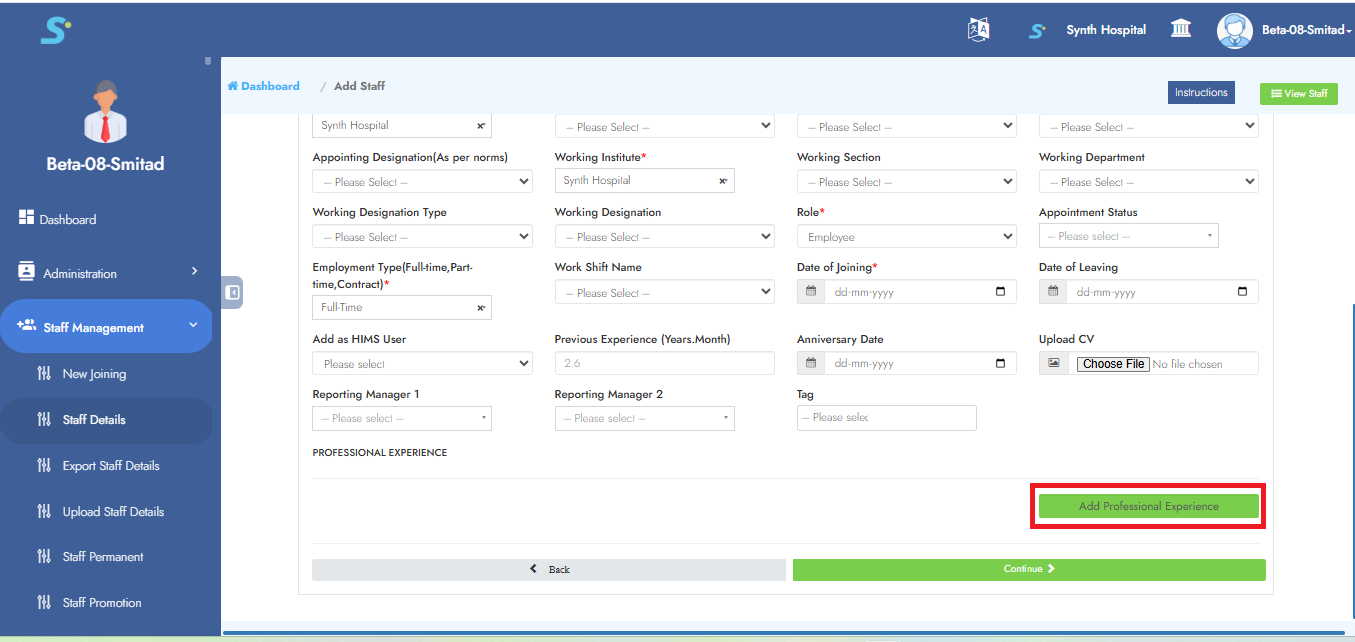
Step 23: Enter Professional Information
Enter required professional information as shown in the image.
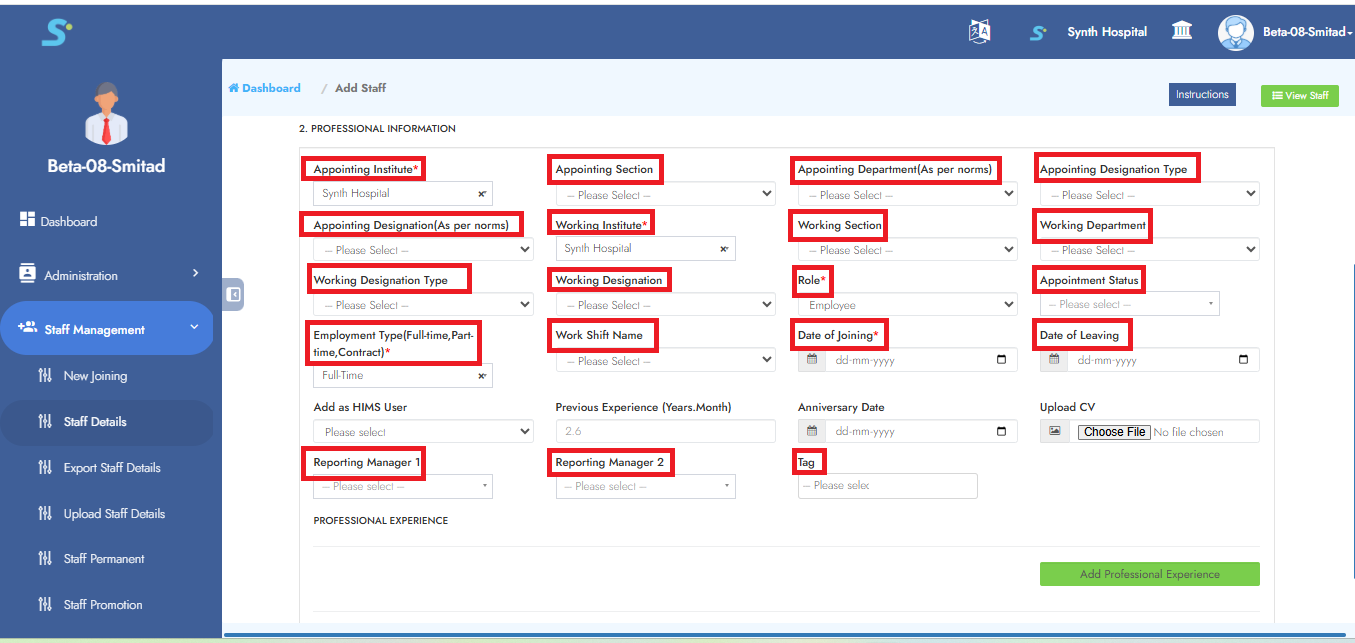
To add employees' professional information, click on the Add Professional Experience button as shown in the image.
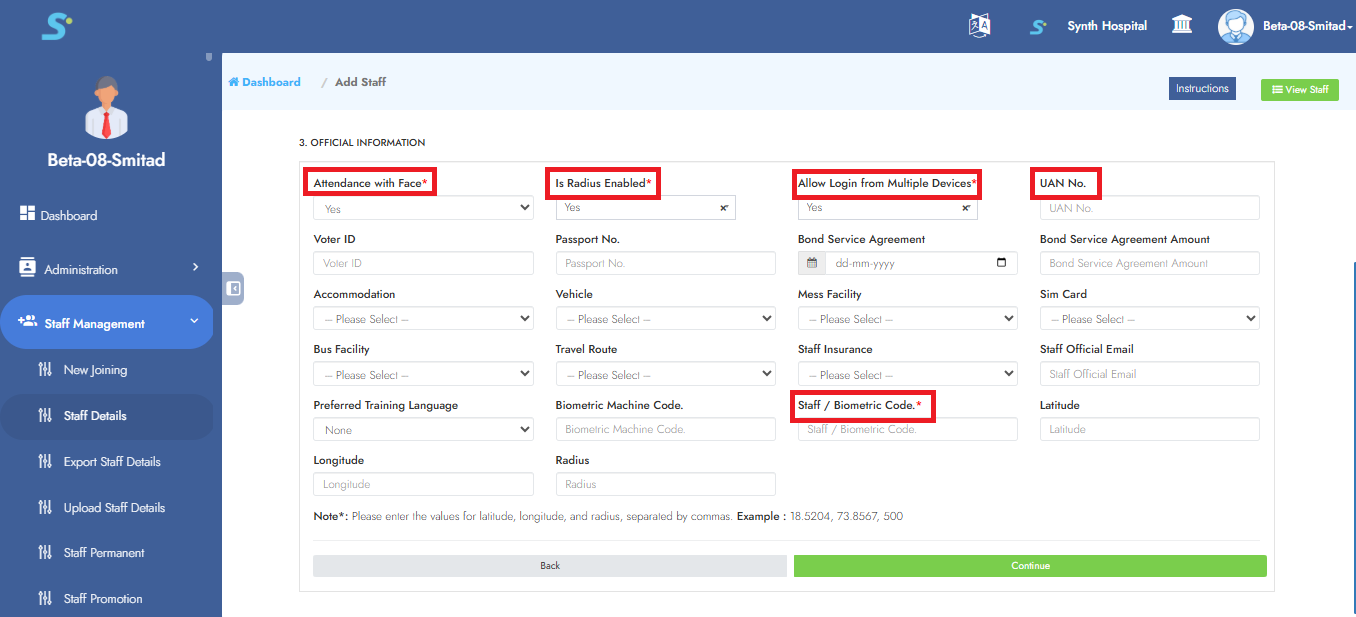
Step 24: Official Information
Add official information details as shown in the image.
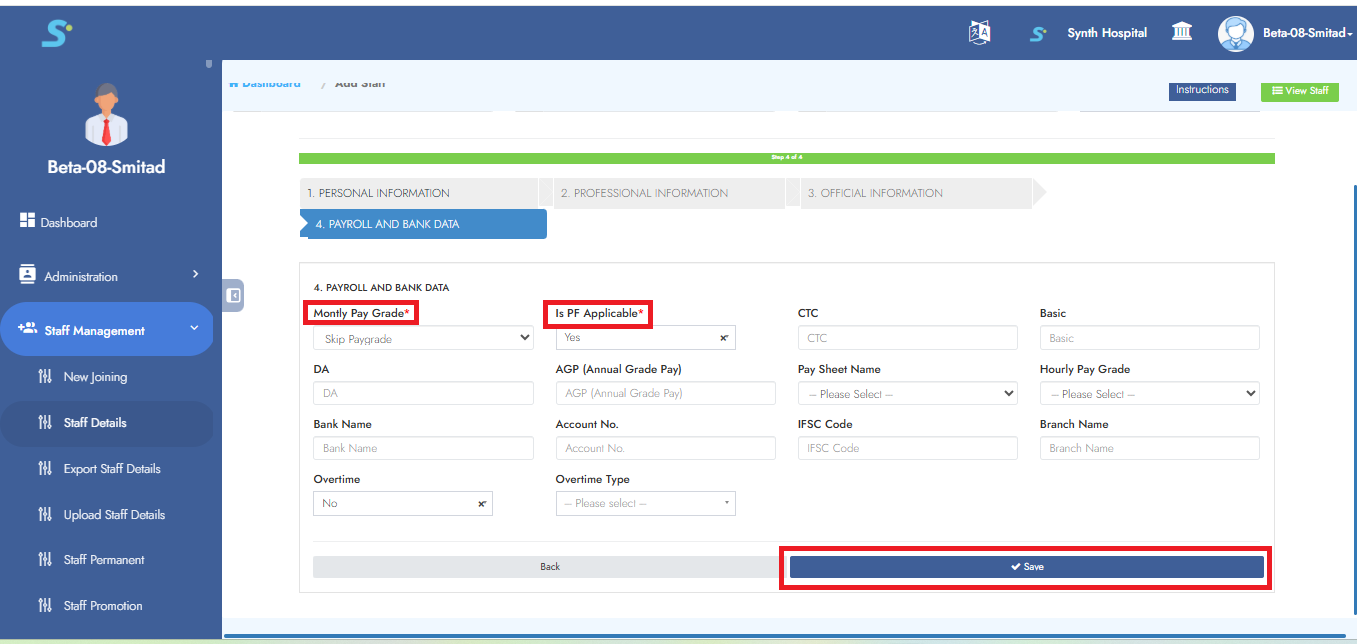
Step 25: Payroll and Bank Data
Add required payroll and bank details in this section as shown in the image.
Click the Save button to successfully add the record.
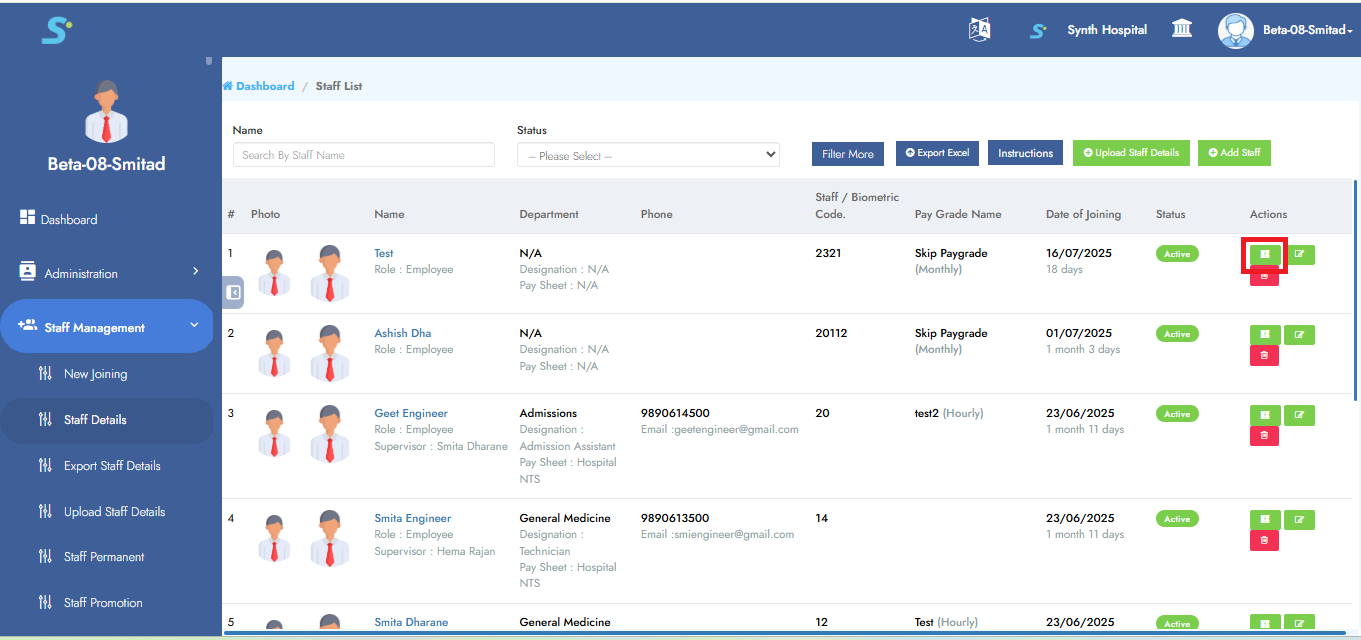
Step 26: Viewing Staff Details
To view entered staff details, click on the Profile button as shown in the image.
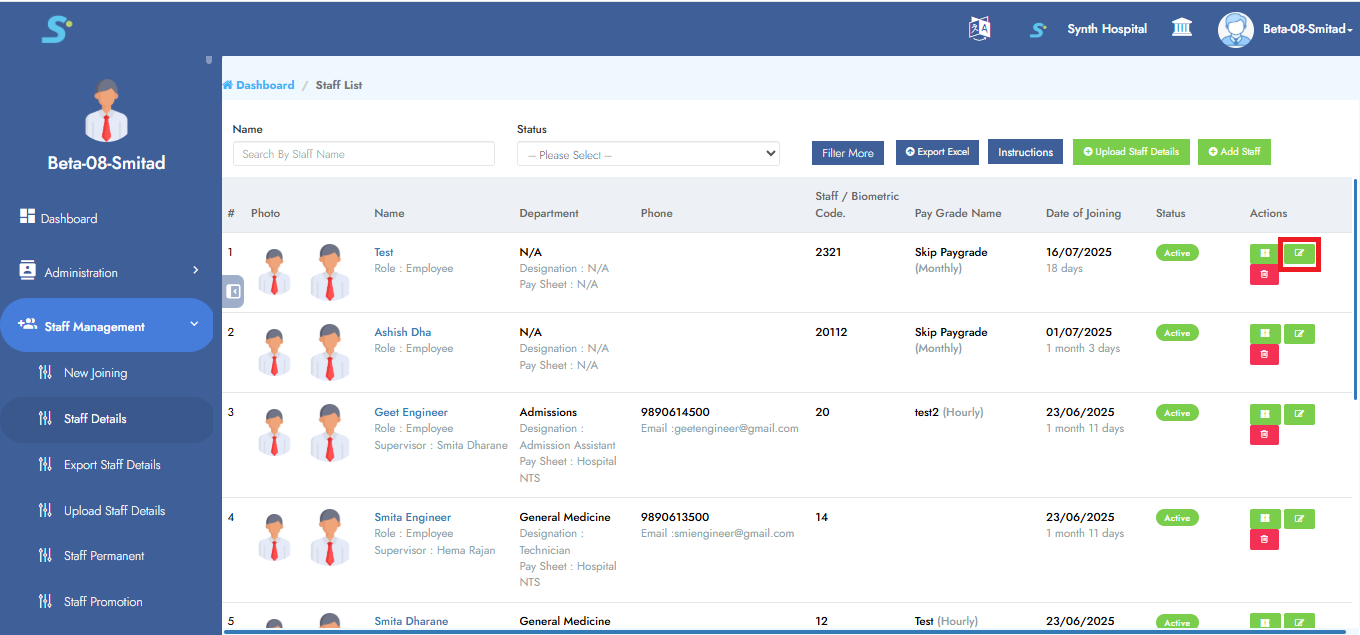
Step 27: Edit Staff Details
To edit staff details, click on the Edit button as shown in the image.
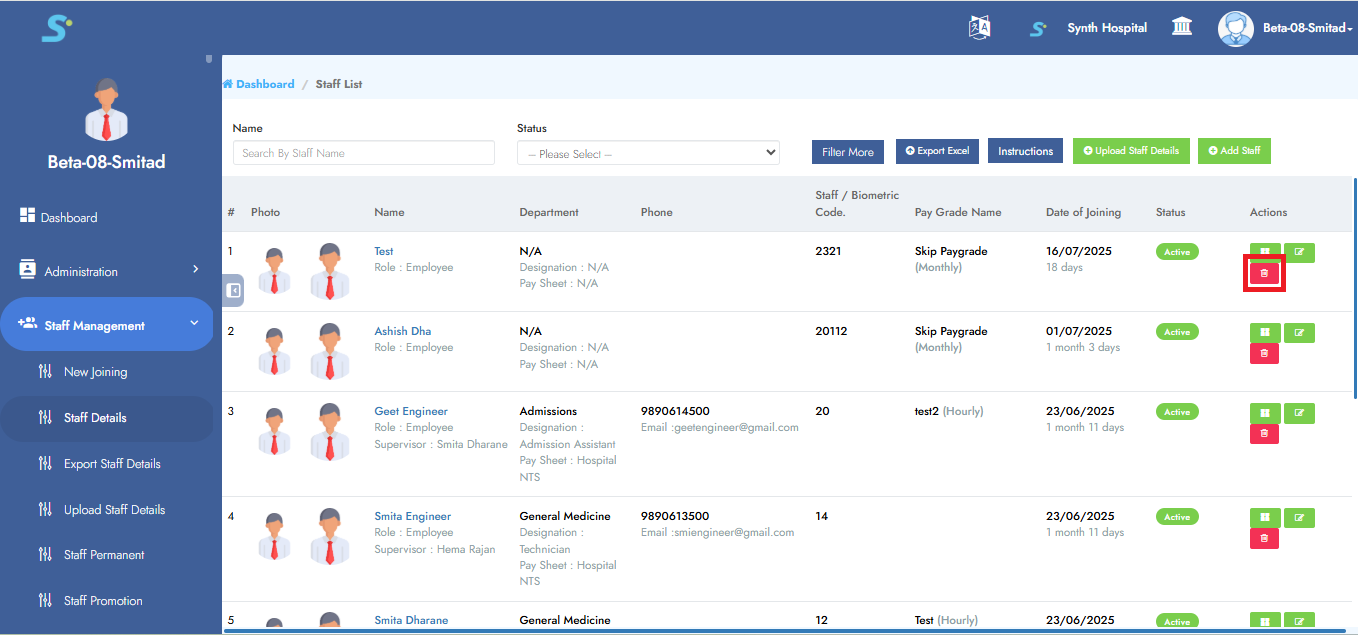
Step 28: Delete Staff Details
To delete staff details, click on the Delete button as shown in the image.
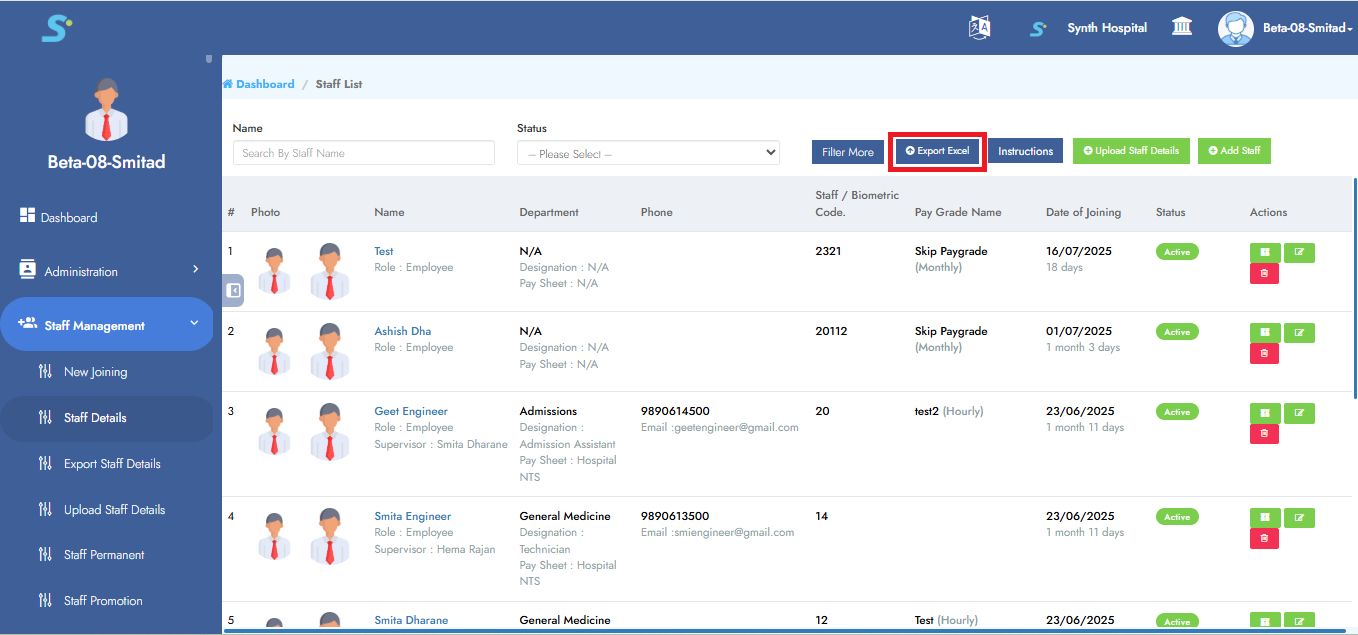
Step 29: Export Staff Details
Clicking on Export Staff Details will export an Excel file of staff details.
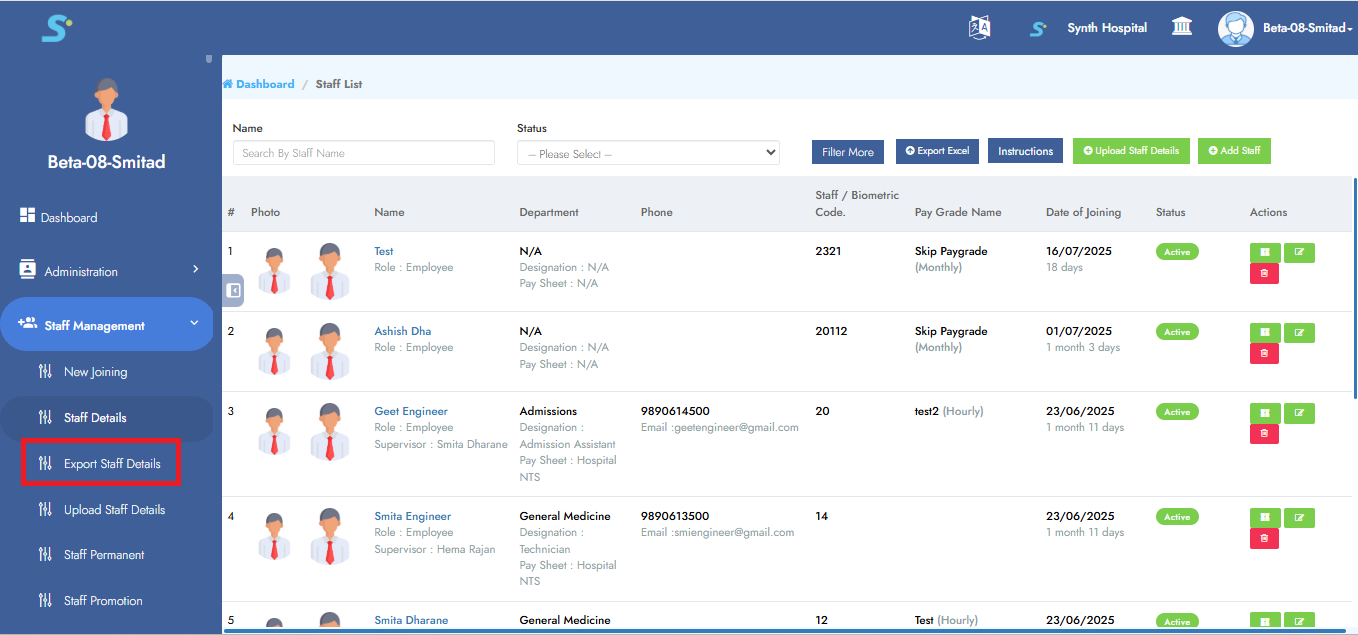 To export an Excel file, you can also click on Export to Excel button, which will also export an Excel file of staff details as shown in the image.
Step 30: Upload Staff Details
Click on the Upload Staff Details option from the side menu.
First, click the Download Sample button and fill in the required details in the Excel sheet.
After updating, click Choose File, then click Upload to complete the process.
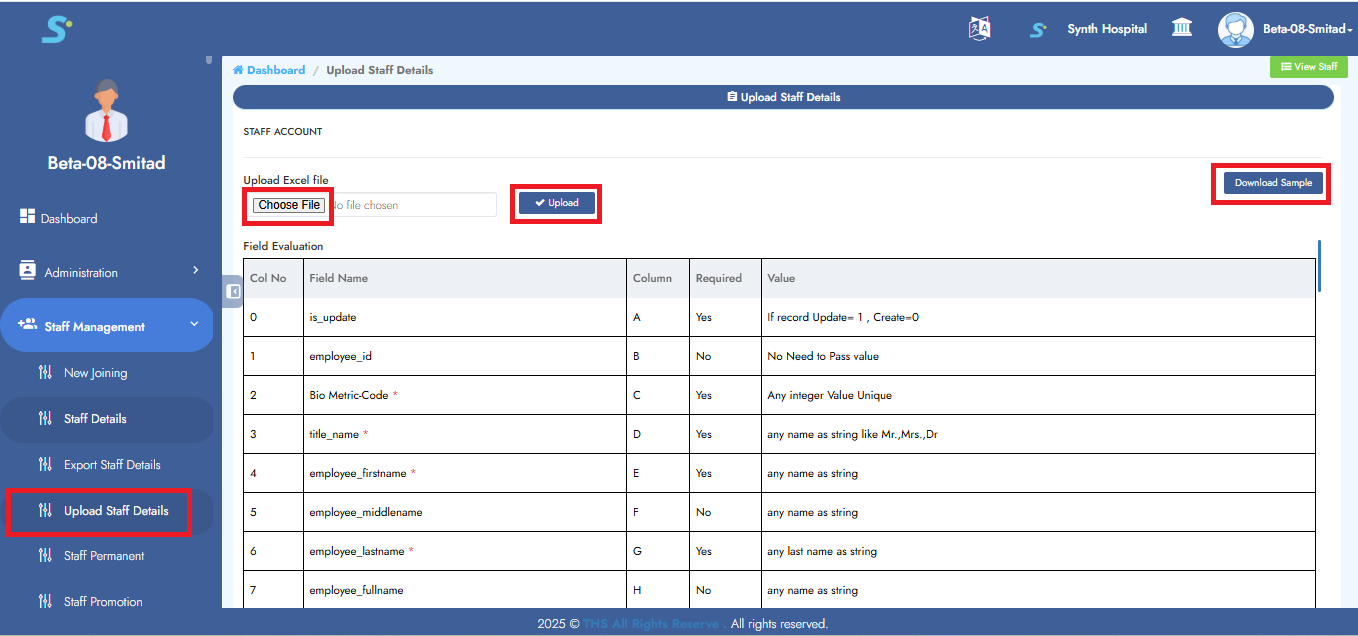
Step 31: Check Uploaded Data
Now you can check your uploaded data, which will be added in staff details.

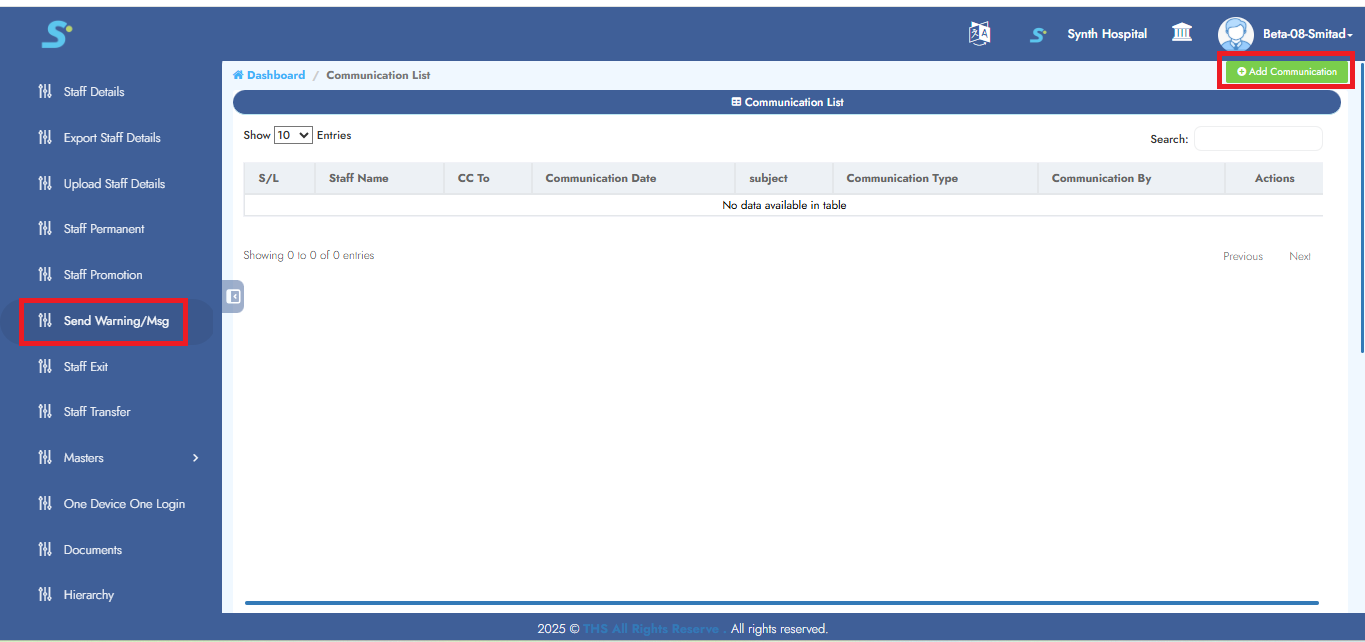
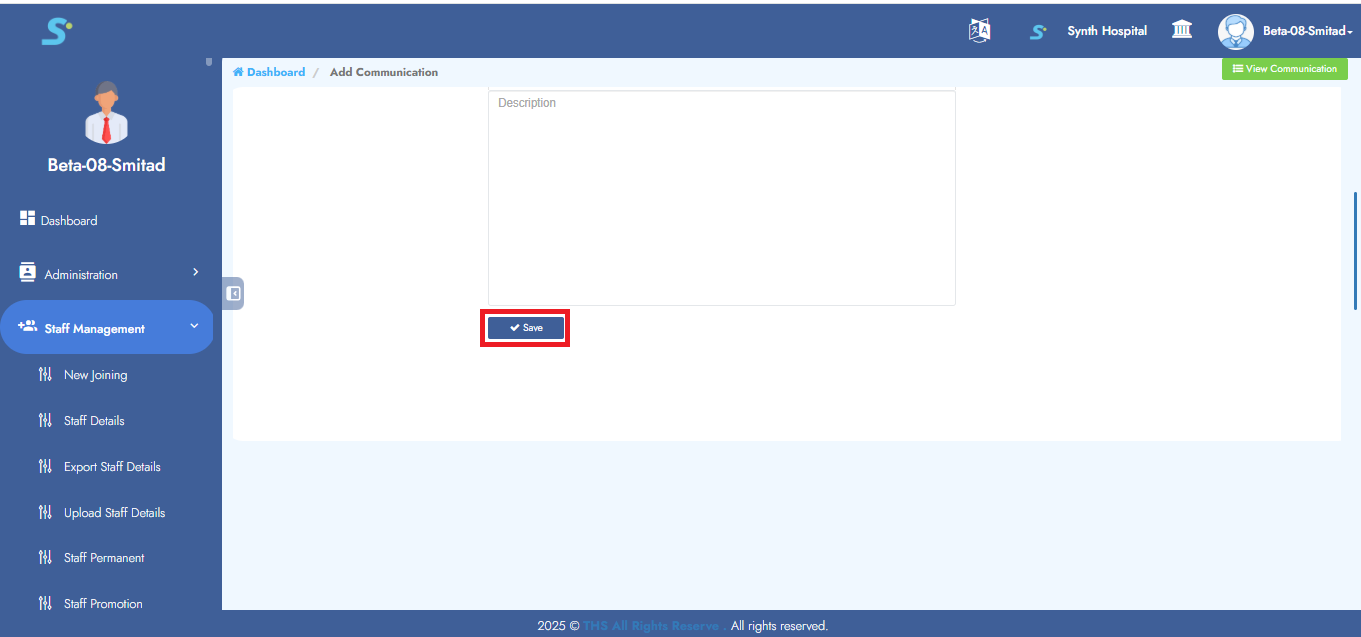
Step 32: Send Warning/Msg
Click on the Send Warning/Msg side menu.
Click on the Add Communication button as shown in the image.
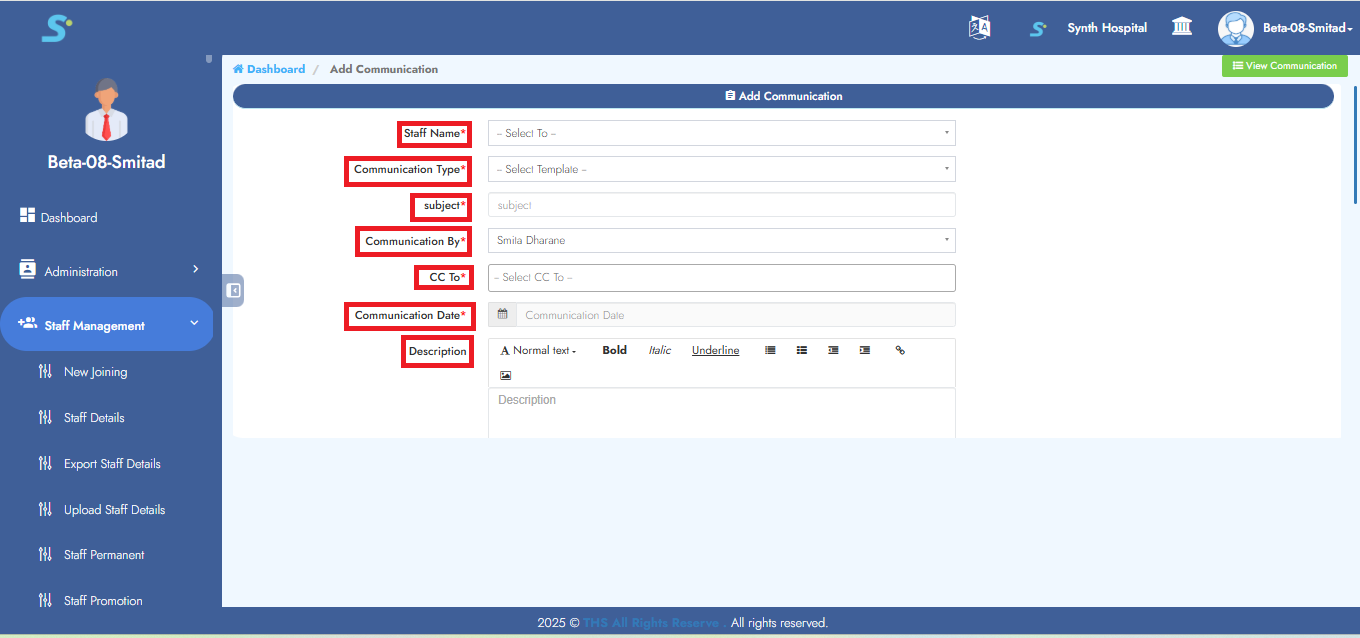
Step 33: Saving Warning/Message
Enter staff name (from drop-down list), communication type (from drop-down list), subject, communication by, CC to, communication date, description, then click on Save button to successfully add the record.
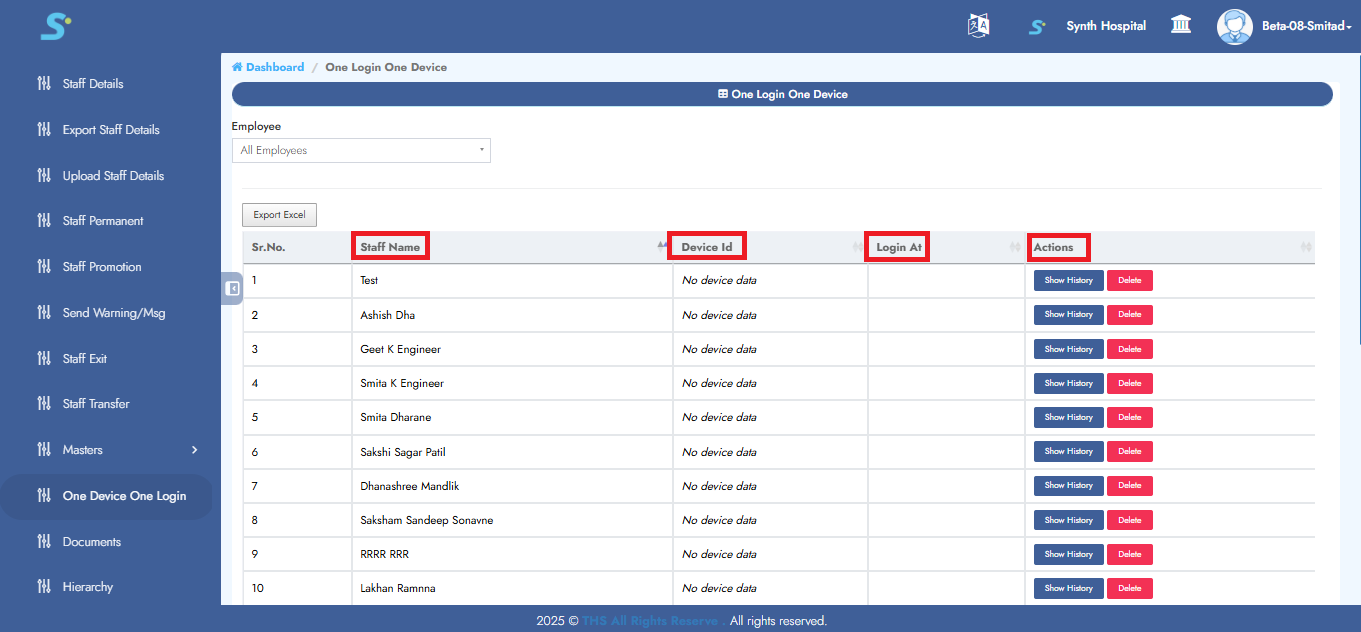
Step 34: One Device One Login
It will show the following details: staff name, device ID, login ID and actions as shown in the image.
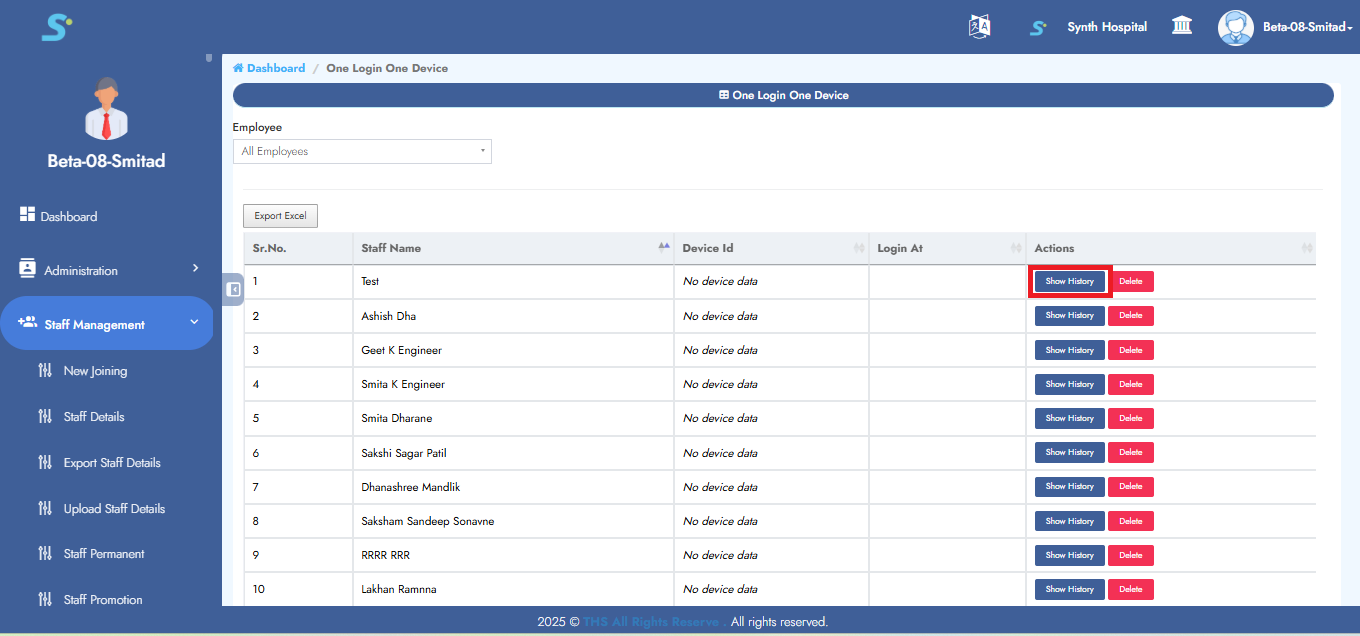
Step 35: Show History
Click on Show History button, which will show the details as shown in the image.
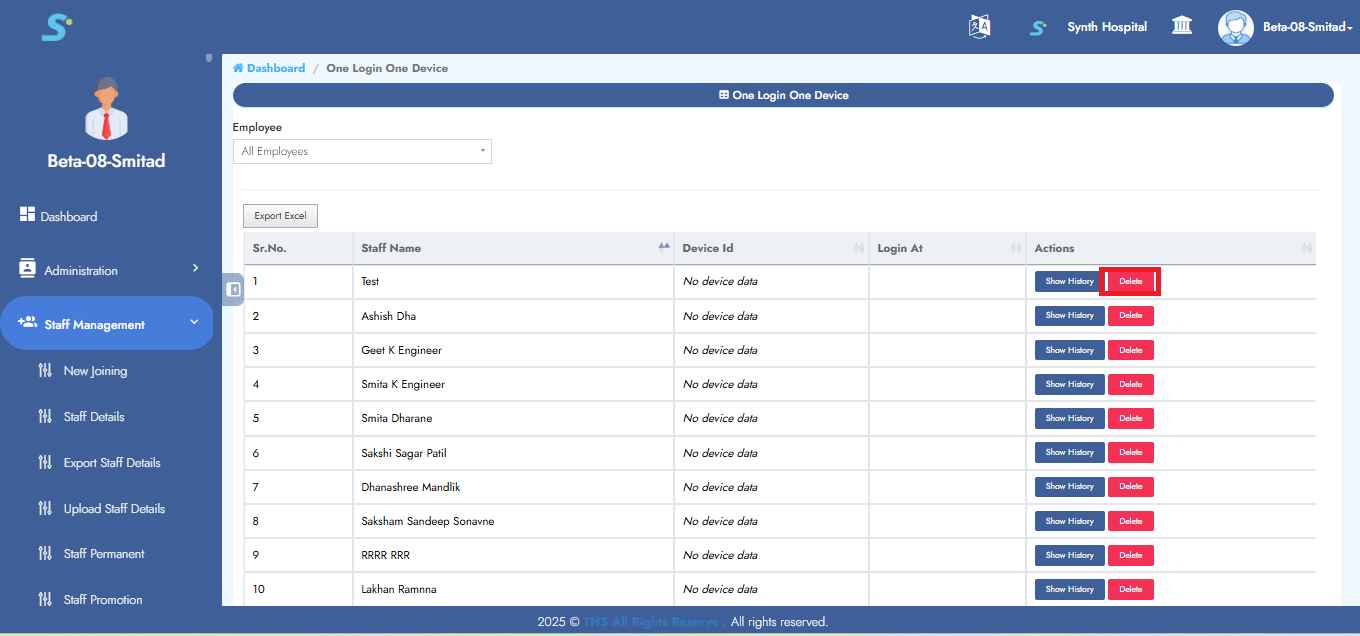
Step 36: Delete Device
Click on the Delete button as shown in the image to delete the device.
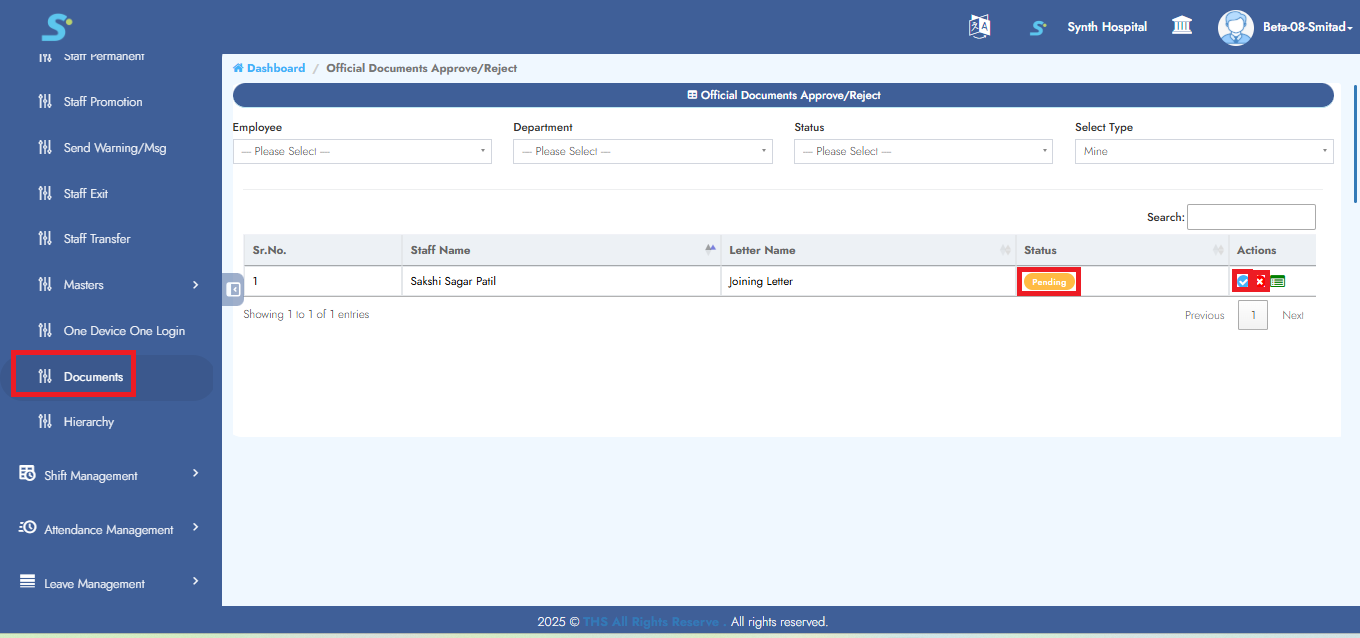
Step 37: Documents
Click on the Documents option from the side menu.
If the document status is pending, click the tick icon to approve or the cross icon to reject, as shown in the image.
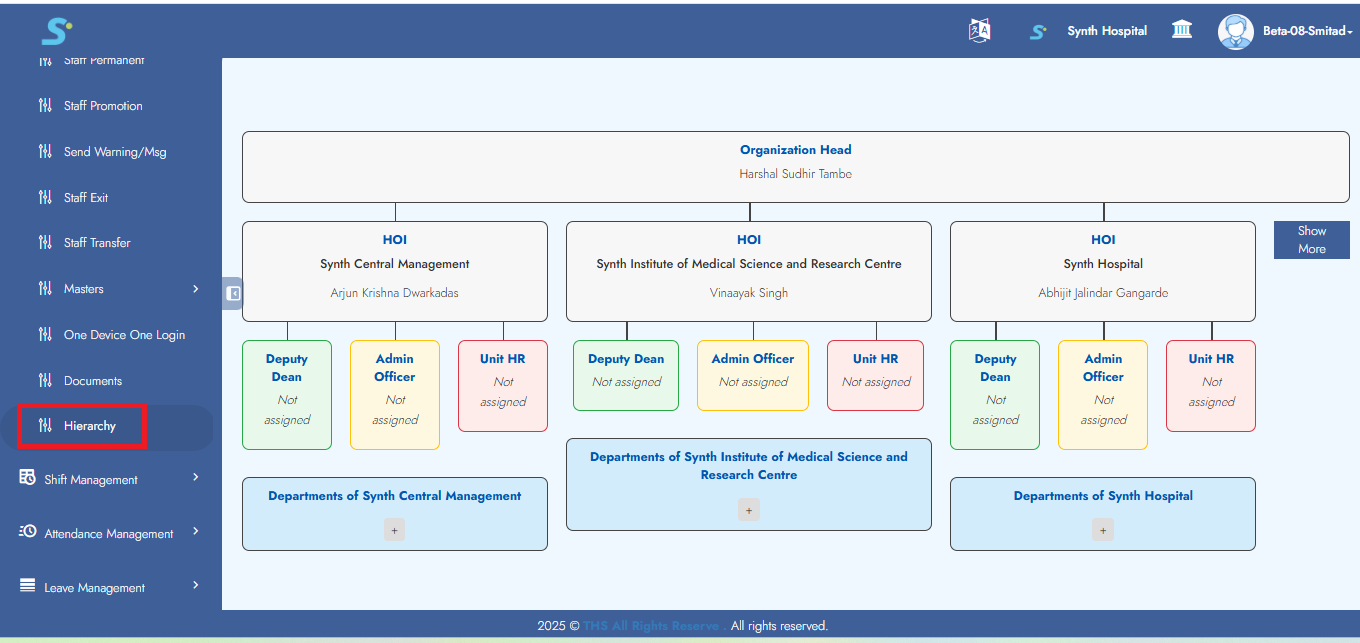
Step 38: Hierarchy
Click on the Hierarchy option from the side menu to view the hierarchy structure as shown in the image.
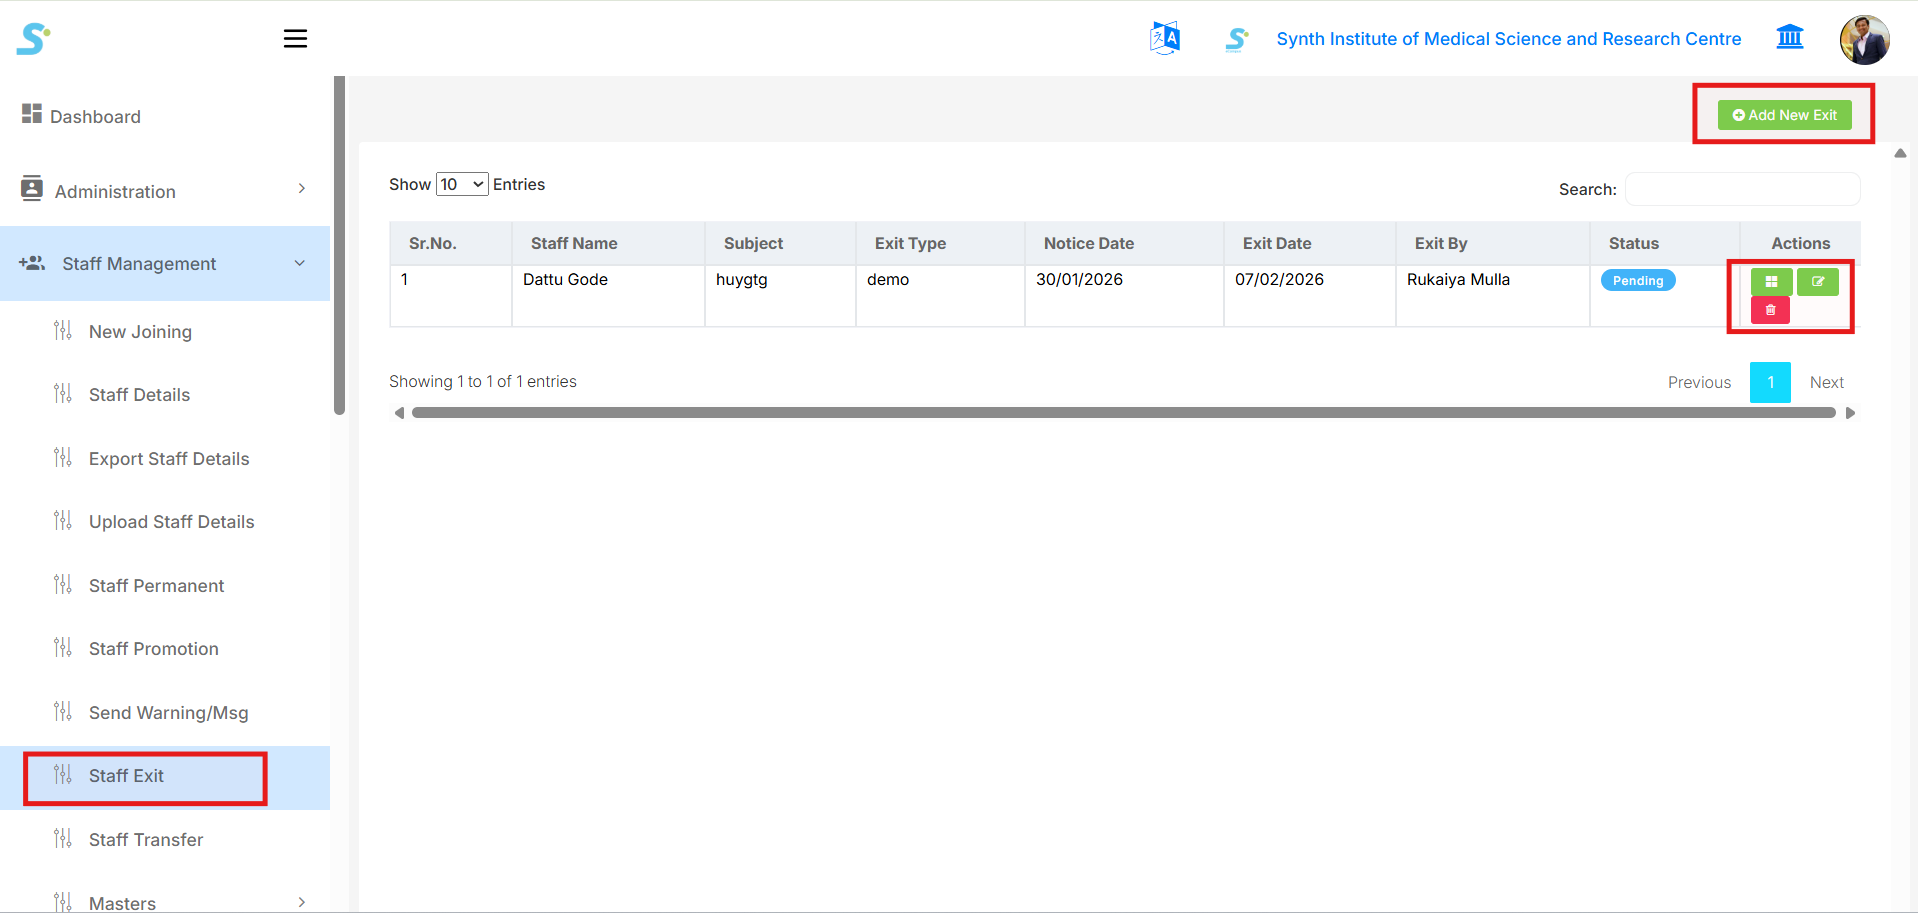
Step 39: View Staff Exit
Click on the Staff Exit option from the side menu to open the Staff Exit list page as shown in the image below.
From this page, you can:
- View all staff exit records
- Check exit details such as:
- Staff Name
- Subject
- Exit Type
- Notice Date
- Exit Date
- Exit By
- Status
- Edit staff exit details
- Delete exit records
To add a new exit entry, click on the Add New Exit button shown on the top-right side.
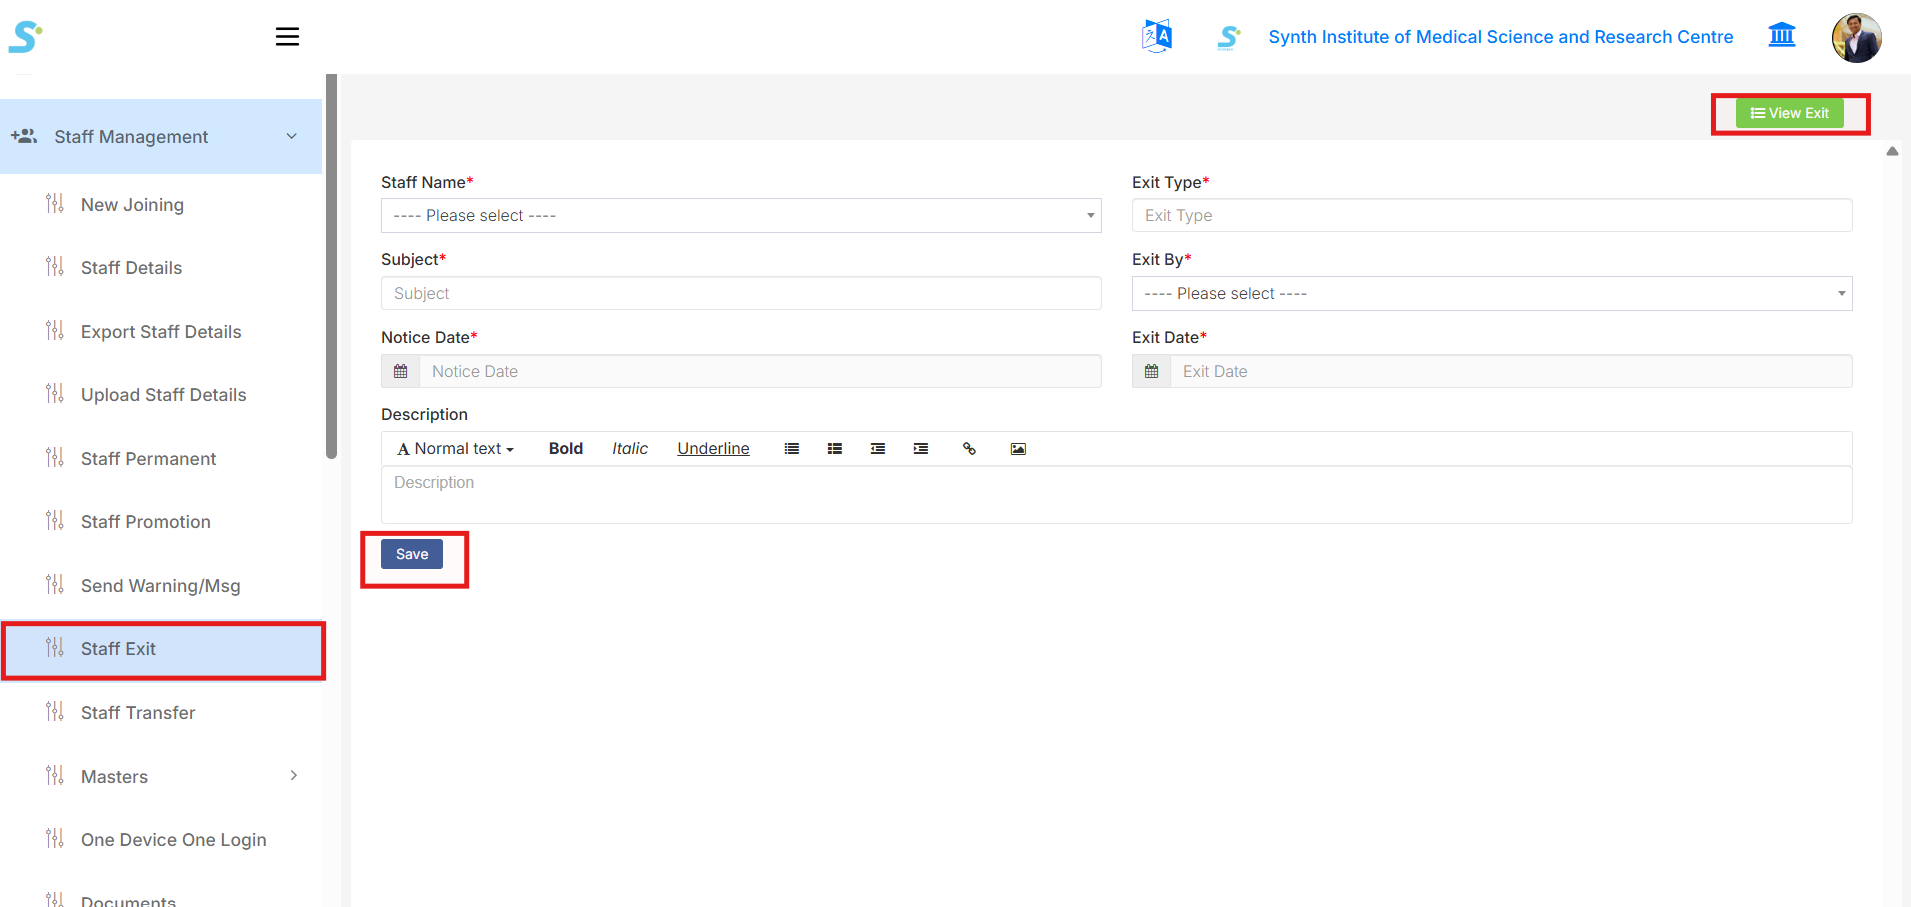
Step 40: Add Staff Exit
After clicking on the Add New Exit button, the Staff Exit form page will open as shown in the image below.
Fill in the following details:
- Staff Name
- Subject
- Exit Type
- Exit By
- Notice Date
- Exit Date
- Description
After entering all required details, click on the Save button to submit the staff exit information.
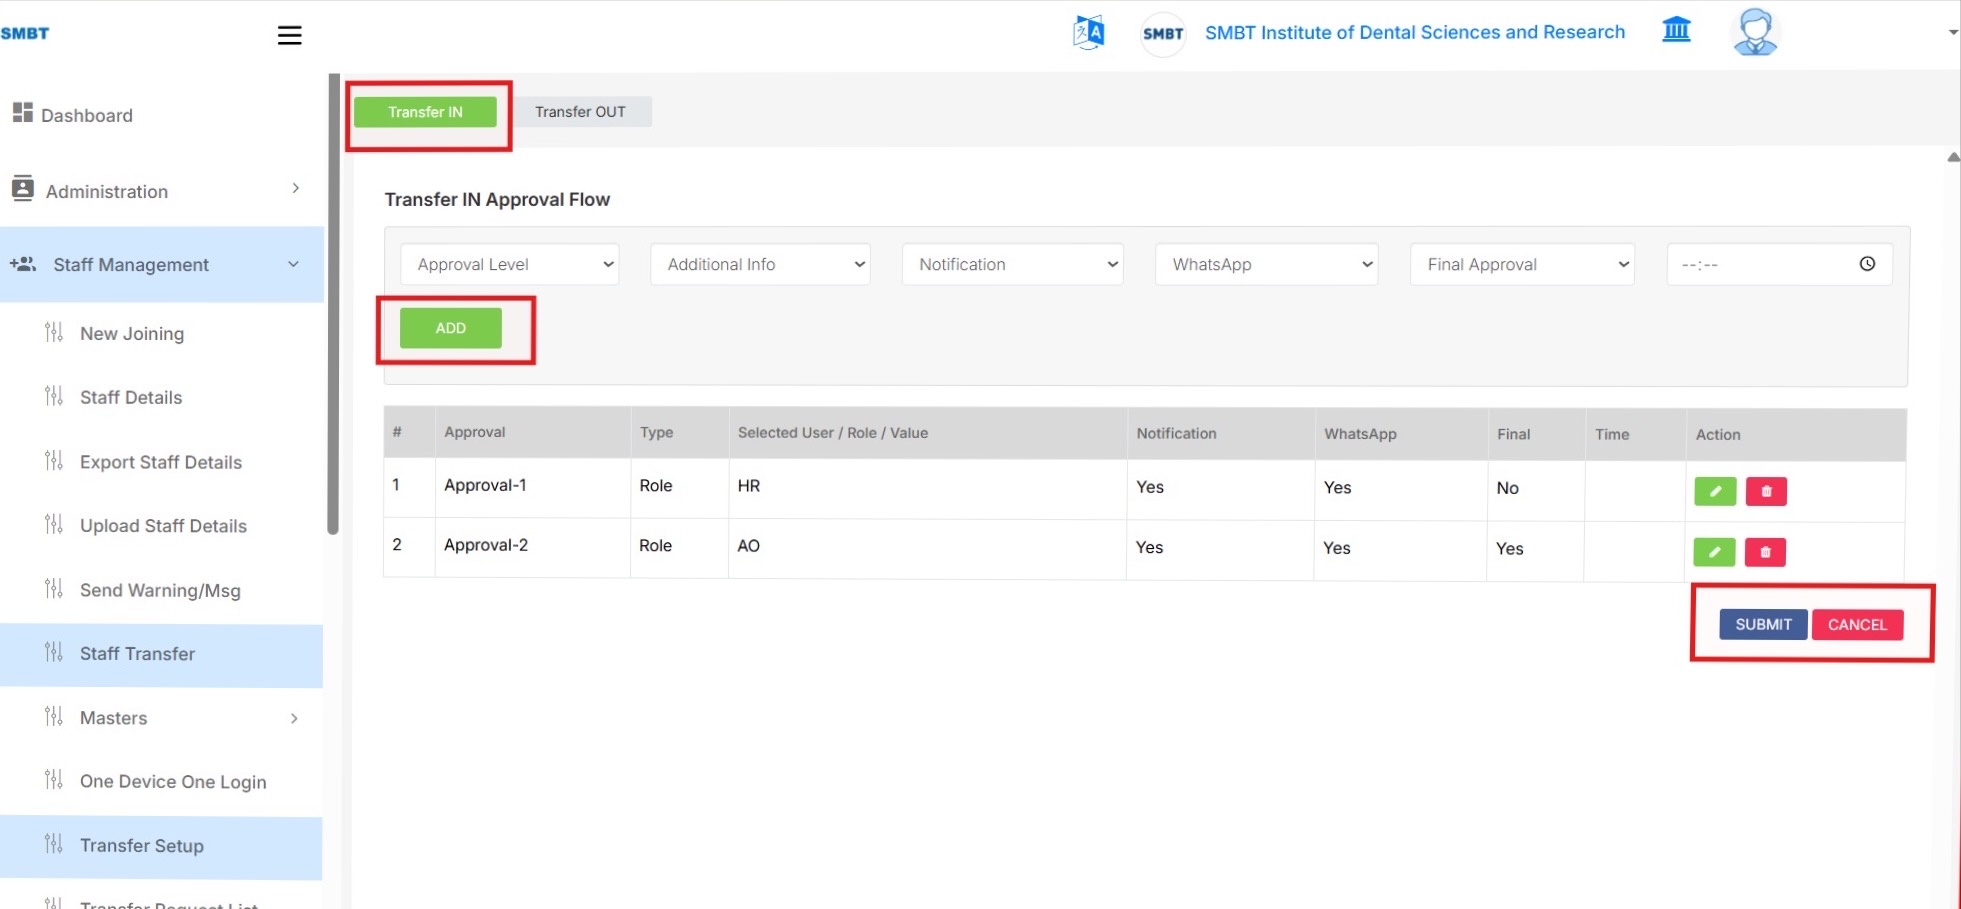
Step 41 - Configure Transfer IN Approval Setup
- Go to Staff Management and click Transfer Setup.
- Select the Transfer IN tab.
- Choose:
- Approval Level
- Additional Info
- Notification
- WhatsApp Notification
- Final Approval
- Time Duration (Optional)
- Click ADD to insert the approval level into the list.
- Add all required approval levels for the receiving/new institute.
- Set Final Approval = Yes only for the last approval level.
- Click SUBMIT to save the Transfer IN approval setup.
Screen Reference
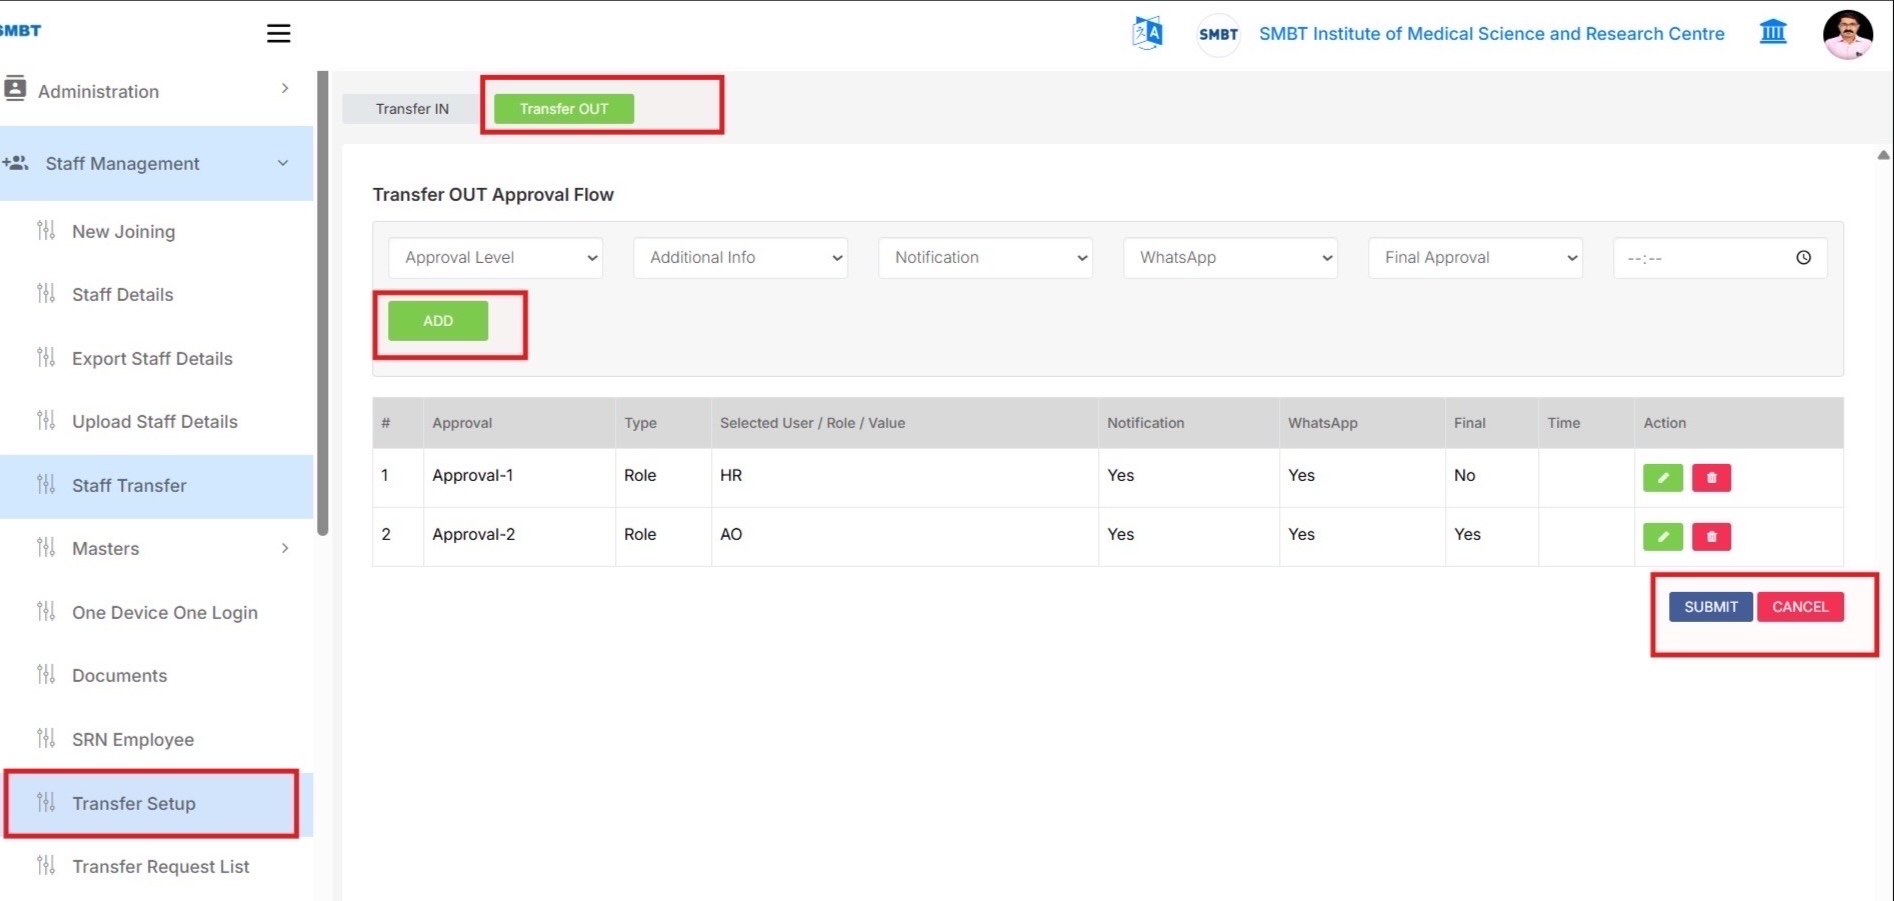
Step 42 - Configure Transfer OUT Approval Setup
- On the same Transfer Setup screen, select the Transfer OUT tab.
- Add approval levels for the current/source institute in the same way.
- Click ADD after selecting each approval level.
- Set Final Approval = Yes only for the last approval level.
- Click SUBMIT to save the Transfer OUT approval setup.
Note:
The screen layout is the same as Transfer IN. Select the Transfer OUT tab before adding Transfer OUT approvers.
Screen Reference
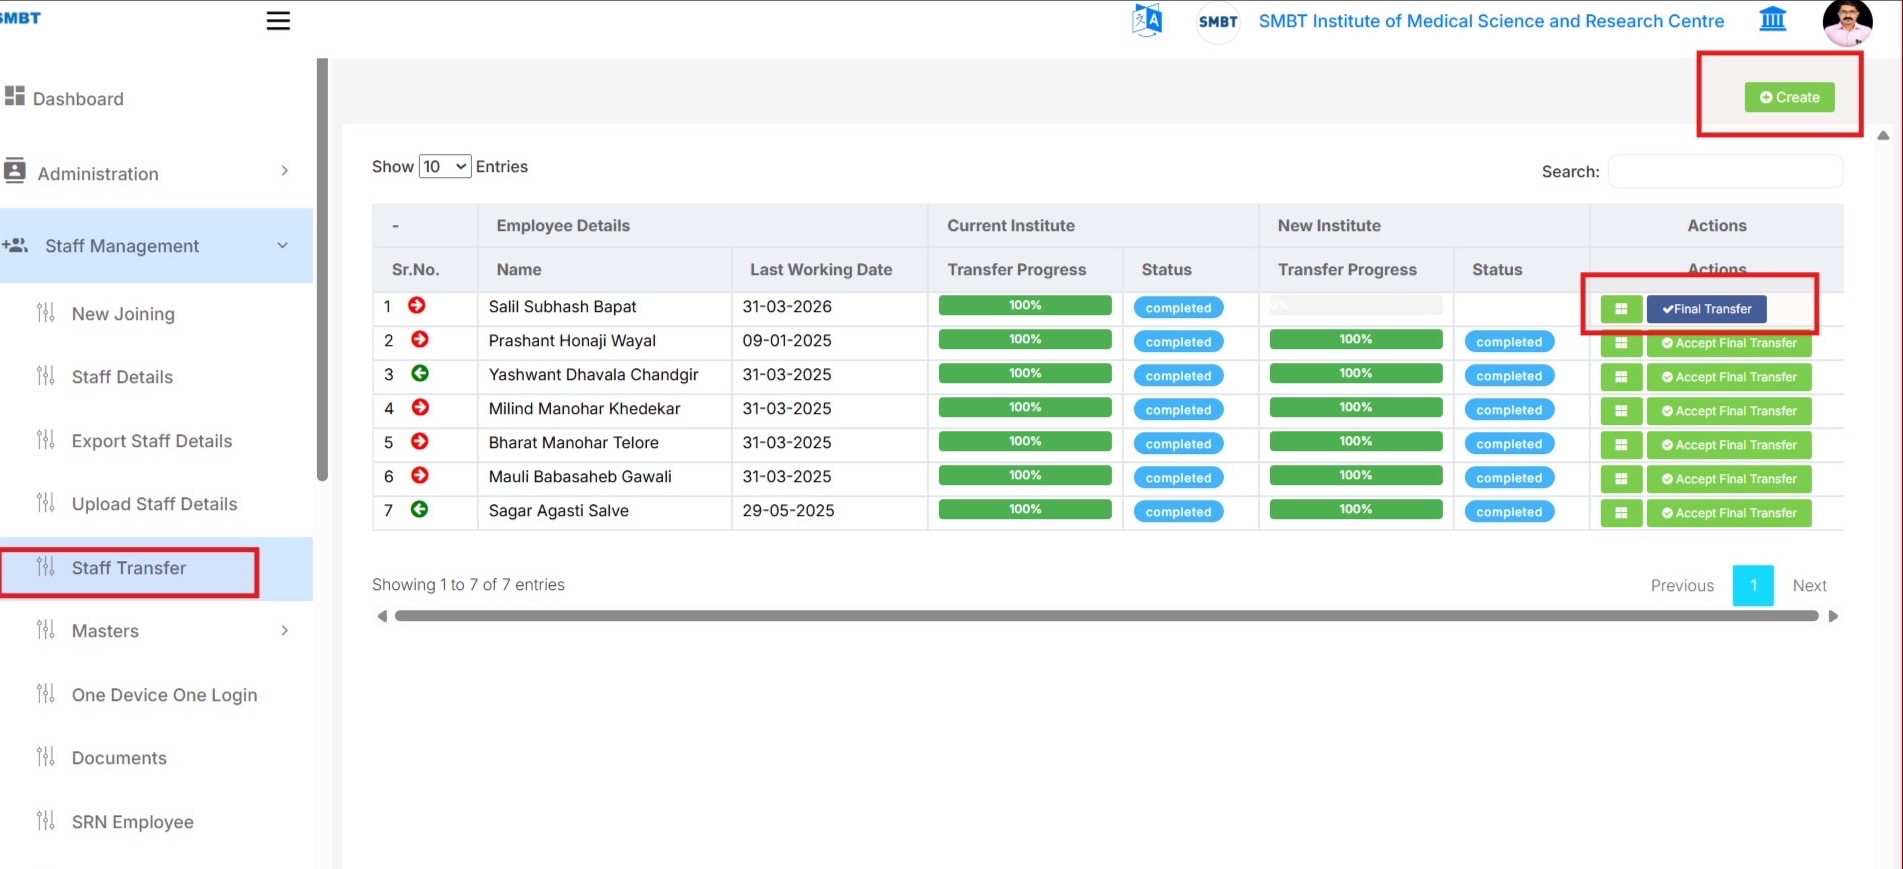
Step 43 - Open Staff Transfer List and Click Create
- Go to Staff Management and click Staff Transfer.
- The staff transfer list displays:
- Employee transfer records
- Current institute progress
- New institute progress
- Click Create from the top-right side to create a new transfer request.
- Use action buttons to:
- View details
- Perform Final Transfer
- Accept Final Transfer
Screen Reference
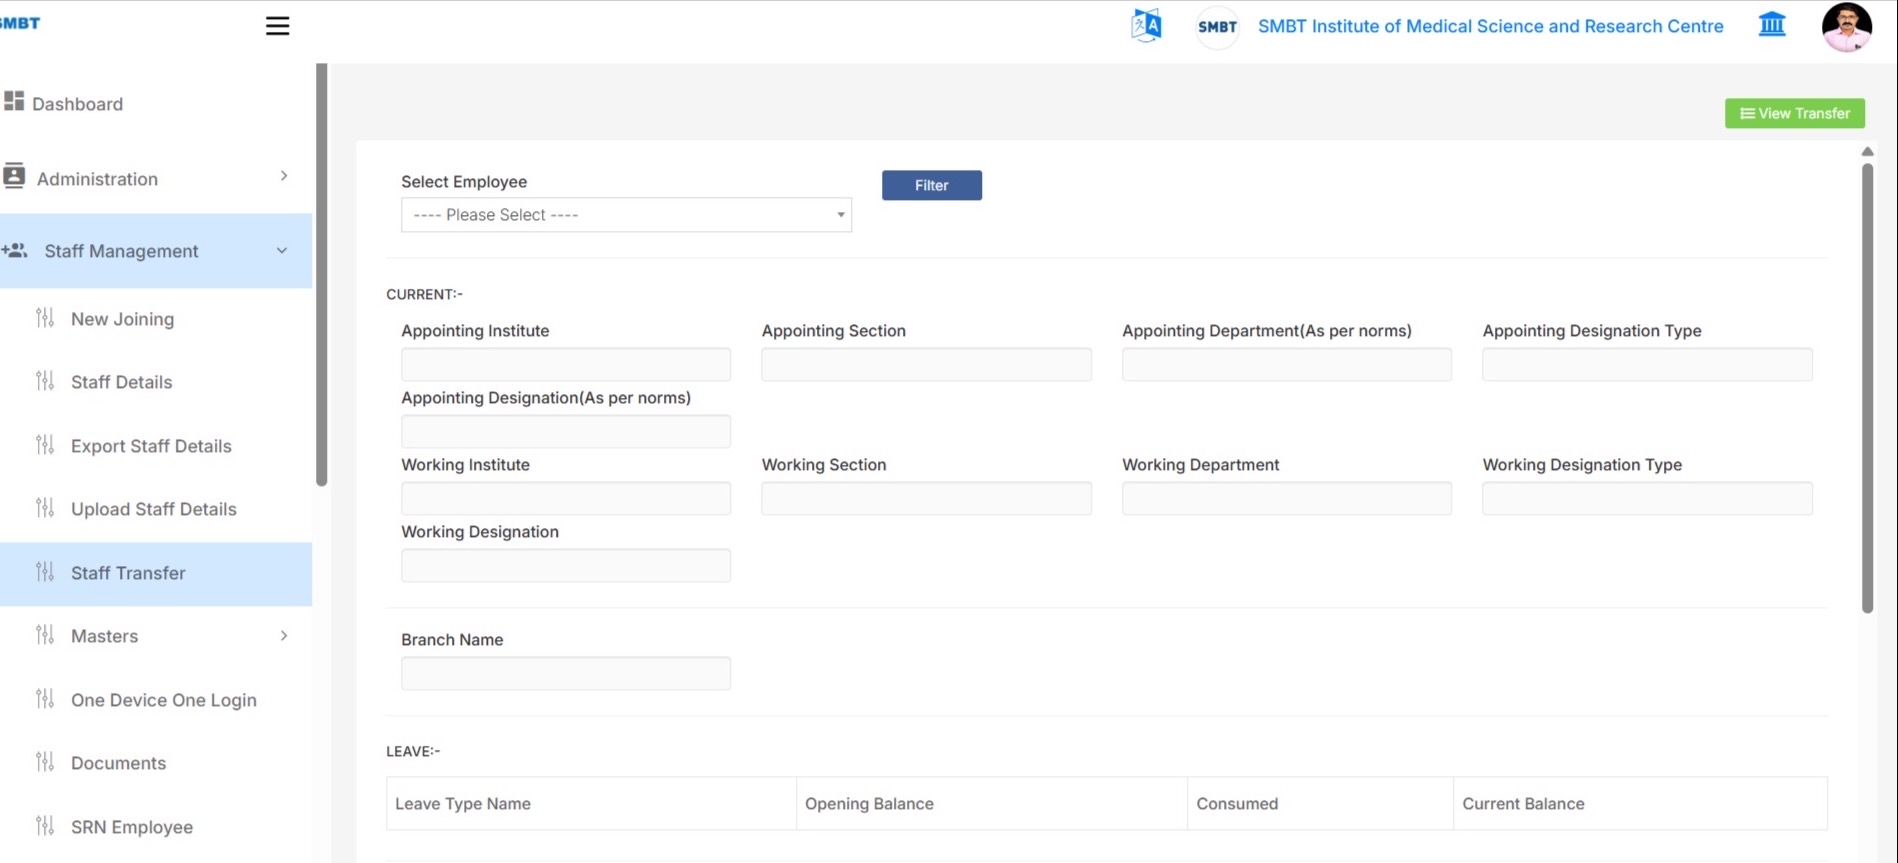
Step 44 - Select Employee and Load Current Details
- On the transfer create screen, select the employee from the Select Employee dropdown.
- Click Filter to load employee details.
The system loads: - Current appointing institute - Working institute - Department - Designation - Branch - Leave details - Salary details
- Verify current employee details before entering new transfer details.
Screen Reference
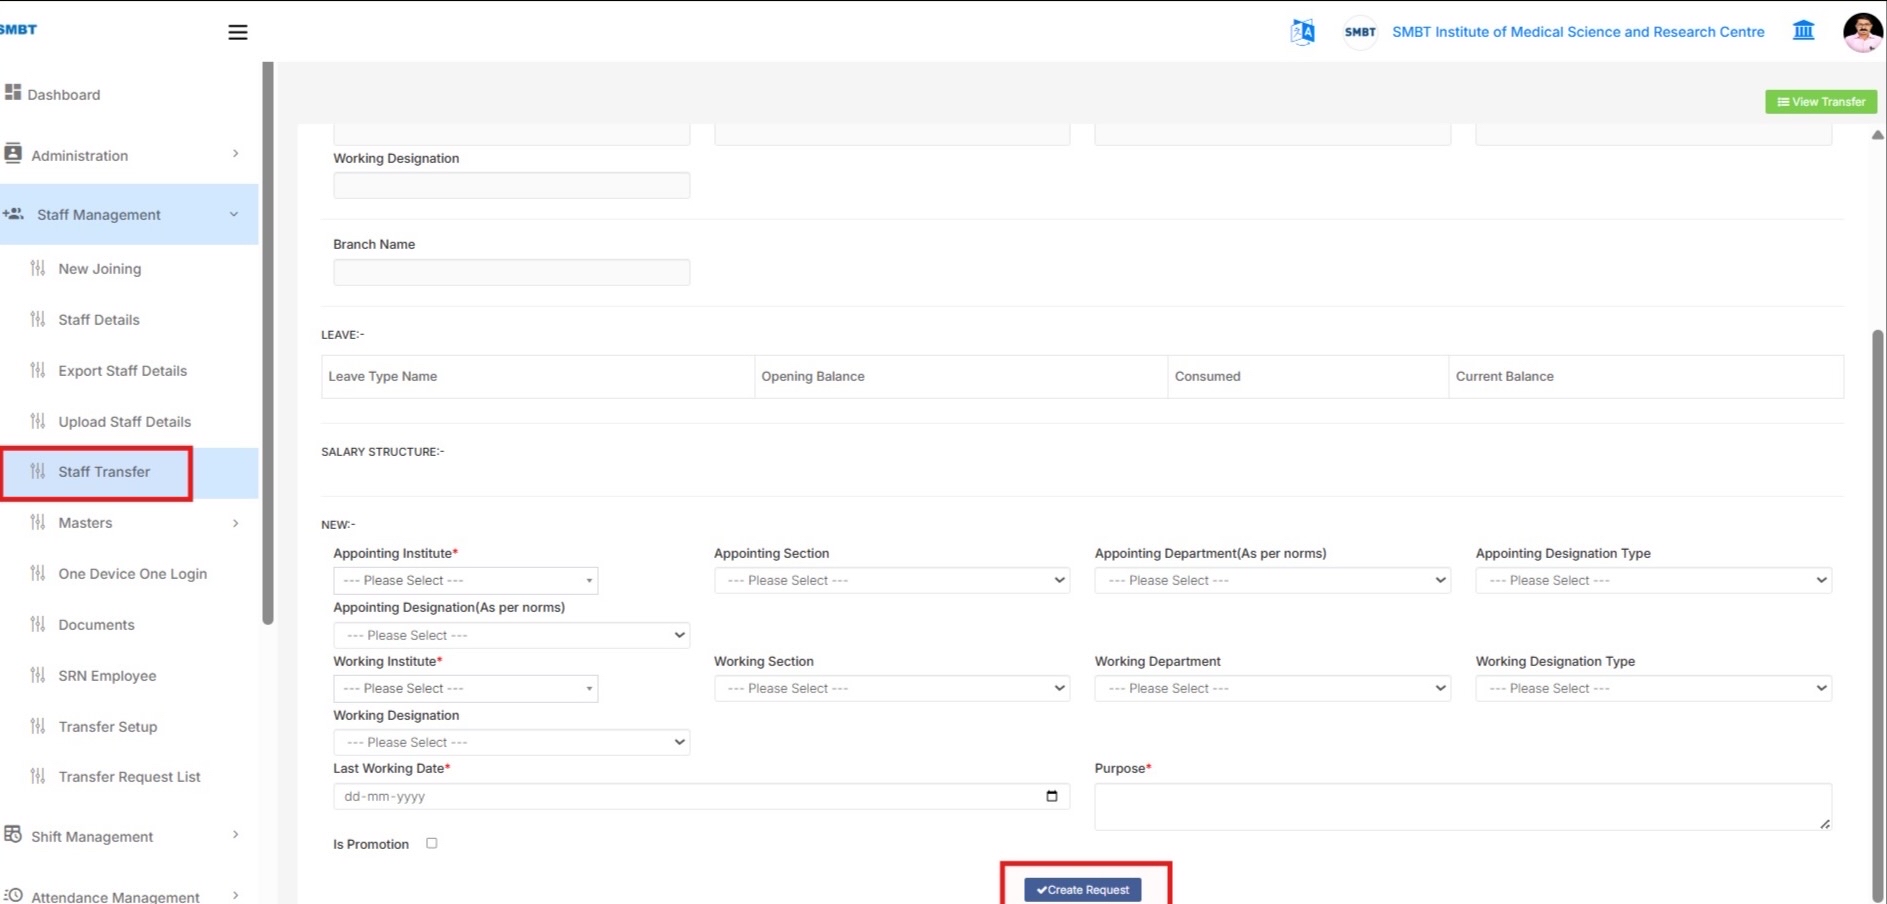
Step 45 - Fill New Transfer Details and Create Request
In the NEW section:
- Select:
- Appointing Institute
- Working Institute
- Section
- Department
- Designation Type
-
Designation
-
Enter:
- Last Working Date
-
Purpose of transfer
-
Select Is Promotion only if transfer includes promotion.
-
Click Create Request.
This initiates the Transfer OUT approval flow.
Screen Reference
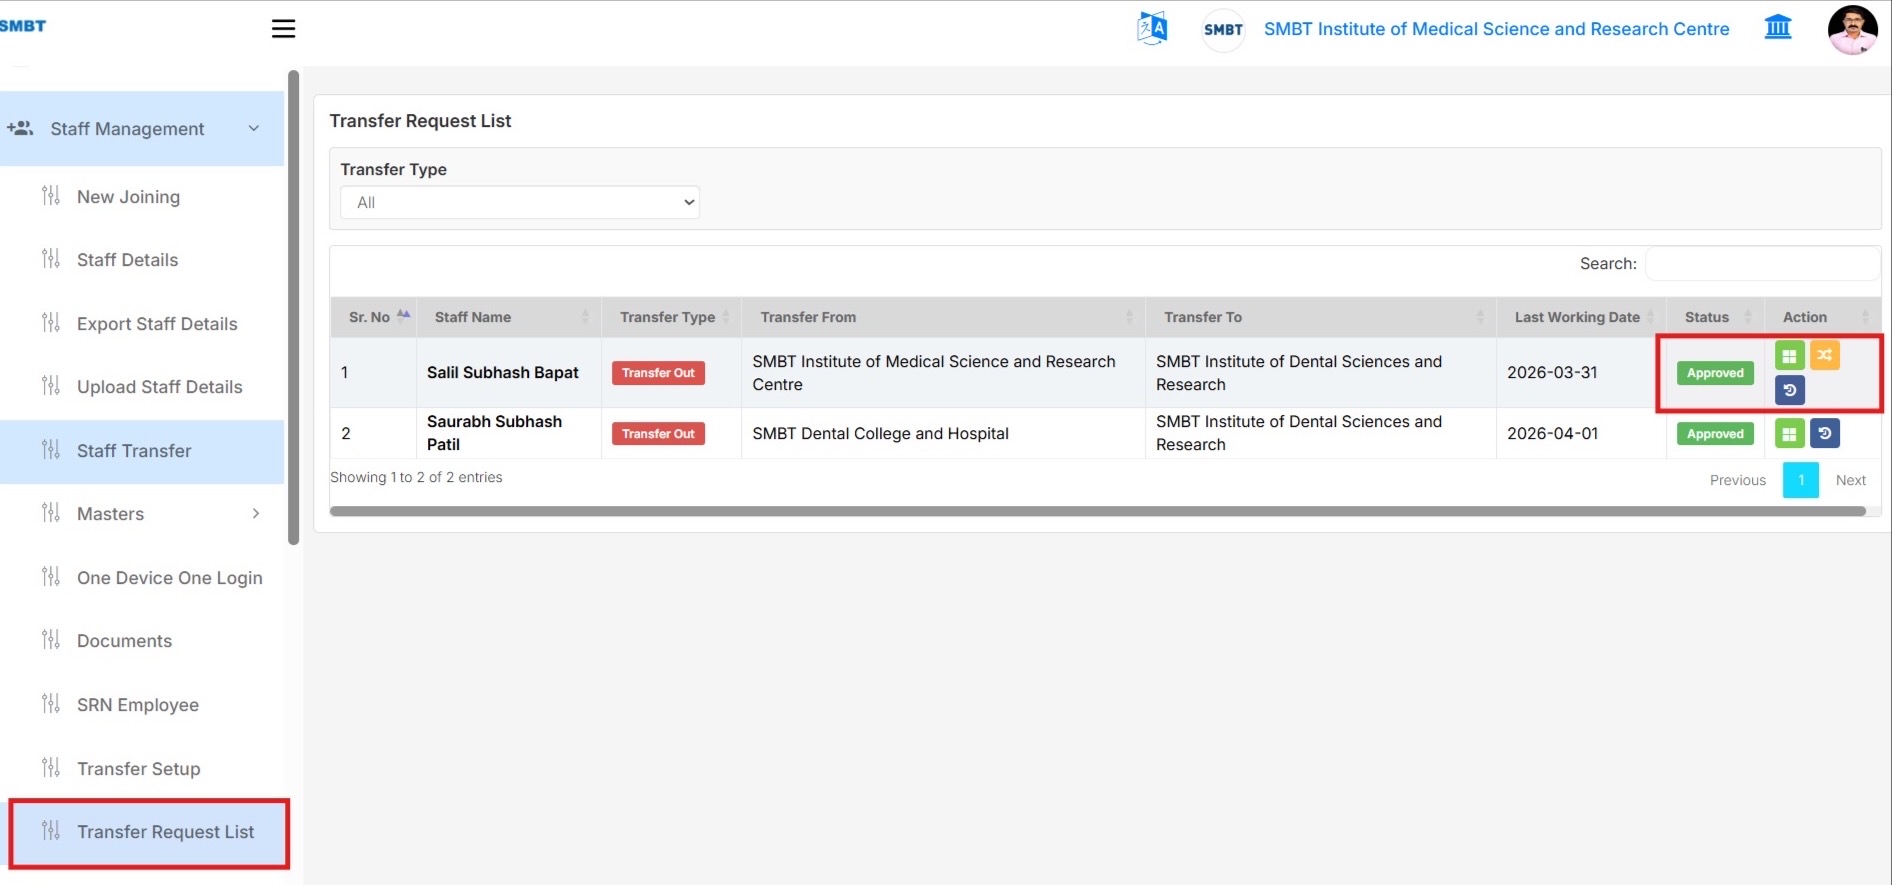
Step 46 - Approve or Reject from Transfer Request List
- Go to Staff Management and click Transfer Request List.
- Only approval-related requests assigned to the logged-in approver are displayed.
- Use Transfer Type filter to view:
- All
- Transfer IN
-
Transfer OUT
-
Click View to open transfer request details.
- Click:
- Approve
- Reject
for pending requests assigned to the logged-in user.
- Approved requests remain visible with updated status.
Screen Reference
Step 47 - Verify Approval Level Status
- Open transfer request details to check approval flow history.
Current Institute Approval Level Status
Shows Transfer OUT approval progress.
New Institute Approval Level Status
Shows Transfer IN approval progress.
The table displays: - Approver Name - Institute - Department - Designation - Status - Date & Time - Remarks
Step 48 - Final Transfer and Accept Final Transfer
- After Transfer OUT approval is completed:
-
Final Transfer action becomes available.
-
Click Final Transfer to initiate Transfer IN approval flow for the new institute.
-
After Transfer IN approval is completed:
-
Accept Final Transfer action becomes available.
-
Click Accept Final Transfer to complete the transfer and archive the request.
-
Transfer status will display:
- Completed
- Accepted
Screen Reference

Important Notes
- Transfer IN and Transfer OUT approval setups must be configured before creating transfer requests.
- Transfer OUT approval is handled by the current/source institute.
- Transfer IN approval is handled by the new/receiving institute.
- Final Transfer should be performed only after Transfer OUT approval completion.
- Accept Final Transfer should be performed only after Transfer IN approval completion.
- Transfer Request List shows requests based on logged-in approval employee mapping.
Summary
The Staff Transfer Module helps users to:
- Configure approval workflows
- Create transfer requests
- Approve or reject transfers
- Track approval progress
- Perform Final Transfer
- Accept completed transfers
Step 49: Employee Documents Report
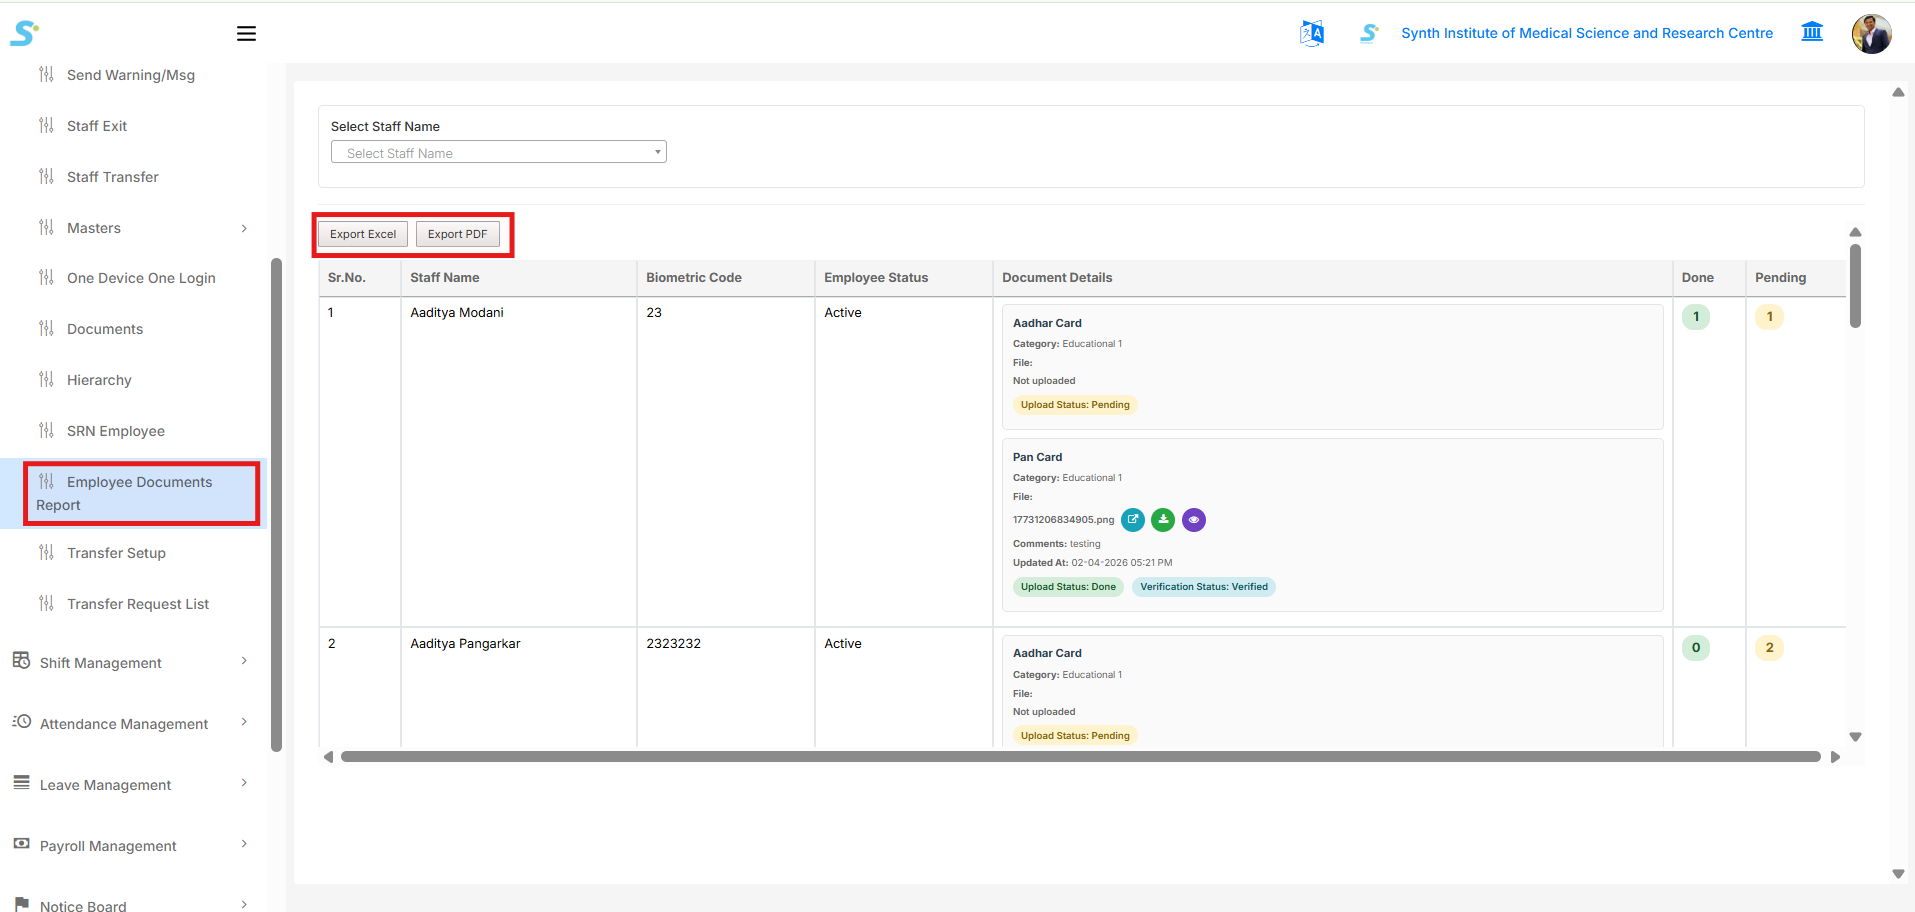
Click on the Employee Documents Report option from the side menu to view staff document upload details as shown in the image below.
From this page, you can:
- View employee-wise uploaded documents
- Check document verification status
- View uploaded and pending documents
- Download uploaded documents
- Export report in:
- Excel
You can also filter records using the Select Staff Name dropdown.
The report displays:
- Staff Name
- Biometric Code
- Employee Status
- Document Details
- Completed Document Count
- Pending Document Count
Document status indicators:
- Upload Status: Done → Document uploaded successfully
- Upload Status: Pending → Document not uploaded
- Verification Status: Verified → Document verified successfully
Step 50 - Self Registration User List Report
-
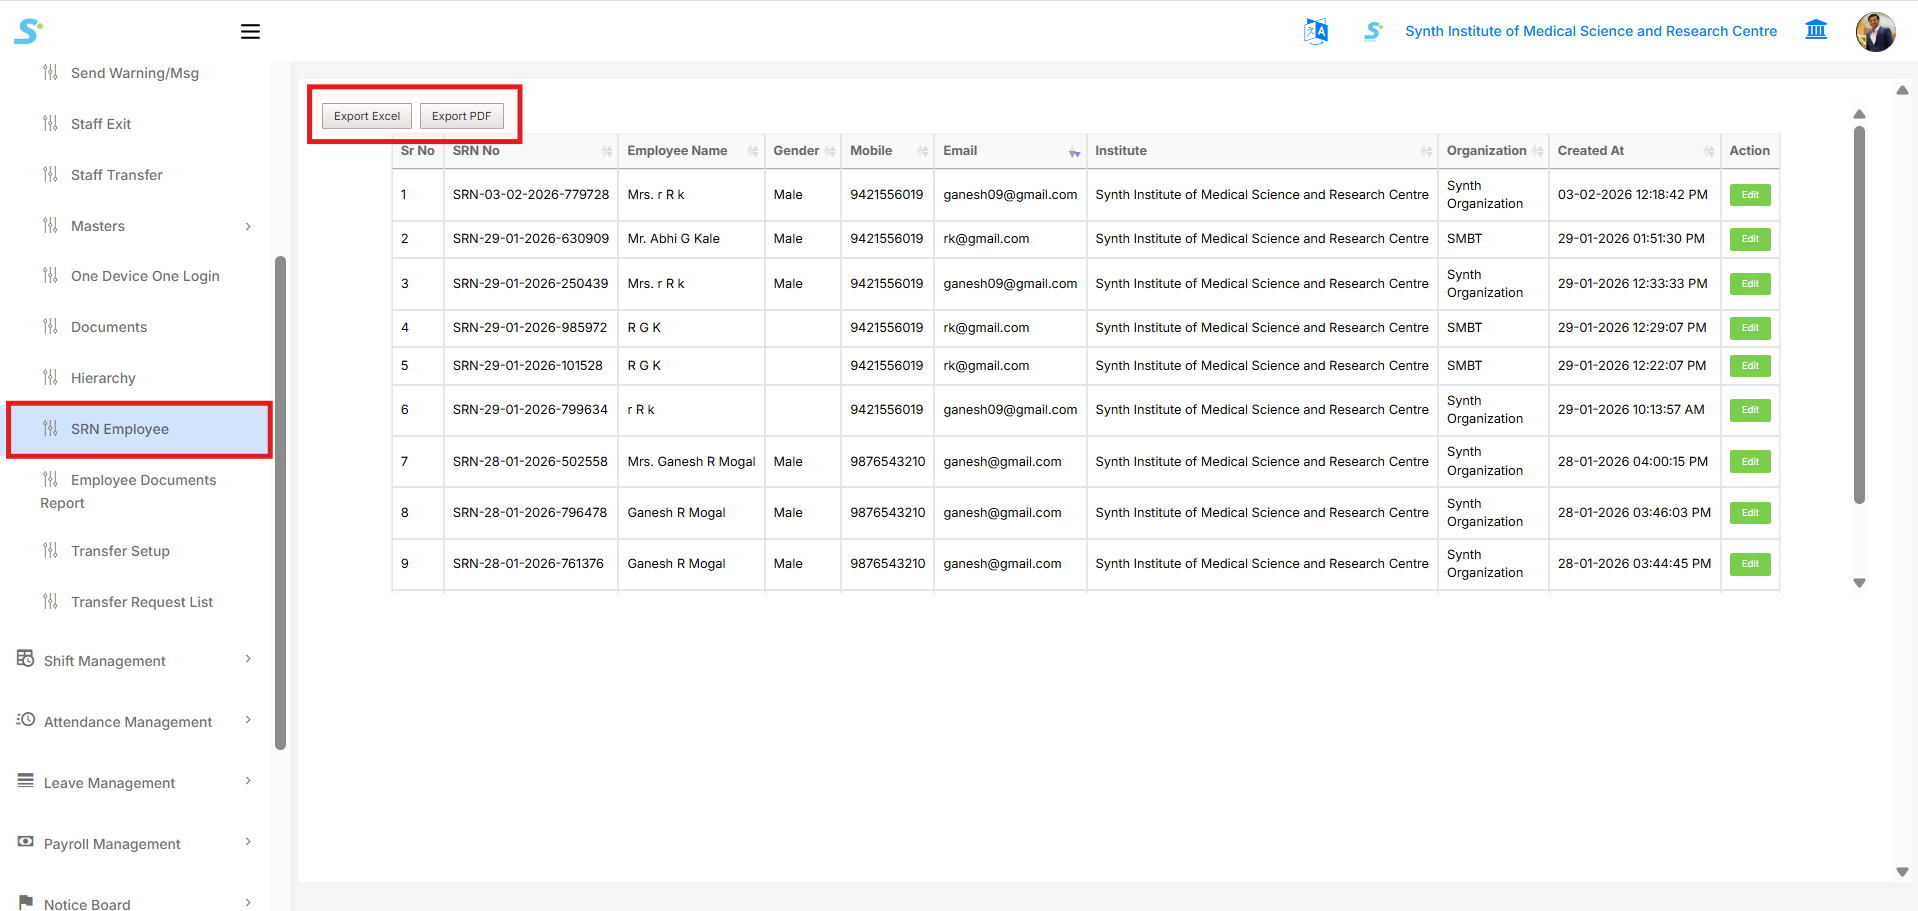
Click on the SRN Employee option from the side menu.
-
The system will display the Self Registration User List Report.
-
You can view employee details such as:
- SRN No
- Employee Name
- Gender
- Mobile Number
- Institute
- Organization
-
Created Date
-
Use the following options:
- Export Excel → Download the report in Excel format.
- Export PDF → Download the report in PDF format.
- Edit → Update employee registration details.
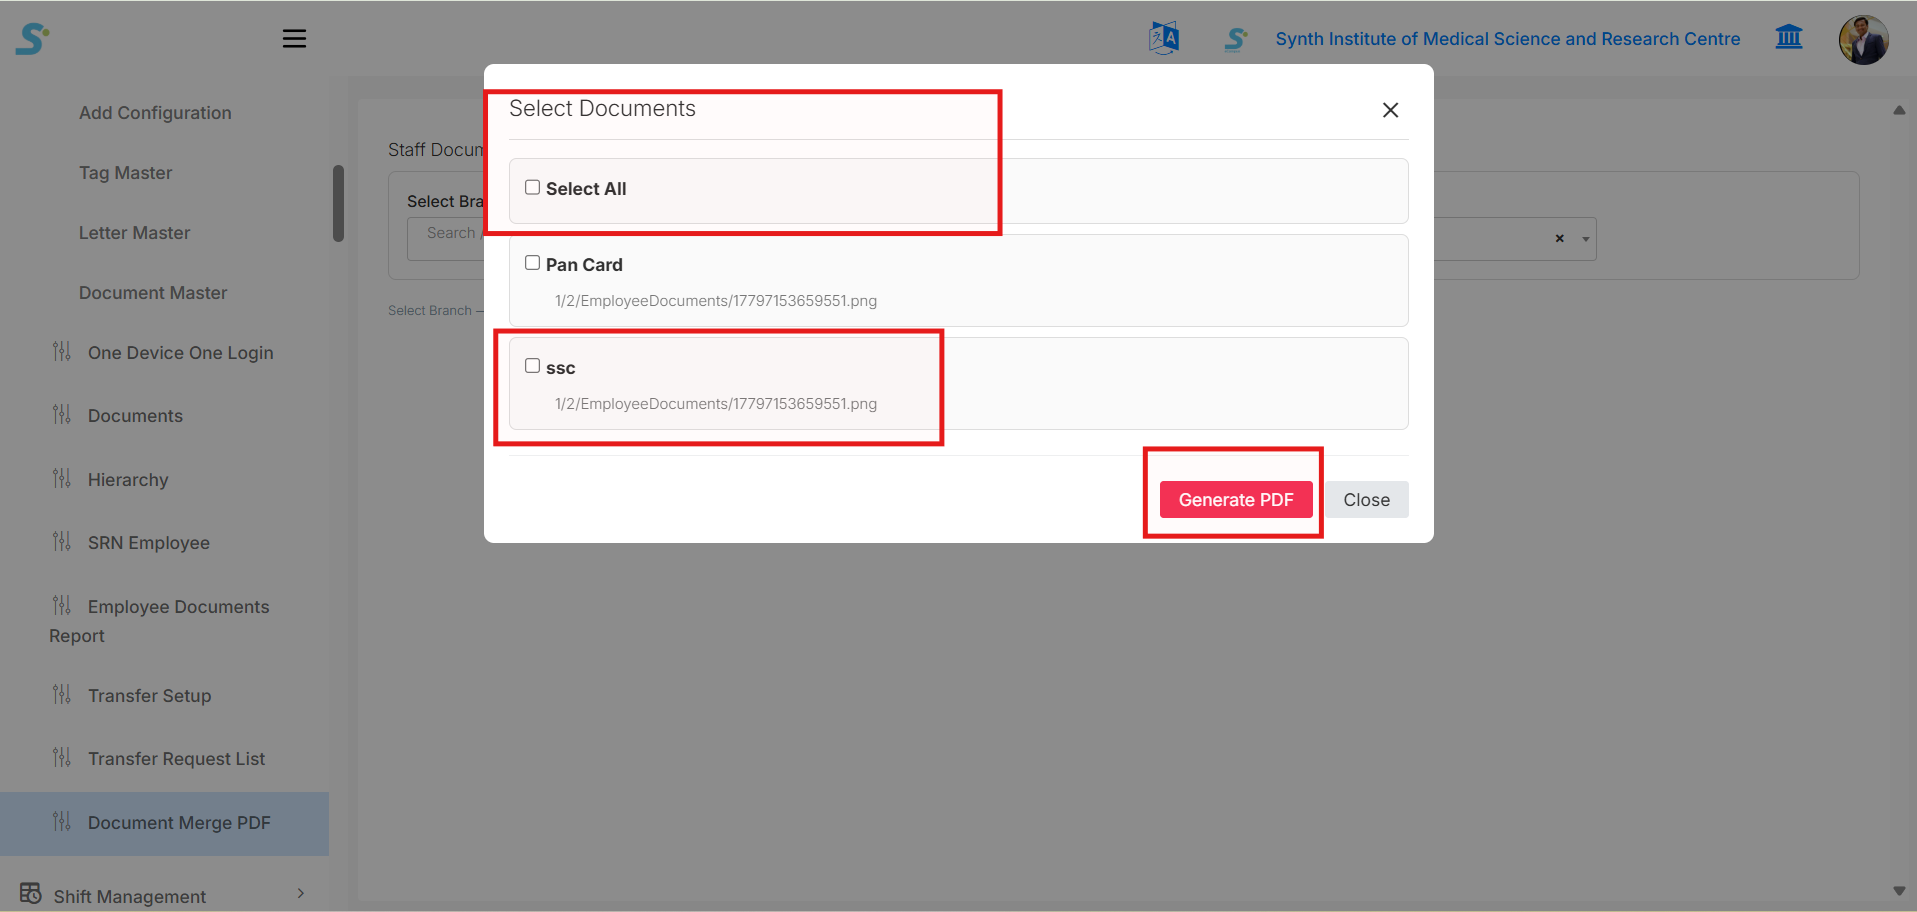
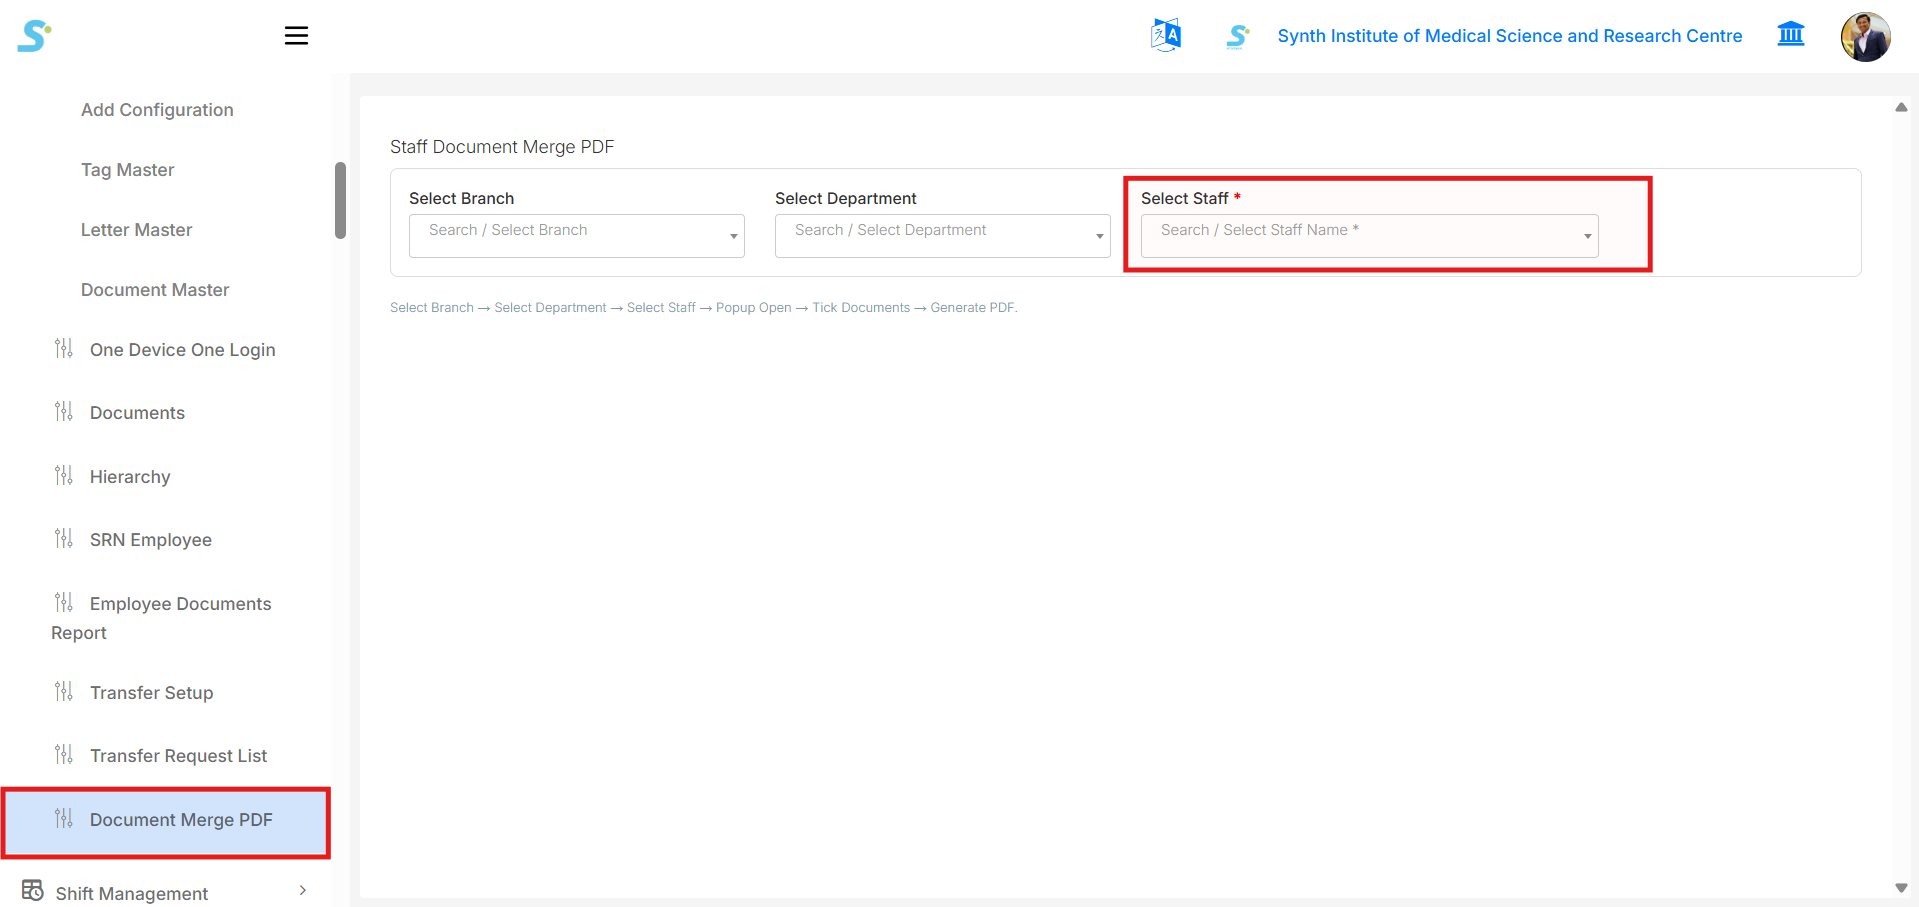
Step 51 - Document Merge PDF
-
Click on the Document Merge PDF option from the side menu.
-
The system will display the Staff Document Merge PDF page.
-
Select the following filters:
- Branch
- Department
-
Staff Name
-
Staff Name is mandatory.
Step 52 - Generate Merged Document PDF
-
After selecting the staff name, the Select Documents popup will open.
-
Select one or more documents from the list.
-
You can also use Select All to select all available documents.
-
Click on the Generate PDF button.
-
The system will generate and download a merged PDF containing the selected staff documents.